Ga door naar hoofdinhoud

LG VX8550 Scroll Wheel Replacement

Wat je nodig hebt

  1. LG VX8550 Scroll Wheel Replacement, Battery: stap 1, afbeelding 1 van 1
    • Slide the battery release up.

  2. LG VX8550 Scroll Wheel Replacement: stap 2, afbeelding 1 van 1
    • Remove the battery by lifting away from the case.

  3. LG VX8550 Scroll Wheel Replacement, Case: stap 3, afbeelding 1 van 1
    • Remove the 2 screw covers next to the rear speaker with a Push Pin.

  4. LG VX8550 Scroll Wheel Replacement: stap 4, afbeelding 1 van 1
    • Remove the 4 cover screws with a Philips #00 screwdriver.

  5. LG VX8550 Scroll Wheel Replacement: stap 5, afbeelding 1 van 1
    • Use the iPod opening tool to pry off the back casing.

  6. LG VX8550 Scroll Wheel Replacement: stap 6, afbeelding 1 van 1
    • Continue sliding the iPod opening tool around the seam of the casing to separate the front and back casings.

  7. LG VX8550 Scroll Wheel Replacement: stap 7, afbeelding 1 van 1
    • Separate the casing halves.

    • Be sure to keep track of the side buttons as they fall out.

  8. LG VX8550 Scroll Wheel Replacement, Motherboard: stap 8, afbeelding 1 van 1
    • Remove the 2 screws from the back of the phone with a Phillips #00 Screwdriver.

  9. LG VX8550 Scroll Wheel Replacement: stap 9, afbeelding 1 van 1
    • Carefully lift up on the motherboard to see the ribbon cables underneath.

    • Use the spudger to carefully disconnect the ribbon cable from the motherboard.

  10. LG VX8550 Scroll Wheel Replacement: stap 10, afbeelding 1 van 1
    • Remove the motherboard from the front casing by lifting straight up.

  11. LG VX8550 Scroll Wheel Replacement, Keypad Housing: stap 11, afbeelding 1 van 1
    • Lay the phone with the screen facedown.

    • The 6 slider screws are visible.

  12. LG VX8550 Scroll Wheel Replacement: stap 12, afbeelding 1 van 1
    • Peel back but don't remove the blue tape to access the 2 center screws.

    • Remove the 6 slider screws with the Phillips #00 screwdriver.

  13. LG VX8550 Scroll Wheel Replacement: stap 13, afbeelding 1 van 1
    • Lift the keypad housing away from the slider.

  14. LG VX8550 Scroll Wheel Replacement, Front Case: stap 14, afbeelding 1 van 1
    • Remove the 2 screw covers next to the speaker with a push pin next to the camera.

  15. LG VX8550 Scroll Wheel Replacement: stap 15, afbeelding 1 van 1
    • Remove the 6 screws with a Phillips #00 Screwdriver.

  16. LG VX8550 Scroll Wheel Replacement: stap 16, afbeelding 1 van 1
    • Use the ipod opening tool to pry the screen casing and the slider mechanism apart from each other.

  17. LG VX8550 Scroll Wheel Replacement: stap 17, afbeelding 1 van 1
    • Carefully lift the slider mechanism to see the ribbon cables underneath.

  18. LG VX8550 Scroll Wheel Replacement: stap 18, afbeelding 1 van 1
    • Slide ribbon cable through the slider mechanism.

  19. LG VX8550 Scroll Wheel Replacement: stap 19, afbeelding 1 van 1
    • Separate the two halves.

  20. LG VX8550 Scroll Wheel Replacement, Screen: stap 20, afbeelding 1 van 1
    • With the spudger, lift up under the connector to unplug it from the circuit board.

  21. LG VX8550 Scroll Wheel Replacement: stap 21, afbeelding 1 van 1
    • Lift and remove the blue tape from screen connector.

  22. LG VX8550 Scroll Wheel Replacement: stap 22, afbeelding 1 van 1
    • Lift the top edge of the screen using a pin to pry under the corner.

  23. LG VX8550 Scroll Wheel Replacement: stap 23, afbeelding 1 van 1
    • Grasp the ribbon cable near the connector and carefully slide it out of the white connector.

    • It is helpful to gently wiggle the ribbon cable from side to side.

  24. LG VX8550 Scroll Wheel Replacement, Scroll Wheel: stap 24, afbeelding 1 van 2 LG VX8550 Scroll Wheel Replacement, Scroll Wheel: stap 24, afbeelding 2 van 2
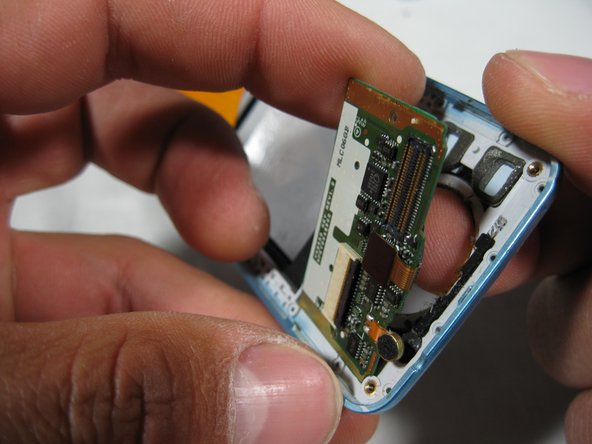
    • Carefully lift the circuit board away from the screen casing using Ipod Opening Tool.

    • Peel the circuit board away from the adhesive backing with your finger.

  25. LG VX8550 Scroll Wheel Replacement: stap 25, afbeelding 1 van 1
    • Remove the scroll wheel from the casing with your hands.

Conclusie

To reassemble your device, follow these instructions in reverse order.

Één andere persoon heeft deze handleiding voltooid.

Nathan Jones

Lid sinds: 04/10/10

89 Reputatie

10 handleidingen geschreven

Team

Cal Poly, Team 34-55, Forte Spring 2010 Lid van Cal Poly, Team 34-55, Forte Spring 2010

CPSU-FORTE-S10S34G55

5 Leden

20 handleidingen geschreven

0 opmerkingen

Voeg opmerking toe

Weergavestatistieken:

Afgelopen 24 uren: 0

Afgelopen 7 dagen: 1

Afgelopen 30 dagen: 1

Altijd: 2,377