Ga door naar hoofdinhoud

LG Stylo 2 Motherboard Replacement

Wat je nodig hebt

  1. LG Stylo 2 Motherboard  Replacement, Battery: stap 1, afbeelding 1 van 3 LG Stylo 2 Motherboard  Replacement, Battery: stap 1, afbeelding 2 van 3 LG Stylo 2 Motherboard  Replacement, Battery: stap 1, afbeelding 3 van 3
    • First you need to remove the back case of the phone.

    • Place the phone face down.

    • Using the plastic opening tool, insert into the initial gap shown.

    • Slowly guide the tool around the case until the case comes off with ease.

  2. LG Stylo 2 Motherboard  Replacement: stap 2, afbeelding 1 van 3 LG Stylo 2 Motherboard  Replacement: stap 2, afbeelding 2 van 3 LG Stylo 2 Motherboard  Replacement: stap 2, afbeelding 3 van 3
    • Place the back case to the side.

    • Use your finger or the opening tool to remove battery.

    • Remove the battery carefully to not damage the phone or the battery.

  3. LG Stylo 2 Motherboard  Replacement, Rear Camera: stap 3, afbeelding 1 van 3 LG Stylo 2 Motherboard  Replacement, Rear Camera: stap 3, afbeelding 2 van 3 LG Stylo 2 Motherboard  Replacement, Rear Camera: stap 3, afbeelding 3 van 3
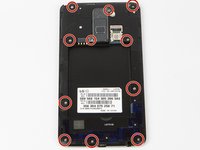
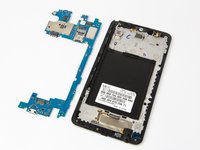
    • Remove the eleven 4mm Phillips #00 screws.

    • Place screws in safe location.

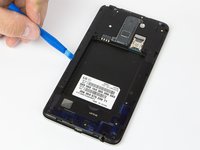
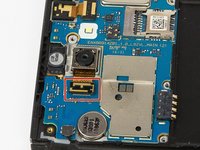
    • Use Plastic opener tool to remove inner case.

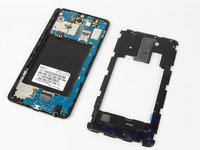
    • Gently remove inner case.

  4. LG Stylo 2 Motherboard  Replacement: stap 4, afbeelding 1 van 3 LG Stylo 2 Motherboard  Replacement: stap 4, afbeelding 2 van 3 LG Stylo 2 Motherboard  Replacement: stap 4, afbeelding 3 van 3
    • Use your finger or the opener to flip the flex cable shown in red box.

    • Use the precision tweezers to remove camera carefully.

  5. LG Stylo 2 Motherboard  Replacement, Motherboard: stap 5, afbeelding 1 van 3 LG Stylo 2 Motherboard  Replacement, Motherboard: stap 5, afbeelding 2 van 3 LG Stylo 2 Motherboard  Replacement, Motherboard: stap 5, afbeelding 3 van 3
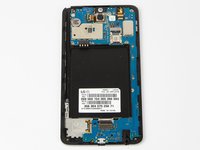
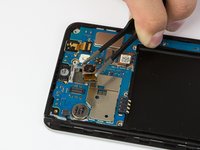
    • Gently flip the cables(shown in red boxes) using the opener tool.

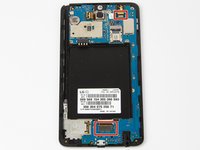
    • Gently remove the motherboard itself.

    • Place motherboard on a soft surface to not damage it.

Conclusie

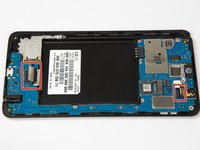
To reassemble your device, follow these instructions in reverse order.

Devon Barber

Lid sinds: 02/13/18

994 Reputatie

5 handleidingen geschreven

Team

USF Tampa, Team S11-G1, Cheng Spring 2018 Lid van USF Tampa, Team S11-G1, Cheng Spring 2018

USFT-CHENG-S18S11G1

4 Leden

10 handleidingen geschreven

Één opmerking

Charging retain 2.1

Kashif Kashi - Antwoord

Voeg opmerking toe

Weergavestatistieken:

Afgelopen 24 uren: 0

Afgelopen 7 dagen: 1

Afgelopen 30 dagen: 15

Altijd: 2,224