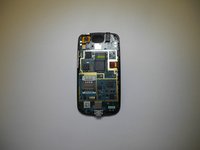
Ga door naar hoofdinhoud

LG Optimus T Motherboard Replacement

Wat je nodig hebt

  1. LG Optimus T Motherboard Replacement, Motherboard: stap 1, afbeelding 1 van 3 LG Optimus T Motherboard Replacement, Motherboard: stap 1, afbeelding 2 van 3 LG Optimus T Motherboard Replacement, Motherboard: stap 1, afbeelding 3 van 3
    • Working on your device while it is turned on may result in electric shock. Make sure to shut down and unplug your device before you begin.

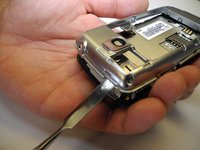
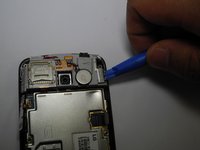
    • Using a prying device, such as a plastic opening tool, remove the phone’s back cover. At the top of the phone, there’s an indentation to put the Spudger into to pop the case off

  2. LG Optimus T Motherboard Replacement: stap 2, afbeelding 1 van 1
    • Remove the battery. There’s an indentation to the left of the camera lens to pull up on the battery with your finger

  3. LG Optimus T Motherboard Replacement: stap 3, afbeelding 1 van 1
    • Use a J0 screwdriver to remove the six 4.5mm screws.

  4. LG Optimus T Motherboard Replacement: stap 4, afbeelding 1 van 2 LG Optimus T Motherboard Replacement: stap 4, afbeelding 2 van 2
    • You might have difficulty popping the interior case off. You may use the metal spudger here with caution if the plastic opening tool fails

    • Remove interior case. Insert the spudger into the indentations at the top, or bottom of the phone to pry off the interior case.

  5. LG Optimus T Motherboard Replacement: stap 5, afbeelding 1 van 1
    • Pull up on connector tab

  6. LG Optimus T Motherboard Replacement: stap 6, afbeelding 1 van 2 LG Optimus T Motherboard Replacement: stap 6, afbeelding 2 van 2
    • Remove SD card mount. Insert the plastic opening tool on the right side to pop off

  7. LG Optimus T Motherboard Replacement: stap 7, afbeelding 1 van 2 LG Optimus T Motherboard Replacement: stap 7, afbeelding 2 van 2
    • Remove metal panel

    • There are four retaining points to insert plastic opening tool and pop off panel

  8. LG Optimus T Motherboard Replacement: stap 8, afbeelding 1 van 1
    • Use a J0 screwdriver to remove the two 1.8mm screws from charging port. (Charging port and motherboard are connected.)

    • Remove motherboard

Conclusie

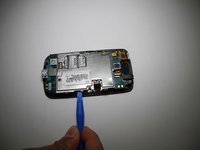
To reassemble your device, follow these instructions in reverse order.

Één andere persoon heeft deze handleiding voltooid.

stacey

Lid sinds: 02/07/17

219 Reputatie

2 handleidingen geschreven

Team

Ohio State, Team 1-3, Wilder Spring 2017 Lid van Ohio State, Team 1-3, Wilder Spring 2017

OSU-WILDER-S17S1G3

4 Leden

5 handleidingen geschreven

0 opmerkingen

Voeg opmerking toe

Weergavestatistieken:

Afgelopen 24 uren: 0

Afgelopen 7 dagen: 1

Afgelopen 30 dagen: 1

Altijd: 284