Ga door naar hoofdinhoud

LG K30 Rear Facing Camera Replacement

Wat je nodig hebt

  1. LG K30 Rear Facing Camera Replacement, Battery: stap 1, afbeelding 1 van 2 LG K30 Rear Facing Camera Replacement, Battery: stap 1, afbeelding 2 van 2
    • Before disassembling your LG K30, discharge the battery below 25%. A charged lithium-ion battery can catch fire and/or explode if accidentally punctured.

    • Power off your Phone before beginning disassembly.

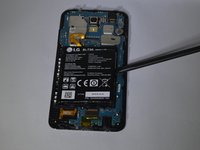
    • Use the 'Jimmy' and 'Metal Spudger' to slowly pry open the outsides of the back case.

  2. LG K30 Rear Facing Camera Replacement: stap 2, afbeelding 1 van 1
    • Remove the thirteen 3.4 mm Phillips #00 screws securing the midframe to the display assembly.

  3. LG K30 Rear Facing Camera Replacement: stap 3, afbeelding 1 van 1
    • Use a metal spudger or plastic opening tool to pry open the outer cover.

  4. LG K30 Rear Facing Camera Replacement: stap 4, afbeelding 1 van 1
    • Use the flat end of a spudger to detach the battery connector from the logic board.

  5. LG K30 Rear Facing Camera Replacement: stap 5, afbeelding 1 van 2 LG K30 Rear Facing Camera Replacement: stap 5, afbeelding 2 van 2
    • Use a spudger to pry the battery from the phone.

    • There may be an adhesive on the back of the battery and the phone. Pry the battery gently to prevent puncture or damage.

    • Do not bend or puncture the battery.

  6. LG K30 Rear Facing Camera Replacement, Motherboard: stap 6, afbeelding 1 van 1
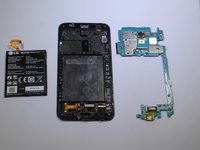
    • Use a spudger to carefully disconnect the front camera connector.

    • Use a spudger to disconnect the display cable connector.

  7. LG K30 Rear Facing Camera Replacement: stap 7, afbeelding 1 van 2 LG K30 Rear Facing Camera Replacement: stap 7, afbeelding 2 van 2
    • Remove the motherboard assembly from the display assembly with the a spudger or hand.

  8. LG K30 Rear Facing Camera Replacement, Rear Facing Camera: stap 8, afbeelding 1 van 2 LG K30 Rear Facing Camera Replacement, Rear Facing Camera: stap 8, afbeelding 2 van 2
    • Only pry on the tab, not the connector itself.

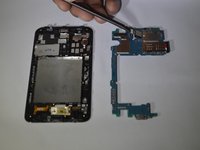
    • Use a Spudger to flip the release tab on the rear-facing camera cable ZIF connector.

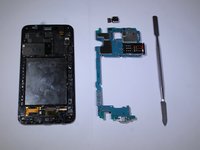
    • Remove the rear-facing camera.

Conclusie

To reassemble your device, follow these instructions in reverse order.

0 opmerkingen

Voeg opmerking toe

Weergavestatistieken:

Afgelopen 24 uren: 0

Afgelopen 7 dagen: 3

Afgelopen 30 dagen: 6

Altijd: 525