Deze versie kan foutieve bewerkingen bevatten. Schakel over naar de recentste gecontroleerde momentopname.
Wat je nodig hebt
-
Deze stap is niet vertaald. Help het te vertalen
-
Remove the rear cover by placing the plastic opening tool in the groove on the bottom left side of the LG G4 and gently prying up.
-
-
Deze stap is niet vertaald. Help het te vertalen
-
Place the plastic opening tool at the bottom edge of the battery and lift up. Carefully remove battery with your hands.
-
-
Deze stap is niet vertaald. Help het te vertalen
-
Remove the eleven 3.9 mm Phillips #00 screws found at the back of the phone.
-
-
Deze stap is niet vertaald. Help het te vertalen
-
Once all the screws have been removed, place the plastic opening tool in the lower left corner and firmly lift the cover up.
-
Detach the cover with your fingers
-
-
Deze stap is niet vertaald. Help het te vertalen
-
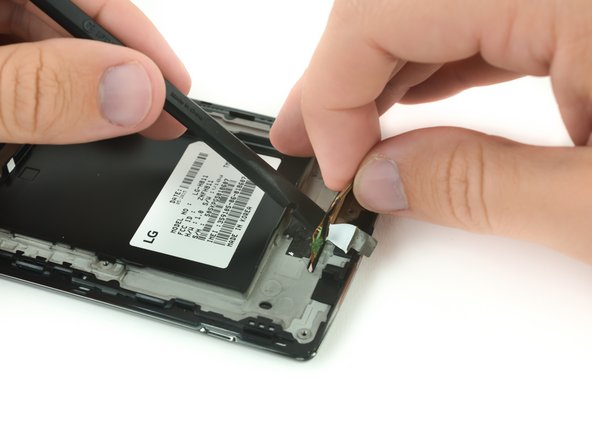
Remove the following four press-fit connectors with the flat edge of a plastic spudger or opening tool:
-
Front-facing camera connector.
-
Rear-facing camera connector.
-
Digitizer connector.
-
-
-
Deze stap is niet vertaald. Help het te vertalen
-
Remove the motherboard by lifting it up using the plastic opening tool and your fingers .
-
-
Deze stap is niet vertaald. Help het te vertalen
-
Use a heat gun or iOpener over the auxiliary port to soften the adhesive that secures it to the plastic housing.
-
-
Deze stap is niet vertaald. Help het te vertalen
-
Insert a nylon spudger into the auxiliary port and gently pry upward to free the port.
-
-
Deze stap is niet vertaald. Help het te vertalen
-
Use a spudger to carefully remove these components and then place them in the new display assembly..
-
-
Deze stap is niet vertaald. Help het te vertalen
-
Use a pair of tweezers to remove the adhesive strip that secures the digitizer ribbon cable.
-
-
Deze stap is niet vertaald. Help het te vertalen
-
Insert the flat side of a nylon spudger below the digitizer ribbon cable to free it from the adhesive.
-
-
Deze stap is niet vertaald. Help het te vertalen
-
Use a heat gun or an iOpener to soften the adhesive underneath the edges of the screen.
-
-
Deze stap is niet vertaald. Help het te vertalen
-
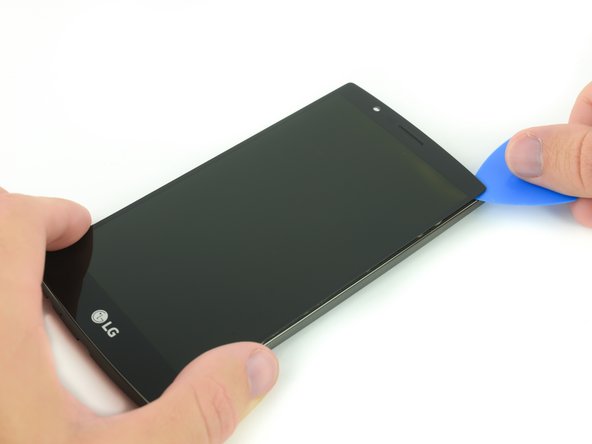
Use a heavy duty suction cup and firmly pull the screen away from the frame to create a small gap.
-
-
Deze stap is niet vertaald. Help het te vertalen
-
Insert a plastic opening pick into the gap between the screen and the plastic housing.
-
Slide the plastic opening pick along the border of the screen to break any additional adhesive and free the screen assembly.
-


Annuleren: ik heb deze handleiding niet afgemaakt.
23 andere personen hebben deze handleiding voltooid.


4 opmerkingen
Per the LG G4 Teardown guide, the glass, digitizer, and LCD are all fused together, so you have to replace the whole assembly
Lorsqu’on remplace l’ensemble écran + LCD achetés ensemble et que l’on transfère les pièces de l’ancien cadre (caméra, vibreur…), il ne faut pas oublier de transférer également 3 petits caoutchoucs carrés noir ou gris (2 en haut de chaque coté du haut parleur, et 1 en bas à gauche de la prise jack), sinon le détecteur de proximité ne marche pas et l’écran s’éteint et le reste lorsqu’on téléphone…
C'est bien qu'on fasse cette observation. Mon technicien avait omis ces neoprenes et j'ai pu les transférés.
My tech had omitted these pads. I am super grateful someone commented that the phone would black out on a call. Problem solved!