Ga door naar hoofdinhoud

LG G Pad F 7.0 Charging Port Replacement

Wat je nodig hebt

  1. LG G Pad F 7.0 Charging Port  Replacement, Charging Port: stap 1, afbeelding 1 van 2 LG G Pad F 7.0 Charging Port  Replacement, Charging Port: stap 1, afbeelding 2 van 2
    • Open up the SIM port, on the top right corner (screen face down).

    • Press the SIM card (white plastic) to pop it out.

    • Remove SIM card and set aside.

  2. LG G Pad F 7.0 Charging Port  Replacement: stap 2, afbeelding 1 van 2 LG G Pad F 7.0 Charging Port  Replacement: stap 2, afbeelding 2 van 2
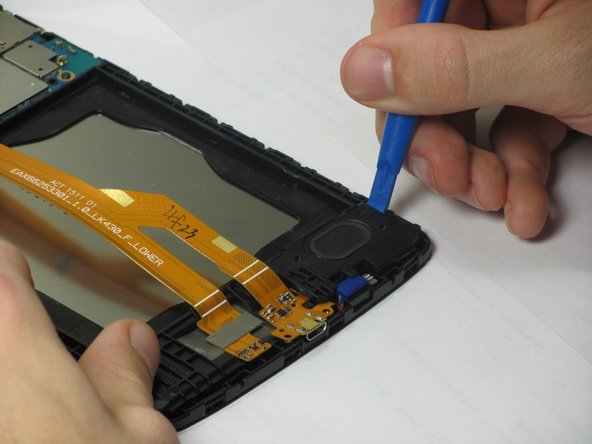
    • Use the plastic opening tool to pry the plastic backing off of the internal block. Start at the location with the SIM port to avoid damage to internal components.

    • Do this by finding the seam between the edge of the screen and the plastic backing, and prying between the two.

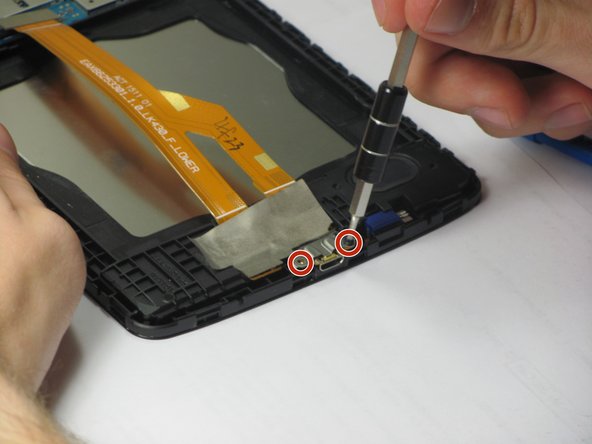
    • Work your way all the way around the edge of the screen, and remove the plastic backing when it is loose.

  3. LG G Pad F 7.0 Charging Port  Replacement: stap 3, afbeelding 1 van 1
    • Locate the top of the large orange ribbon cable.

    • Pry it off with the plastic opening tool as shown in the image.

  4. LG G Pad F 7.0 Charging Port  Replacement: stap 4, afbeelding 1 van 2 LG G Pad F 7.0 Charging Port  Replacement: stap 4, afbeelding 2 van 2
    • Remove the gyroscope (the blue rectangular cube) located near the bottom of the device with the plastic opening tool as shown in the image.

    • Remove the speaker located in the bottom right corner of the device with the plastic opening tool as shown in the image.

  5. LG G Pad F 7.0 Charging Port  Replacement: stap 5, afbeelding 1 van 2 LG G Pad F 7.0 Charging Port  Replacement: stap 5, afbeelding 2 van 2
    Gereedschap gebruikt in deze stap:
    Tweezers
    $4.99
    Koop
    • Remove the two screws located on the charging port as seen in the image using the Phillips screwdriver.

    • Using the tweezers, remove the orange ribbon cable along with the charging port.

Conclusie

To reassemble your device, follow these instructions in reverse order.

7 andere personen hebben deze handleiding voltooid.

Erik

Lid sinds: 01/25/17

293 Reputatie

1 Handleiding geschreven

Team

Cal Poly, Team 8-5, Banghart Winter 2017 Lid van Cal Poly, Team 8-5, Banghart Winter 2017

CPSU-BANGHART-W17S8G5

3 Leden

10 handleidingen geschreven

4 opmerkingen

Good work, Pictures are clear and easy to follow

Jonah Basl - Antwoord

Just a minor item. On step 4 it tells you to remove the gyroscope, then remove the speaker. On on the unit I worked in you had to remove the speaker so you could get remove the gyroscope. I was working on the 8.0 instead of the 7.0 model, so perhaps that accounted for the difference.

Alan Siebens - Antwoord

Where do you buy the new charging port you need to put in? It's like gold lined teeth top and bottom.

Stands For Jesus - Antwoord

Also on his LG can we turn it into a prepaid monthly service if we get a at&t sim card kit or something similar?

Stands For Jesus - Antwoord

Voeg opmerking toe

Weergavestatistieken:

Afgelopen 24 uren: 1

Afgelopen 7 dagen: 3

Afgelopen 30 dagen: 11

Altijd: 4,079