Ga door naar hoofdinhoud
LG Flare Microphone Replacement

LG Flare Microphone Replacement

Kelsey Hanna

Kelsey Hanna en 7 andere bijdragers

Voor het laatst geüpdatet op May 7, 2024

Geen schatting
Gemiddeld
Heeft betere plaatjes nodig
Mislukte opmaak
Betere introductie
Ontbrekende informatie

This guide will show you how to take your LG Flare apart to reach the microphone and replace it.

If you find yourself having cell phone issues such as someone not being able to hear you during a phone call or audio recordings are not picking up any noise, you may have a broken microphone.

Wat je nodig hebt

Gereedschap

  1. LG Flare Microphone Replacement, Microphone: stap 1, afbeelding 1 van 2 LG Flare Microphone Replacement, Microphone: stap 1, afbeelding 2 van 2
    • Remove the back cover by pressing on the top middle raised lines of the back cover and sliding the cover off.
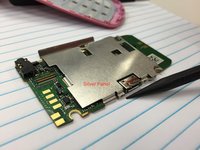
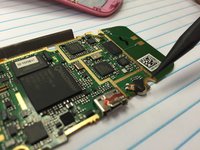
  2. LG Flare Microphone Replacement: stap 2, afbeelding 1 van 1
    • Remove the battery by popping the top out and removing the battery.

  3. LG Flare Microphone Replacement: stap 3, afbeelding 1 van 1
    • Use appropriately sized Philips-head screwdriver to remove the six small screws on the back of the phone under the battery.

  4. LG Flare Microphone Replacement: stap 4, afbeelding 1 van 1
    • Use an opening tool to pop the back panel apart around the edges, and then pry the whole piece off.

  5. LG Flare Microphone Replacement: stap 5, afbeelding 1 van 1
    • Use an opening tool to separate the tabs on the green circuit board from the front body of the phone.

  6. LG Flare Microphone Replacement: stap 6, afbeelding 1 van 1
    • Use an opening tool to pop the orange connecting strip off of the circuit board.

  7. LG Flare Microphone Replacement: stap 7, afbeelding 1 van 1
    • Un-clip the 2 metal clips on one side of the circuit board.

  8. LG Flare Microphone Replacement: stap 8, afbeelding 1 van 2 LG Flare Microphone Replacement: stap 8, afbeelding 2 van 2
    Gereedschap gebruikt in deze stap:
    Tweezers
    $4.99
    • Using tweezers and wedge, remove silver piece from green circuit board.

  9. LG Flare Microphone Replacement: stap 9, afbeelding 1 van 1
    • Remove the microphone (rip soldering).

  10. LG Flare Microphone Replacement: stap 10, afbeelding 1 van 1
    • Solder new microphone in place OR buy replacement circuit board from www.ifixit.com and replace.

Conclusie

To reassemble your device, follow these instructions in reverse order.

Kelsey Hanna

Lid sinds: 09/29/15

1 Reputatie

1 Handleiding geschreven

Team

Ohio State, Team 1-3, Garvin Fall 2015 Lid van Ohio State, Team 1-3, Garvin Fall 2015

OSU-GARVIN-F15S1G3

4 Leden

4 handleidingen geschreven

0 opmerkingen

Voeg opmerking toe

Weergavestatistieken:

Afgelopen 24 uren: 0

Afgelopen 7 dagen: 1

Afgelopen 30 dagen: 1

Altijd: 211