Ga door naar hoofdinhoud

Kyocera Hydro Vibe Trim Replacement

Wat je nodig hebt

  1. Kyocera Hydro Vibe Trim Replacement, Battery: stap 1, afbeelding 1 van 1
    • Make sure that the device is turned off before beginning.

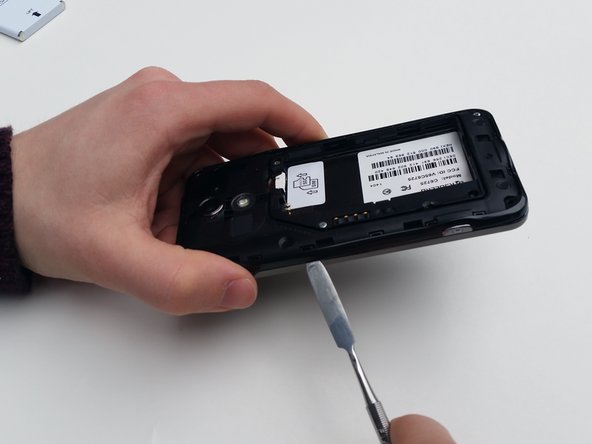
    • Look for a small indentation on the bottom of the phone.

    • Insert the plastic opening tool into the indentation and lift off the back casing.

  2. Kyocera Hydro Vibe Trim Replacement: stap 2, afbeelding 1 van 3 Kyocera Hydro Vibe Trim Replacement: stap 2, afbeelding 2 van 3 Kyocera Hydro Vibe Trim Replacement: stap 2, afbeelding 3 van 3
    • The large white component is the battery. Look for a small indentation under the arrow that says "LIFT."

    • Place the plastic opening tool in the indentation and lift the battery out of the socket.

  3. Kyocera Hydro Vibe Trim Replacement, Trim: stap 3, afbeelding 1 van 1
    • Locate the screws holding the trim which are the four side screws on each corner.

    • Remove each screw with a Phillips screw driver #J00. The screws are 5mm Phillips.

  4. Kyocera Hydro Vibe Trim Replacement: stap 4, afbeelding 1 van 2 Kyocera Hydro Vibe Trim Replacement: stap 4, afbeelding 2 van 2
    • Locate the clasps holding the trim in place.

    • You will need to insert the metal spudger through the bottom of the trim and slowly push upwards to release the clasps.

  5. Kyocera Hydro Vibe Trim Replacement: stap 5, afbeelding 1 van 1
    • The trim is flimsy.

    • This is what the trim will look like once removed.

Conclusie

To reassemble your device, follow these instructions in reverse order.

0 opmerkingen

Voeg opmerking toe

Weergavestatistieken:

Afgelopen 24 uren: 0

Afgelopen 7 dagen: 0

Afgelopen 30 dagen: 2

Altijd: 688