Ga door naar hoofdinhoud

Konica Minolta Dimage Z6 LCD Screen Replacement

Wat je nodig hebt

  1. Konica Minolta Dimage Z6 LCD Screen Replacement, LCD Screen: stap 1, afbeelding 1 van 2 Konica Minolta Dimage Z6 LCD Screen Replacement, LCD Screen: stap 1, afbeelding 2 van 2
    • Push the battery cover in and away from the camera.

    • Remove all four batteries.

    • Close the battery cover before continuing.

  2. Konica Minolta Dimage Z6 LCD Screen Replacement: stap 2, afbeelding 1 van 3 Konica Minolta Dimage Z6 LCD Screen Replacement: stap 2, afbeelding 2 van 3 Konica Minolta Dimage Z6 LCD Screen Replacement: stap 2, afbeelding 3 van 3
    • Use a Phillips #000 screwdriver to remove the two black screws above the LCD screen.

    • The screws are small and fall out easily. You should take them out over a solid surface and set them aside somewhere safe.

    • Remove the black view protector.

    • Remove the screen cover by applying slight force at the top, then pulling away from the camera.

  3. Konica Minolta Dimage Z6 LCD Screen Replacement: stap 3, afbeelding 1 van 3 Konica Minolta Dimage Z6 LCD Screen Replacement: stap 3, afbeelding 2 van 3 Konica Minolta Dimage Z6 LCD Screen Replacement: stap 3, afbeelding 3 van 3
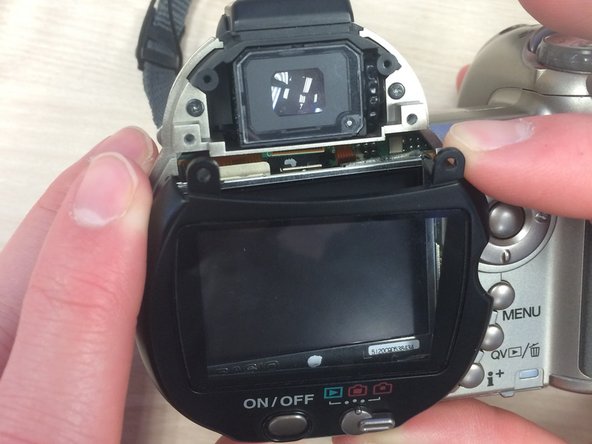
    • Carefully use the spudger to pop the LCD screen out of the bracket.

    • The LCD screen should still be attached by orange ribbon cable and two wires, one orange and one white.

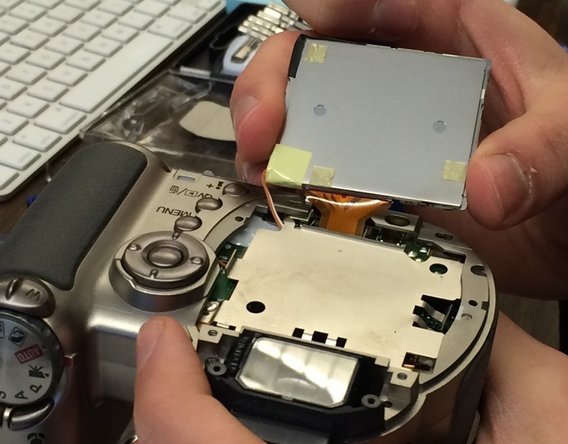
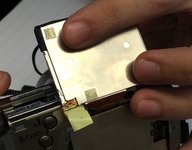
    • Use tweezers to carefully pull the ribbon cable from the logic board, not from the LCD screen.
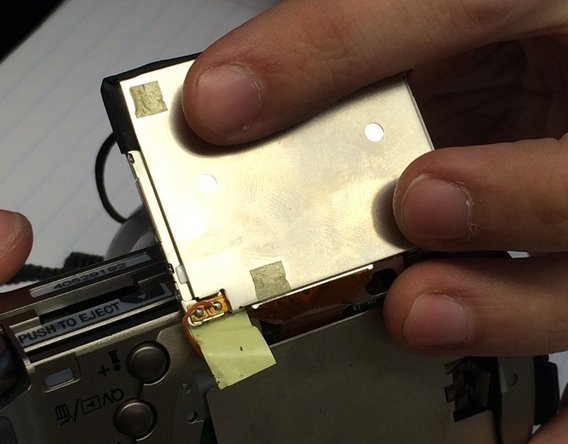
    • Peel back yellow tape on LCD screen to reveal where the two wires are attached. Use tweezers to detach the orange and white wires from the LCD screen.

    • Attach the wires to the new screen in the same spot they were attached to the old one.

    • Attach the new screen's ribbon tape to the logic board underneath the metal plate.

    • With the new screen attached, put it in place on the metal plate. You can now replace the screen cover.

  4. Konica Minolta Dimage Z6 LCD Screen Replacement: stap 5, afbeelding 1 van 1
    • As you start to reassemble, note the grey extension at the bottom of the black screen cover. Apply pressure to the bottom of the cover and slide upwards onto screen.

Conclusie

With the main screen cover in place, follow steps 1-3 in reverse to completely reassemble the device. If the new screen was attached correctly, the camera should function as normal.

Ethan Anderson

Lid sinds: 02/16/16

1 Reputatie

1 Handleiding geschreven

Team

Ohio State, Team 1-3, Burgess Spring 2016 Lid van Ohio State, Team 1-3, Burgess Spring 2016

OSU-BURGESS-S16S1G3

4 Leden

1 handleiding geschreven

0 opmerkingen

Voeg opmerking toe

Weergavestatistieken:

Afgelopen 24 uren: 2

Afgelopen 7 dagen: 5

Afgelopen 30 dagen: 13

Altijd: 750