Inleiding
This details how to remove the (satellite) speaker terminals on the back of the Klipsch Promedia 2.1 computer speakers and replace them with new, similar, but not identical terminals.
How do you know if your speakers are the original version of the Promedia 2.1 model?
- There is a rocker-type power switch on the amp.
- One of the satellite (small) speakers has a control pod near the bottom,
with volume and bass control on it and; - It says version 2.1 on the amp surface near the serial number.
The subsitute terminals are not an exact drop-in replacement forthe original ones. The solder terminals on them are too wide to fit through the circuit board holes. However, the new terminals fit the amp opening very nicely without the circuit board. Instead of using the circuit board, we put it aside. We use some bolts and nuts to hold the new terminals directly to the amp wall. We use silicone caulking to fill any air gaps caused by imperfect fit. The results are very good.
Wat je nodig hebt
-
-
UNPLUG subwoofer/amp and place it on a SOFT flat work surface, such as an antistatic mat or a thick towel. Place it on its side so that the 3-D plastic Klipsch logo faces down and the amp/speaker connections are facing up.
-
Unless you're sure what you're doing, NEVER touch the capacitors, or you could receive a dangerous or even lethal shock. If you're not sure, leave the amp unplugged 3 or more days before taking it apart.
-
-
-
Find the eight (8) screws around the periphery of the metal amp that fasten the amp to the wooden subwoofer enclosure. Notice that all 8 screws sit on top of, or at the intersection of the outermost gold lines. Undo these eight screws. DON'T undo any other screws at this time.
-
-
-
When you've finished removing all 8 amp screws, SLOWLY lift the amp assembly out of the sub enclosure. Be careful. The red and black speaker wires encased in black insulation that connect the amp to the speaker are a bit tight. Don't pull the speaker wires or you could damage something.
-
-
-
Look inside the subwoofer enclosure to find the woofer driver. Notice the black and red wires with terminals at the ends clipped onto the speaker's terminals.
-
Gently grasp one wire terminal and wiggle it left and right while pulling the terminal away from the speaker.
-
Remove the other terminal using a similar method. NOTE: Black is usually negative and red positive. However, Klipsch labelled the speaker terminals incorrectly, so the black wire clips on to "+" and the red wire clips on to "-" . Also, on my unit, each wire terminal only fit on the correct speaker terminal and not the other.
-
-
-
-
Now, carefully move the amp assembly and the wooden enclosure enough so that you can see the speaker terminals on the rear of the amp. Undo the two screws (on each side of the speaker terminals), and set them aside, noting where they came from.
-
-
-
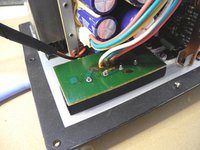
Now, gently and carefully put the amp assembly back down onto your work surface. Notice the green PCB (circuit board) there. That's the PCB for the speaker terminals, surrounded on one side by some foam insulation to prevent air leakage.
-
Gently pull the green PCB up and out of the opening in the amp wall by pulling from the sides of the black foam around the edge. DON'T pull or strain any of the coloured wires attached.
-
-
-
I bought some replacement terminals that have similar dimensions to the original ones. The screw holes also line up with the screw holes on the subwoofer cabinet. However, there's a problem. Notice the difference in width between the solder tabs on the new speaker terminals and the old ones?
-
The solder tabs on the new speaker terminals are too wide to fit through the holes in the terminal PCB. Now what? I considered modding the new ones. However, that was going to be tricky, and a bit complicated.
-
Inestead, I decided to cut the wires to the PCB, solder those wires to the new speaker terminals and bolt the new terminals to the amp. The PCB would no longer be needed. The guide therefore documents how to do that. In future, if someone knows of terminals that fit this enclosure AND has solder tabs that will those PCB holes, let us know!
-
-
-
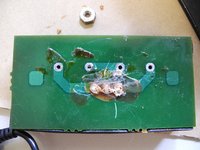
Now, as close as you can to the green PCB, cut the red, green and white wires soldered to the PCB with a side cutter or similar. Make sure to vacuum or remove any tiny wire fragments. We don't want anything shorting the circuit anywhere.
-
Oops! I don't have a photo of this step. The second shot shows the PCB after this step was completed.
-
-
-
Apply masking tape to the metal amp wall around the four sides of the terminal opening. I applied tape about about 2-3 mm. away from each side of the opening, so the caulking would stick up to 2-3mm away from the opening.
-
Now, apply a bead of silicone caulking around the edges of the hole. The caulking only needs to be about 1.5mm high to work well. That should be just enough to keep the new terminals close to the amp wall when you fasten them down. Allow 24 hours or more for silicon to dry properly.
-
-
-
Strip about 1/4" of insulation off the ends of the red, green and white wires. Twist the ends of each wire to wind them tight. Apply a little flux to the new speaker terminals to promote a good solder joint.
-
With pushbuttons facing down, and while facing the front of the terminals, solder the red wire to the right terminal, the white wire to the left terminal and the green wire to the second terminal from the right. Strip and solder a bridge wire between the middle terminals. NOTE: solder white wire near the end to ensure it's not stretched too tight.
-
-
-
Now, gently reinsert the terminals back into the opening in the amp wall. Be careful not to stretch any of the three wires.
-
With a pin or the tip of some scissors, cut a tiny portion of the caulking away from where the bolt holes are to allow for the bolts to go through the holes.
-
Insert a size 6-32 bolt through each speaker terminal hole. Fasten a 6-32 nut on each bolt on the other side of the terminals. Tighten them very snugly, but DO NOT torque them tightly. You could break the terminals. After all, they're made of hard plastic.
-
Once installed, apply a bead of caulking around the outside perimeter of the speaker terminals, to ensure there are no air leaks.
-
-
-
I used a can of compressed air (with thin tube attachment) and sprayed air at the joint between the terminals and the amp wall to test for air leaks. Air was leaking through.
-
For this reason, I applied a second, thin layer of silicone caulking around the perimeter of the terminals and smoothed it very gently with a finger. That seemed to stop most of the air leaks.
-
Keep in mind the terminals are an open design, so a small amount of air will go right through them where the push buttons are. I am deciding whether to use some kind of temporary putty, like Blu-Tac on the rear to seal up any remaining air leaks.
-


Works basically as well as the original terminals. Would be nice to find terminals that fit the original Klipsch PCB in future.
Annuleren: ik heb deze handleiding niet afgemaakt.
7 andere personen hebben deze handleiding voltooid.
11Gids Commentaar
Thank you, doing this now in Nov. of 2022
Julian: Let us know how it goes!
I followed the instructions, but my subwoofer isn't working properly. It is super quiet no matter how loudly I turn up the bass volume. Is there a bass controller on the PCB that is lost when you remove it?
I'm having the "quiet bass" issue as well, I think it may have to do with the thermal flaws of the original ProMedia 2.1 design. I read this on another forum: "The original capacitors were next to a hot resistor, so they usually have lost their capacitance" but I don't have the electronics skills to confirm.
Skye -