Ga door naar hoofdinhoud

Kenwood Chef Drive Gear replace

Wat je nodig hebt

  1. Kenwood Chef Drive Gear replace, Tools: stap 1, afbeelding 1 van 1
    • Prepare your Tools.

  2. Kenwood Chef Drive Gear replace, Open Electronic box: stap 2, afbeelding 1 van 1
    • Remove five Screens T20 from the bottom and lift the bottom plate up.

  3. Kenwood Chef Drive Gear replace, Remove electronic box: stap 3, afbeelding 1 van 2 Kenwood Chef Drive Gear replace, Remove electronic box: stap 3, afbeelding 2 van 2
    • Separate nine cables.

    • Remove all screws from the electronic box.

    • Remove the electronic box.

  4. Kenwood Chef Drive Gear replace, Loosen the tilt mechanics: stap 4, afbeelding 1 van 3 Kenwood Chef Drive Gear replace, Loosen the tilt mechanics: stap 4, afbeelding 2 van 3 Kenwood Chef Drive Gear replace, Loosen the tilt mechanics: stap 4, afbeelding 3 van 3
    • Tilt the machine head.

    • Remove the security washer from the hinge axle.

    • Remove the axle and the machine stand.

  5. Kenwood Chef Drive Gear replace, Spring and design plate: stap 5, afbeelding 1 van 3 Kenwood Chef Drive Gear replace, Spring and design plate: stap 5, afbeelding 2 van 3 Kenwood Chef Drive Gear replace, Spring and design plate: stap 5, afbeelding 3 van 3
    • Pull the spring out.

    • Remove the screw.

    • Remove the design plate.

  6. Kenwood Chef Drive Gear replace, Remove cover: stap 6, afbeelding 1 van 3 Kenwood Chef Drive Gear replace, Remove cover: stap 6, afbeelding 2 van 3 Kenwood Chef Drive Gear replace, Remove cover: stap 6, afbeelding 3 van 3
    • Remove four screws T20.

    • Remove the cover.

  7. Kenwood Chef Drive Gear replace, Remove top cover: stap 7, afbeelding 1 van 3 Kenwood Chef Drive Gear replace, Remove top cover: stap 7, afbeelding 2 van 3 Kenwood Chef Drive Gear replace, Remove top cover: stap 7, afbeelding 3 van 3
    • Remove two screws T20.

    • Remove the top cover. Note: the cable connecting the top cover and the lower case is very short.

    • Remove the screws from the "Light on/off"-unit and separate it from the top cover.

  8. Kenwood Chef Drive Gear replace, Remove motor cover: stap 8, afbeelding 1 van 1
    • Remove three screws T20 and the washers.

    • Take the cover off.

  9. Kenwood Chef Drive Gear replace, Motor: stap 9, afbeelding 1 van 1
    • Remove three screws T20 and the plastic washers.

  10. Kenwood Chef Drive Gear replace, Remove drive gear: stap 10, afbeelding 1 van 3 Kenwood Chef Drive Gear replace, Remove drive gear: stap 10, afbeelding 2 van 3 Kenwood Chef Drive Gear replace, Remove drive gear: stap 10, afbeelding 3 van 3
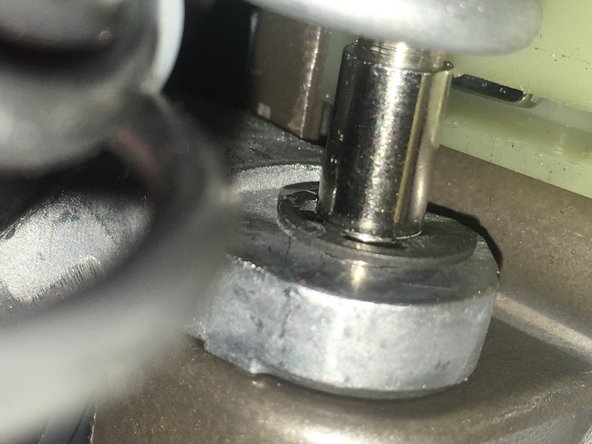
    • Using a punch and a hammer push out the pin. (Note: support the gear on the opposite side to protect the the motor shaft from damage).

    • The gear ist free.

    • When inserting the pin, support the gear on the opposite side to protect the the motor shaft from damage.

Conclusie

To reassemble your device, follow these steps in reverse order.

5 andere personen hebben deze handleiding voltooid.

Met dank aan deze vertalers:

de en

100%

VauWeh helpt ons de wereld te herstellen! Wil je bijdragen?
Begin met vertalen ›

Dominik Kübelsbeck

Lid sinds: 07/08/19

279 Reputatie

1 Handleiding geschreven

13 opmerkingen

super Anleitung

hat problemlos geklappt

vielen Dank.

PS: ist schon ein bisschen aufwendig, nur um den Antriebszahn zu wechseln, die gesamte Maschine zu zerlegen.

Gruß Rainer

Rainer Jourdan - Antwoord

Great tutorial, however it does not apply for me, as I have a Kenwood titanium KMY60 model, this spare part does NOT have a pin. I can’t say how it is fixed to the gear, could you advice on how to disassemble it?

landrieu - Antwoord

Hi, how did you manage to disassemble the part without the pin? How is it fixed? Thank you!

Christian Bolleter -

vielen Dank für die Anleitung. Hat (fast) alles funktioniert, außer das Kabel für das Licht. Es rutscht beim Einsetzen des Oberteils immer wieder ab. Gibt es einen besonderen Tip?

Andre2111 - Antwoord

Danke für die Anleitung. Wir haben angefangen, nach Gutdünken loszuschrauben und sind kläglich gescheitert. Mit der Anleitung hat es geklappt. Vielen Dank dafür!

Ich bin selber Ingenieur und konstruiere mechanische Bauteile und bin doch sehr verwundert, das Kenwood dermaßen kompliziert baut.

Niels Rütthard - Antwoord

Voeg opmerking toe

Weergavestatistieken:

Afgelopen 24 uren: 5

Afgelopen 7 dagen: 56

Afgelopen 30 dagen: 238

Altijd: 8,726