Ga door naar hoofdinhoud

JBL Charge 2 Plus full disassembly

Wat je nodig hebt

  1. JBL Charge 2 Plus full disassembly, mainboard: stap 1, afbeelding 1 van 2 JBL Charge 2 Plus full disassembly, mainboard: stap 1, afbeelding 2 van 2
    • Вставьте мудрость здесь.

  2. JBL Charge 2 Plus full disassembly: stap 2, afbeelding 1 van 3 JBL Charge 2 Plus full disassembly: stap 2, afbeelding 2 van 3 JBL Charge 2 Plus full disassembly: stap 2, afbeelding 3 van 3
    • Вставьте мудрость здесь.

  3. JBL Charge 2 Plus full disassembly: stap 3, afbeelding 1 van 2 JBL Charge 2 Plus full disassembly: stap 3, afbeelding 2 van 2
    • Вставьте мудрость здесь.

    My charge 2 plus is different from this one. The screws are different. There are no screws on the side speakers and the battery cover is not the same.

    sir.rapses - Antwoord

    Original device?

    Not fake?

    Pavel Amelyanenka - Antwoord

  4. JBL Charge 2 Plus full disassembly: stap 4, afbeelding 1 van 2 JBL Charge 2 Plus full disassembly: stap 4, afbeelding 2 van 2
    • Вставьте мудрость здесь.

  5. JBL Charge 2 Plus full disassembly: stap 5, afbeelding 1 van 3 JBL Charge 2 Plus full disassembly: stap 5, afbeelding 2 van 3 JBL Charge 2 Plus full disassembly: stap 5, afbeelding 3 van 3
    • Вставьте мудрость здесь.

  6. JBL Charge 2 Plus full disassembly: stap 6, afbeelding 1 van 2 JBL Charge 2 Plus full disassembly: stap 6, afbeelding 2 van 2
    • Вставьте мудрость здесь.

  7. JBL Charge 2 Plus full disassembly: stap 7, afbeelding 1 van 3 JBL Charge 2 Plus full disassembly: stap 7, afbeelding 2 van 3 JBL Charge 2 Plus full disassembly: stap 7, afbeelding 3 van 3
    • Вставьте мудрость здесь.

    Hey,

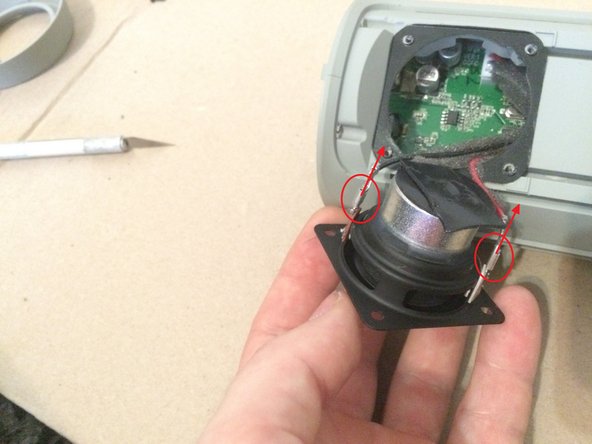
    So I have no experience on working with electronics. Does anyone know how I should remove these wires?

    Arjen de jong - Antwoord

  8. JBL Charge 2 Plus full disassembly: stap 8, afbeelding 1 van 2 JBL Charge 2 Plus full disassembly: stap 8, afbeelding 2 van 2
    • Вставьте мудрость здесь.

  9. JBL Charge 2 Plus full disassembly: stap 9, afbeelding 1 van 2 JBL Charge 2 Plus full disassembly: stap 9, afbeelding 2 van 2
    • Вставьте мудрость здесь.

  10. JBL Charge 2 Plus full disassembly: stap 10, afbeelding 1 van 2 JBL Charge 2 Plus full disassembly: stap 10, afbeelding 2 van 2
    • Вставьте мудрость здесь.

  11. JBL Charge 2 Plus full disassembly: stap 11, afbeelding 1 van 3 JBL Charge 2 Plus full disassembly: stap 11, afbeelding 2 van 3 JBL Charge 2 Plus full disassembly: stap 11, afbeelding 3 van 3
    • Вставьте мудрость здесь.

  12. JBL Charge 2 Plus full disassembly: stap 12, afbeelding 1 van 2 JBL Charge 2 Plus full disassembly: stap 12, afbeelding 2 van 2
    • Вставьте мудрость здесь.

    здравстуйте, подскажите где можно закать этот шлейф, и можно ли купить новый корпус

    Денис Мирный - Antwoord

  13. JBL Charge 2 Plus full disassembly: stap 13, afbeelding 1 van 2 JBL Charge 2 Plus full disassembly: stap 13, afbeelding 2 van 2
    • Вставьте мудрость здесь.

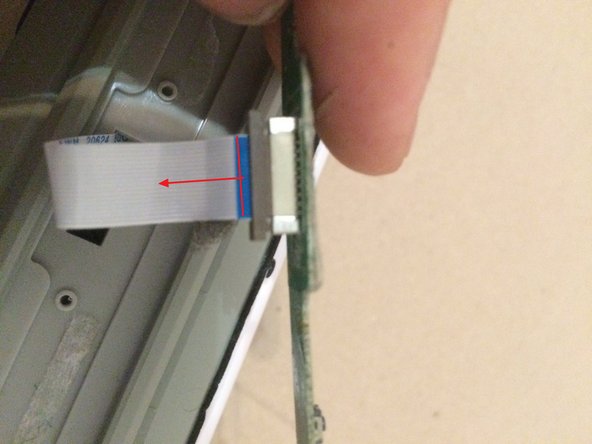
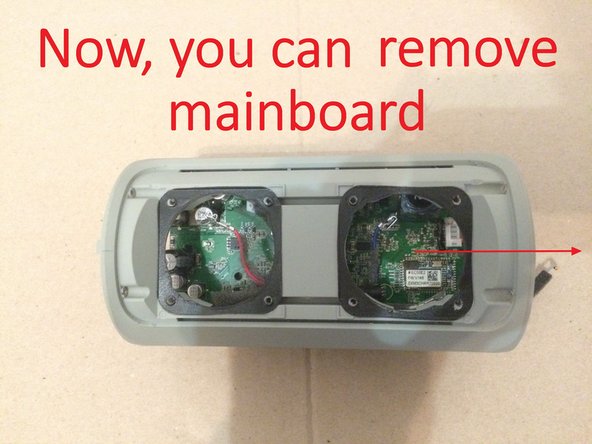
    You do not need the steps 13 -15 as it is possible to unplug de flex with the bottom PCB still installed.

    For this I removed the speaker cable for better access.

    But you’ll need long pliers and patience to plug it back in

    Martin Stegmann - Antwoord

  14. JBL Charge 2 Plus full disassembly: stap 14, afbeelding 1 van 2 JBL Charge 2 Plus full disassembly: stap 14, afbeelding 2 van 2
    • Вставьте мудрость здесь.

  15. JBL Charge 2 Plus full disassembly: stap 15, afbeelding 1 van 3 JBL Charge 2 Plus full disassembly: stap 15, afbeelding 2 van 3 JBL Charge 2 Plus full disassembly: stap 15, afbeelding 3 van 3
    • Вставьте мудрость здесь.

    what do we call this part of the motherbord?

    You Tech - Antwoord

  16. JBL Charge 2 Plus full disassembly: stap 16, afbeelding 1 van 3 JBL Charge 2 Plus full disassembly: stap 16, afbeelding 2 van 3 JBL Charge 2 Plus full disassembly: stap 16, afbeelding 3 van 3
    • Вставьте мудрость здесь.

  17. JBL Charge 2 Plus full disassembly: stap 17, afbeelding 1 van 3 JBL Charge 2 Plus full disassembly: stap 17, afbeelding 2 van 3 JBL Charge 2 Plus full disassembly: stap 17, afbeelding 3 van 3
    • Вставьте мудрость здесь.

  18. JBL Charge 2 Plus full disassembly: stap 18, afbeelding 1 van 2 JBL Charge 2 Plus full disassembly: stap 18, afbeelding 2 van 2
    • Вставьте мудрость здесь.

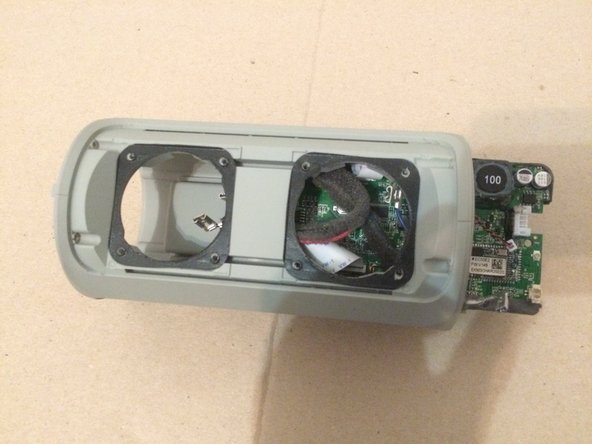
    On the first picture above, what is the object with the number 100 on it, what is its function and how do I replace/attach it if it came loose?

    brenbampton411 - Antwoord

    yah dude me too I need that part

    Vm Bro -

    From where we can get JBL ORIGINAL MOTHERBOARD??

    Annora Petrova - Antwoord

Conclusie

Чтобы собрать устройство, выполните пункты инструкции в обратном порядке.

16 andere personen hebben deze handleiding voltooid.

Pavel Amelyanenka

Lid sinds: 11/05/16

874 Reputatie

2 handleidingen geschreven

16 opmerkingen

Great. Thanks to your help I got my JBL back. Thank you and I hope you continue to help other people.

Heitor BC - Antwoord

AWESOME! Glad to hear, it was helpful.

irlanda -

So our speaker hit the ground and that little piece with the 100 on it has separated from the motherboard. Is there anyway to fix that without replacing the whole thing?

somer.yocom - Antwoord

Yes, this is not a problem. It is enough to solder this part into place. And everything will work perfectly.

Pavel Amelyanenka -

привет павел, у меня тоже есть такой проблем. мой синок удалил на полу мой jbl. и ето маленкой деталь 100 развалился. но я и потерял етот деталь. если у тебе ест информация скажи пожалуйста точное име деталь 100 которий находится на верху интегральной схеми ( 100 написано с белие цифри)спасибо

Илко Маринов - Antwoord

My one was on charging and something happened it still works but sound is very very low .. U need to put that next to ur ear to listen .. I opened that and found the near the speaker connector(on the left side corner) the board is hot… what to do

Soni - Antwoord

Hi.

Specify in the photo the most precisely the place of heating.

Pavel Amelyanenka -

подскажите а где на этой плате контроллер питания и зарядки или укажите его маркировку

matrix2007 - Antwoord

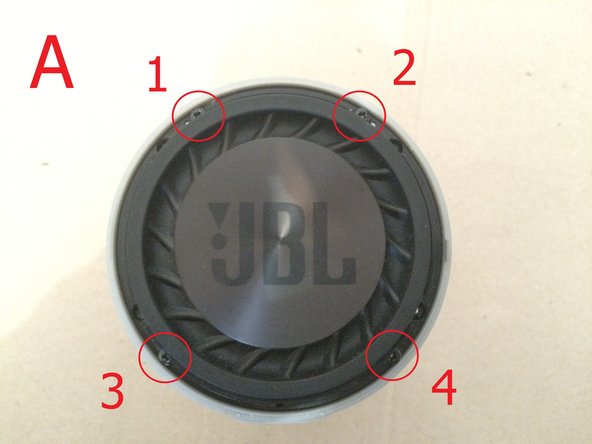
Step 2 was the hardest part since the industrial glue on the mesh is pretty durable - be careful not to break the speakers in the process

Claas Koester - Antwoord

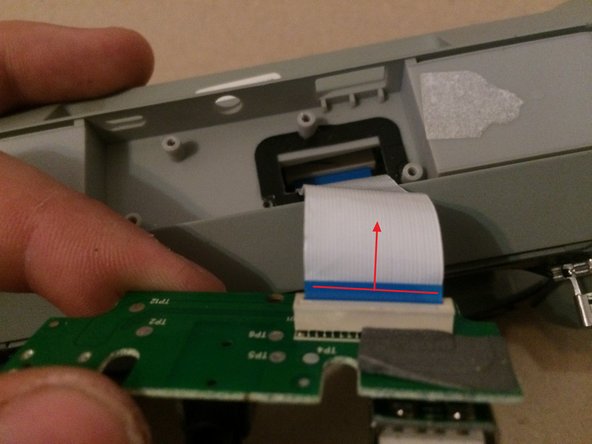
I had the same problem with the ‘100’ part that fell off. Unfortunately the flat cable came loose from the board. Any idea how to reattach it? Also, I wish I had seen this page before the dismantling video on youtube. Apparently that was the lazy way: keeping the top on. That would have made all the difference with this flat cable!

Marthin Stout - Antwoord

Which cable do you mean?

Pavel Amelyanenka -

The flat cable from board to control unit (top). The cable is currently loose on both ends. I thought the flat cable had a (little black) connector sliding into the connector on the board. Turns out this black thing was not connected to the cable. Now I am unsure how to reattach it. Also, I notice from your step 15 that you have a flat cable for the bottom connectors. Either I have not disassembled my unit far enough or my unit does not have a flat cable attached to the bottom. I don’t think I need to find out :-)

Marthin Stout -

подскажите где можно купить шлейф на контроллер кнопок, и весь корпус

Денис Мирный - Antwoord

My JBL Charge 2+ now makes a crackling and high pitched fart-like sound when music is played, at first i thought it was the audio drivers that were faulty but I pulled them out and tested on another player and they were playing music just fine, meaning it is a board problem but I do not know which of the three boards is faulty so that I replace it. I see (1) the function board with led light, (2) the motherboard in the middle and (3) the power board with audio jack and USB ports, so I do not know which board to replace. Any assistance will be appreciated.

Lyon Bassey - Antwoord

Voeg opmerking toe

Weergavestatistieken:

Afgelopen 24 uren: 1

Afgelopen 7 dagen: 21

Afgelopen 30 dagen: 107

Altijd: 14,136