Inleiding
This installation is on 2013 RAV4 LTD with JBL sound system. I installed the Curt hitch 13149 and 56166 T-Connector wiring kit from e-Trailer.com.
There are no holes to be drilled and/or tapped. Novice to intermediate mechanical/electrical skill level.
Wat je nodig hebt
-
-
The Curt 56166 T-connector wiring kit comes everything I needed for this installation.
-
-
-
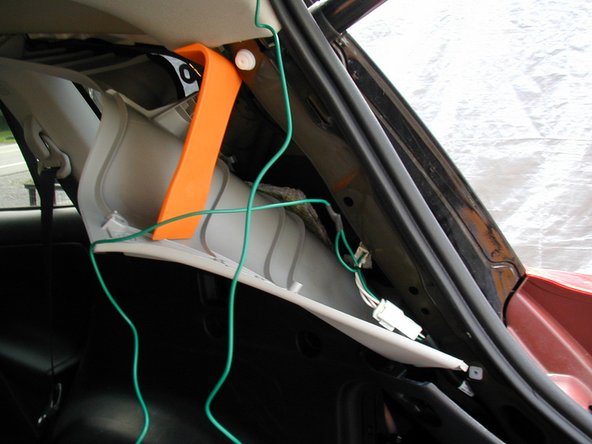
With the JBL speaker on the driver’s side, it made accessing the wiring a bit tougher. (NOTE: The picture that came with the instructions shows the harness being accessed by removing the small vented panels. This is not accurate. The harness is located up higher and behind the rear trim.)
-
-
-
Above the side panels are the rear trim panels that the plastic tools can be pried with one of the plastic tools. The top plastic rivets are tough and may slip out of the panels, but you can pop them out and slide them back on to the panel. Once those are free, you can see the light harnesses on both sides.
-
-
-
Once the side panel is free, you can see the lighting harness. Do the same on the passenger side. (NOTE: The picture that came with the wiring instructions shows the harness being accessed by removing the small vented panels. This is not accurate. The harness is located up higher and behind the rear trim.)
-
-
-
-
The converter box can be attached to the rear post with the 2-sided tape that came with the kit. By removing one of the bolts of the speaker assembly, the grounding wire can be slid between the assembly and frame and the bolt re-inserted to provide a ground. (If no speaker, a hole exists to insert a hex head bolt)
-
-
-
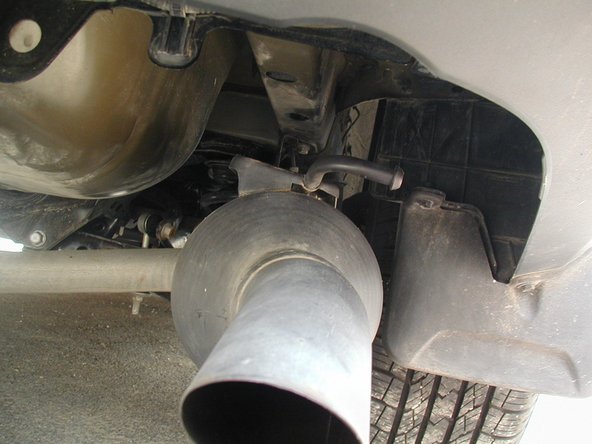
Looking from the underside of the rear metal bumper assembly, I found a rectangular rubber insert which can be removed. The connector to the trailer hitch and wire to the battery can exit the hatch area without any drilling of holes or removing the rubber plugs from the cargo pit. Thread both wires down and through the post connecting the bumper.
-
-
-
Once in the engine compartment, remove the negative terminal. Attach one of the red fuse link wires to the 12g wire with the remaining straight connector and the other part of the fuse link to the battery positive side using the round connector. Insert the fuse. Re-attach the negative terminal and check with trailer wire tester.
-


Accessing and installing the wiring is the most difficult part of this project, so it will take the longest to do. The small cost of the plastic tool kit is worth the investment to reduce damaging the vinyl and plastic interior parts. The advantage of this IFIXIT project is that you have access to your vehicle throughout in case you need it.
Accessing and installing the wiring is the most difficult part of this project, so it will take the longest to do. The small cost of the plastic tool kit is worth the investment to reduce damaging the vinyl and plastic interior parts. The advantage of this IFIXIT project is that you have access to your vehicle throughout in case you need it.
Annuleren: ik heb deze handleiding niet afgemaakt.
3 andere personen hebben deze handleiding voltooid.
2 opmerkingen
Our full-service NYC towing company gives busy drivers the help that they need when they need it so they can get back to work and back on schedule fast.
I sincerely appreciate your assistance on my achievement on such subject. I sincerely appreciate the information you provided regarding my areas for improvement; this knowledge will help me much in how I tackle our upcoming assignment. I appreciate your advice, and I'm hoping we can soon discover additional chances for input.