Deze versie kan foutieve bewerkingen bevatten. Schakel over naar de recentste gecontroleerde momentopname.
Wat je nodig hebt
-
-
Verwijder de volgende 10 schroeven uit de onderste behuizing van de MacBook Pro 13" Unibody:
-
Zeven 3 mm lange kruiskopschroeven.
-
Drie 13.5 mm lange kruiskopschroeven.
-
-
-
Til de voorkant onderste behuizing iets omhoog en duw de behuizing richting de achterkant van de laptop om de behuizing volledig los te krijgen.
-
-
Deze stap is niet vertaald. Help het te vertalen
-
Use the flat end of a spudger to lift the battery connector up out of its socket on the logic board.
-
-
Deze stap is niet vertaald. Help het te vertalen
-
Remove the soft padding that may be on top and gently pull the connector up out of its socket on the logic board.
-
-
Deze stap is niet vertaald. Help het te vertalen
-
Pull the camera cable connector toward the optical drive to disconnect it from the logic board.
-
-
Deze stap is niet vertaald. Help het te vertalen
-
Use the flat end of a spudger to pry the optical drive connector straight up off the logic board.
-
-
Deze stap is niet vertaald. Help het te vertalen
-
Use the flat end of a spudger to pry the hard drive connector straight up off the logic board.
-
-
-
Deze stap is niet vertaald. Help het te vertalen
-
Remove the following screws securing the subwoofer to the upper case:
-
One 3.8 mm Phillips screw
-
One 5 mm Phillips screw
-
-
Deze stap is niet vertaald. Help het te vertalen
-
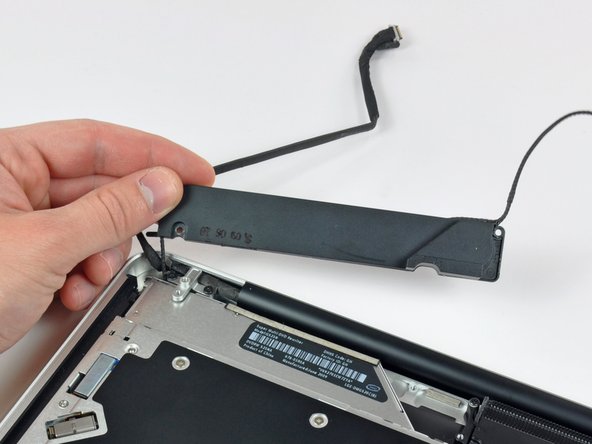
Lift the subwoofer off the optical drive, and set it above the computer.
-
-
Deze stap is niet vertaald. Help het te vertalen
-
Remove the two 10 mm Phillips screws securing the camera cable bracket to the upper case.
-
Lift the camera cable bracket out of the upper case.
-
-
Deze stap is niet vertaald. Help het te vertalen
-
Remove the three 2.5 mm Phillips screws securing the optical drive to the upper case.
-
Lift the optical drive from its right edge and pull it out of the computer.
-
-
Deze stap is niet vertaald. Help het te vertalen
-
Remove the optical drive cable by pulling it straight away from the optical drive.
-
-
Deze stap is niet vertaald. Help het te vertalen
-
Remove the two black Phillips #0 screws securing the small metal mounting bracket. Transfer this bracket to your new optical drive or hard drive enclosure.
-
-
Deze stap is niet vertaald. Help het te vertalen
-
Remove the plastic spacer from the optical bay hard drive enclosure by pressing in on one of the clips on either side and lifting it up and out of the enclosure.
-
-
Deze stap is niet vertaald. Help het te vertalen
-
Make sure that the hard drive connectors are facing down before placing it into the enclosure.
-
Gently place the hard drive into the enclosure's hard drive slot.
-
While firmly holding the enclosure in place with one hand, use your other hand to press the hard drive into the enclosure connectors.
-
-
Deze stap is niet vertaald. Help het te vertalen
-
Once the hard drive is snug, reinsert the plastic spacer while holding the hard drive against the bottom of the enclosure.
-
-
Deze stap is niet vertaald. Help het te vertalen
-
Use two Phillips #1 screws to secure the drive to its enclosure.
-
-
Deze stap is niet vertaald. Help het te vertalen
-
Attach the optical drive bracket to the new enclosure with two Phillips #0 screws.
-
Reconnect any cables you have removed from the original optical drive onto the optical bay enclosure.
-
-
Deze stap is niet vertaald. Help het te vertalen
-
Align the cable's SATA connector with the drive's port and plug in securely.
-
Plug the USB connector into your laptop and your optical drive is ready for use.
-
Annuleren: ik heb deze handleiding niet afgemaakt.
106 andere personen hebben deze handleiding voltooid.
4 opmerkingen
I bought a 1TB SSD/hybrid drive from Ifixit.com to upgrade the 256GB HDD that came with MBP 2010. Disk Utility could not see the new drive on the original HDD cable but saw the old one just fine. New replacement cable was not the correct size for the MBP 2010 but worked just fine in my other MBP 2012. Put the stock HDD back in with the original HDD cable, removed the optical drive and replaced with the 1TB dual drive per instructions without problems. I have read online that the SATA HDD cable in MBP 2009 and early 2010 was too slow to read modern high-speed SATA drives.
Only glitch I found is DVD/CDs will not mount in the optical drive using the external USB cable that came with the dual disk kit purchased here. Will eventually have to find time to try swapping the optical drive with my other laptop to test internally as well as the external cable. At this point I don't care, didn't use the optical, love the two working internal disk drives. Thanks guys!
I replaced Primary HDD with SSD and moved HDD to optical slot with caddy, and it seems works, but HDD in optical slot is incredibly slow now. Macbook 7.1. Sierra. SSD Savage 250Gb.
Smoooooth, like butta. Thanks for another great guide and parts. My 2010 macbook pro now has an ssd running fast w sierra, and my conventional drive for lots of storage. About $200 for ssd and the parts, and my computer will be in good shape for a few more years!


