Inleiding
There are many benefits to adding a second hard drive to your laptop such as improved speeds, greater storage space, and less heartache when installing new software. Use this guide to install one using our optical bay hard drive enclosure.
Wat je nodig hebt
-
-
Remove the following ten screws:
-
Three 14.4 mm Phillips #00 screws
-
Three 3.5 mm Phillips #00 screws
-
Four 3.5 mm shouldered Phillips #00 screws
-
-
-
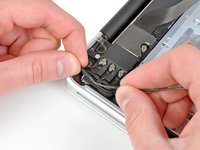
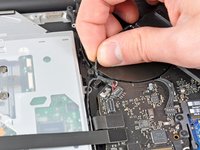
Use the edge of a spudger to pry the battery connector upwards from its socket on the logic board.
-
-
-
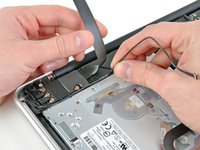
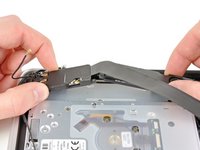
Use the flat end of a spudger to pry the AirPort/Bluetooth ribbon cable connector up from its socket on the logic board.
-
-
-
-
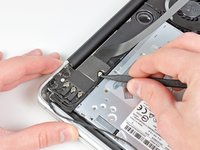
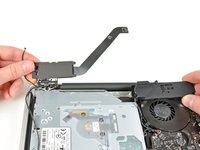
Pull the optical drive cable away from the optical drive.
-
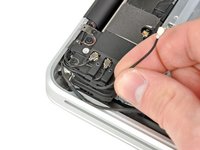
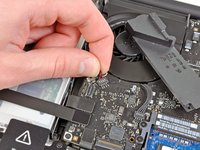
Remove the two black Phillips #0 screws securing the small metal mounting bracket. Transfer this bracket to your new optical drive or hard drive enclosure.
-
-
-
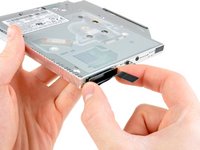
Remove the plastic spacer from the optical bay hard drive enclosure by pressing in on one of the clips on either side and lifting it up and out of the enclosure.
-
-
-
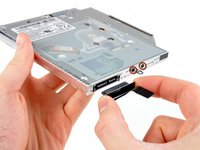
Make sure that the hard drive connectors are facing down before placing it into the enclosure.
-
Gently place the hard drive into the enclosure's hard drive slot.
-
While firmly holding the enclosure in place with one hand, use your other hand to press the hard drive into the enclosure connectors.
-


To reassemble your device, follow these instructions in reverse order.
To reassemble your device, follow these instructions in reverse order.
Annuleren: ik heb deze handleiding niet afgemaakt.
96 andere personen hebben deze handleiding voltooid.


5 opmerkingen
Thank you very much for this guide. The whole process is easier than expected.
That guide just saved my Macbook Pro. The disk, when installed at its regular place, was not working anymore (read-only somehow, or completely invisible) while it was perfectly working when connected through USB. So I'm not using this as a second disk but as my primary disk and it's working nicely. Ok, it may sound as if it is the beginning of the end for my late 2011 Macbook Pro, but this gives me time to be able to afford a replacement. Thanks!
Did you try to replace the hard drive cable? MacBook Pro 13" Unibody Late 2011 Hard Drive Cable Replacement
This was likely the problem of the logic board not recognizing your hard drive in its original location.
I followed the above guide and now have an additional 500Gb disk space. Winning!
FYI - you don't have to remove all those camera cables, you can push them aside carefully and still get to the screw underneath.
Thanks for the guide - it worked flawlessly
I placed old hard drive in “optiBay” enclosure and Samsung 840 EVO 120GB instead of main hard drive.
I had data backup done earlier, so I opted in for complete wipe/format - booted into recovery mode - installed fresh OS, I’m keeping my OS and apps on the SSD and home folder on HDD. It boots up very fast, apps are starting up like crazy