Ga door naar hoofdinhoud

Infant Optics DXR-8 Monitor Replacement

Gearchiveerde handleiding
Deze handleiding wordt enkel nog bijgehouden voor historische doeleinden. Gebruik de laatste versie van deze gids om uw reparatie uit te voeren.

Wat je nodig hebt

  1. Infant Optics DXR-8 Monitor Replacement, Monitor: stap 1, afbeelding 1 van 1
    • Start by gently inserting the plastic opening tool between the led and casing.

  2. Infant Optics DXR-8 Monitor Replacement: stap 2, afbeelding 1 van 1
    • Slowly pry the cover away from the bottom using the plastic opening tool.

  3. Infant Optics DXR-8 Monitor Replacement: stap 3, afbeelding 1 van 1
    • Glide the tool around the entire cover to reveal the screws, which are 5.0 mm.

  4. Infant Optics DXR-8 Monitor Replacement: stap 4, afbeelding 1 van 1
    • Remove the cover and set it aside.

  5. Infant Optics DXR-8 Monitor Replacement: stap 5, afbeelding 1 van 2 Infant Optics DXR-8 Monitor Replacement: stap 5, afbeelding 2 van 2
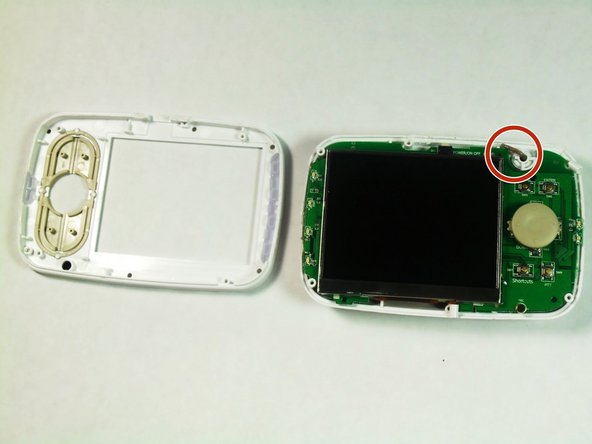
    • Remove the four corner screws, 5.0 mm, using a J1 bit.

    • Lift the top away from the bottom using the metal spudger. Be careful not to rip the antenna wire.

Conclusie

To reassemble your device, follow these instructions in reverse order.

6 andere personen hebben deze handleiding voltooid.

Larsha Johnson

Lid sinds: 08/26/15

526 Reputatie

3 handleidingen geschreven

Team

USF Tampa, Team 6-4, Remmell Fall 2015 Lid van USF Tampa, Team 6-4, Remmell Fall 2015

USFT-REMMELL-F15S6G4

4 Leden

3 handleidingen geschreven

2 opmerkingen

What is the part number for the LCD?

jstarion - Antwoord

From the pictures LQ035NC111 seem to be the part number.

Michael C -

Voeg opmerking toe

Weergavestatistieken:

Afgelopen 24 uren: 0

Afgelopen 7 dagen: 2

Afgelopen 30 dagen: 2

Altijd: 5,830