Ga door naar hoofdinhoud

Imation Superdisk USB Drive Daughter Board Replacement

Wat je nodig hebt

  1. Imation Superdisk USB Drive Daughter Board Replacement, Plastic Housing: stap 1, afbeelding 1 van 2 Imation Superdisk USB Drive Daughter Board Replacement, Plastic Housing: stap 1, afbeelding 2 van 2
    • Flip the device over so the bottom is facing up.

    • You will know it is the bottom because there will be six silver screws visible.

  2. Imation Superdisk USB Drive Daughter Board Replacement: stap 2, afbeelding 1 van 2 Imation Superdisk USB Drive Daughter Board Replacement: stap 2, afbeelding 2 van 2
    • Remove the USB converter device by gently pulling it out.

    • Do not pull the converter device out by the cord.

  3. Imation Superdisk USB Drive Daughter Board Replacement: stap 3, afbeelding 1 van 2 Imation Superdisk USB Drive Daughter Board Replacement: stap 3, afbeelding 2 van 2
    • Remove the six silver screws using a small Phillips head screwdriver.

  4. Imation Superdisk USB Drive Daughter Board Replacement: stap 4, afbeelding 1 van 2 Imation Superdisk USB Drive Daughter Board Replacement: stap 4, afbeelding 2 van 2
    • Slide the bottom plastic panel of the shell down so it is free of the end cap and the top panel.

    • Lift panel free of device.

  5. Imation Superdisk USB Drive Daughter Board Replacement: stap 5, afbeelding 1 van 2 Imation Superdisk USB Drive Daughter Board Replacement: stap 5, afbeelding 2 van 2
    • Remove the plastic end cap by sliding it forward, freeing from the rest of the device.

    • You can identify the end cap by noting the label "SuperDisk Drive" above where you would insert a floppy disk.

  6. Imation Superdisk USB Drive Daughter Board Replacement: stap 6, afbeelding 1 van 2 Imation Superdisk USB Drive Daughter Board Replacement: stap 6, afbeelding 2 van 2
    • Slide the metal housing out of the plastic shell.

  7. Imation Superdisk USB Drive Daughter Board Replacement, Metal Casing: stap 7, afbeelding 1 van 2 Imation Superdisk USB Drive Daughter Board Replacement, Metal Casing: stap 7, afbeelding 2 van 2
    • Slide metal panel out of the metal casing.

  8. Imation Superdisk USB Drive Daughter Board Replacement: stap 8, afbeelding 1 van 2 Imation Superdisk USB Drive Daughter Board Replacement: stap 8, afbeelding 2 van 2
    • Slide disk drive out of metal casing.

  9. Imation Superdisk USB Drive Daughter Board Replacement, Daughter Board: stap 9, afbeelding 1 van 1
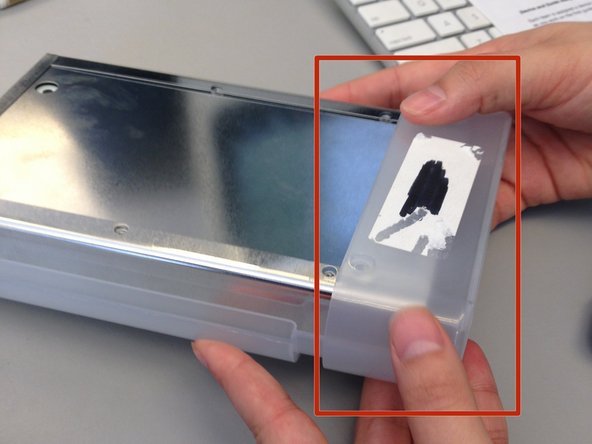
    • Flip the disk drive over so the the plug on the daughter board is visible.

  10. Imation Superdisk USB Drive Daughter Board Replacement: stap 10, afbeelding 1 van 2 Imation Superdisk USB Drive Daughter Board Replacement: stap 10, afbeelding 2 van 2
    • Using an iPod opener put pressure on the white plug and pull backwards until the daughter board unplugs from the main unit.

  11. Imation Superdisk USB Drive Daughter Board Replacement: stap 11, afbeelding 1 van 2 Imation Superdisk USB Drive Daughter Board Replacement: stap 11, afbeelding 2 van 2
    • Gently pull on the daughter board until it separates from the device.

Conclusie

To reassemble your device, follow these instructions in reverse order.

2 andere personen hebben deze handleiding voltooid.

Darlena

Lid sinds: 02/11/14

219 Reputatie

3 handleidingen geschreven

Team

Ohio State, Team 1-2, Buehl Spring 2014 Lid van Ohio State, Team 1-2, Buehl Spring 2014

OSU-BUEHL-S14S1G2

4 Leden

14 handleidingen geschreven

0 opmerkingen

Voeg opmerking toe

Weergavestatistieken:

Afgelopen 24 uren: 2

Afgelopen 7 dagen: 4

Afgelopen 30 dagen: 17

Altijd: 935