Ga door naar hoofdinhoud

Huawei Ideos S7 Slim Logic Board Replacement

Wat je nodig hebt

  1. Huawei Ideos S7 Slim Logic Board Replacement, Battery: stap 1, afbeelding 1 van 3 Huawei Ideos S7 Slim Logic Board Replacement, Battery: stap 1, afbeelding 2 van 3 Huawei Ideos S7 Slim Logic Board Replacement, Battery: stap 1, afbeelding 3 van 3
    • Place the tablet on a flat clear surface to keep the screen safe.

    • Slide the larger portion of the back cover off the tablet.

    • This will reveal the battery.

  2. Huawei Ideos S7 Slim Logic Board Replacement: stap 2, afbeelding 1 van 2 Huawei Ideos S7 Slim Logic Board Replacement: stap 2, afbeelding 2 van 2
    • Lift the battery out with your finger.

    • Make sure you use the slot near the bottom of the device as shown. Trying to lift from anywhere else will not work and may damage the battery or the device.

  3. Huawei Ideos S7 Slim Logic Board Replacement, Logic Board: stap 3, afbeelding 1 van 2 Huawei Ideos S7 Slim Logic Board Replacement, Logic Board: stap 3, afbeelding 2 van 2
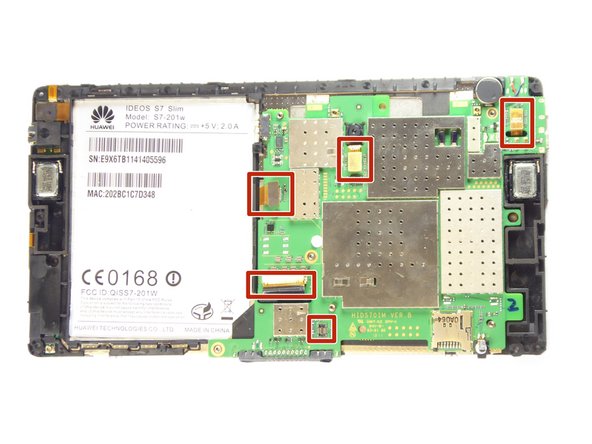
    • Using a plastic opening tool, pry off the top cover casing gently by moving the tool along all three sides.

  4. Huawei Ideos S7 Slim Logic Board Replacement: stap 4, afbeelding 1 van 1
    • With a T5 hexagonal head, remove the nine black 2.5 mm torx screws. Place them carefully aside on the magnetic mat.

  5. Huawei Ideos S7 Slim Logic Board Replacement: stap 5, afbeelding 1 van 3 Huawei Ideos S7 Slim Logic Board Replacement: stap 5, afbeelding 2 van 3 Huawei Ideos S7 Slim Logic Board Replacement: stap 5, afbeelding 3 van 3
    • Using a plastic opening tool, pry off the back casing gently on each side of the tablet.

  6. Huawei Ideos S7 Slim Logic Board Replacement: stap 6, afbeelding 1 van 3 Huawei Ideos S7 Slim Logic Board Replacement: stap 6, afbeelding 2 van 3 Huawei Ideos S7 Slim Logic Board Replacement: stap 6, afbeelding 3 van 3
    • Using a Phillips #00 screwdriver, remove the following screws:

    • Four 5mm wide grey Phillips screws on the logic board.

    • One of the 5mm screws is hidden under the circular white tape in the center of the logic board.

    • Seven 3mm small grey Phillips screws (four on one side, three on the other) from the black side casing.

  7. Huawei Ideos S7 Slim Logic Board Replacement: stap 7, afbeelding 1 van 3 Huawei Ideos S7 Slim Logic Board Replacement: stap 7, afbeelding 2 van 3 Huawei Ideos S7 Slim Logic Board Replacement: stap 7, afbeelding 3 van 3
    • Disconnect the five cables connected to the logic board and then carefully lift the logic board out of the casing.

Conclusie

To reassemble your device, follow these instructions in reverse order.

Één andere persoon heeft deze handleiding voltooid.

Gregory Philip

Lid sinds: 09/21/16

585 Reputatie

4 handleidingen geschreven

Team

UC Davis, Team 1-1, Oliver Fall 2016 Lid van UC Davis, Team 1-1, Oliver Fall 2016

UCD-OLIVER-F16S1G1

5 Leden

10 handleidingen geschreven

0 opmerkingen

Voeg opmerking toe

Weergavestatistieken:

Afgelopen 24 uren: 0

Afgelopen 7 dagen: 1

Afgelopen 30 dagen: 3

Altijd: 633