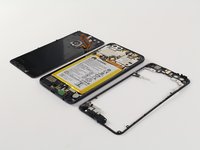
Ga door naar hoofdinhoud

Huawei Honor 8 Rear Facing Camera Replacement

Gearchiveerde handleiding
Deze handleiding wordt enkel nog bijgehouden voor historische doeleinden. Gebruik de laatste versie van deze gids om uw reparatie uit te voeren.

Wat je nodig hebt

  1. Huawei Honor 8 Rear Facing Camera Replacement, Rear Glass & Frame: stap 1, afbeelding 1 van 1
    • Make sure you spend at least 5 minutes heating up the adhesive. Prying off the glass cover too early can result in cracking the panel.

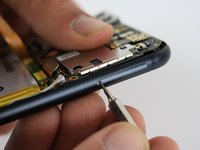
    • Using a heat gun or hairdryer, apply heat approximately three inches above the glass panel to warm up the adhesive around the outside edge of the phone.

    • Make sure to apply heat evenly across the outside edge of the device.

  2. Huawei Honor 8 Rear Facing Camera Replacement: stap 2, afbeelding 1 van 2 Huawei Honor 8 Rear Facing Camera Replacement: stap 2, afbeelding 2 van 2
    • Be careful not to tear the orange ribbon wire when removing the back panel.

    • Using a plastic opening tool, gently pry up a corner of the rear glass panel.

    • Slowly slide the plastic opening tool around the outside of the glass panel to break through the adhesive.

    • Additional plastic opening tools can be used to help separate the back panel from the phone body.

    • Gently lift the back panel off once all the adhesive has been removed.

  3. Huawei Honor 8 Rear Facing Camera Replacement: stap 3, afbeelding 1 van 3 Huawei Honor 8 Rear Facing Camera Replacement: stap 3, afbeelding 2 van 3 Huawei Honor 8 Rear Facing Camera Replacement: stap 3, afbeelding 3 van 3
    • Using a Phillips PH00 screwdriver, remove the silver Phillips 3.5 mm screw circled in red.

    • Using a spudger, gently lift off the small metal tab that was held in place by the screw.

    • Gently pry off the orange ribbon wire on the back panel.

  4. Huawei Honor 8 Rear Facing Camera Replacement: stap 4, afbeelding 1 van 1
    • Keep the tiny screws on a magnetic pad or a designated area so they will not be lost. There are eighteen screws in total.

    • Using a Phillips PH00 screwdriver, remove the eight silver Phillips 3.5 mm screws circled in red.

    • Using a Phillips PH00 screwdriver, remove the six black Phillips 4.0 mm screws circled in orange.

    • Using a Phillips PH00 screwdriver, remove the single silver 3.0 mm Phillips screw circled in yellow.

    • Using the Phillips PH00 screwdriver tip, gently scratch away the white stickers outlined in green circles to expose hidden screws.

    • Using a Phillips PH00 screwdriver, remove the two black Phillips 4.0 mm screws circled in green.

  5. Huawei Honor 8 Rear Facing Camera Replacement: stap 5, afbeelding 1 van 3 Huawei Honor 8 Rear Facing Camera Replacement: stap 5, afbeelding 2 van 3 Huawei Honor 8 Rear Facing Camera Replacement: stap 5, afbeelding 3 van 3
    • Slowly slide the plastic opening tool around the perimeter of the inner lining.

    • Additional plastic opening tools can be used to help separate the inner lining from the phone body.

    • Gently pull the inner lining up to remove it from the phone body.

  6. Huawei Honor 8 Rear Facing Camera Replacement, Motherboard: stap 6, afbeelding 1 van 3 Huawei Honor 8 Rear Facing Camera Replacement, Motherboard: stap 6, afbeelding 2 van 3 Huawei Honor 8 Rear Facing Camera Replacement, Motherboard: stap 6, afbeelding 3 van 3
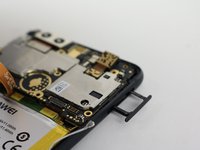
    • Holding the phone so that the cameras are at the top, locate the small hole on the top right edge of the device.

    • Using the 0.8 mm Sim Eject tool, push down on the small hole to release the Sim Card tray.

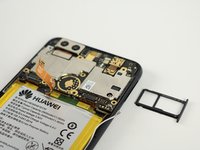
    • Gently pull out the Sim Card tray and set it aside.

  7. Huawei Honor 8 Rear Facing Camera Replacement: stap 7, afbeelding 1 van 1
    • In the following steps you will disconnect the five connectors circled in red holding the motherboard in place.

  8. Huawei Honor 8 Rear Facing Camera Replacement: stap 8, afbeelding 1 van 2 Huawei Honor 8 Rear Facing Camera Replacement: stap 8, afbeelding 2 van 2
    • Gently pull the small ribbon connection between the battery and motherboard upward to disconnect it.

    • Use a spudger to help pry off the connection if necessary.

  9. Huawei Honor 8 Rear Facing Camera Replacement: stap 9, afbeelding 1 van 1
    • Use a spudger to gently pry off the small antenna cable on the right side of the motherboard.

  10. Huawei Honor 8 Rear Facing Camera Replacement: stap 10, afbeelding 1 van 2 Huawei Honor 8 Rear Facing Camera Replacement: stap 10, afbeelding 2 van 2
    • Using a spudger, gently pry up the small connection that holds the motherboard in place.

  11. Huawei Honor 8 Rear Facing Camera Replacement: stap 11, afbeelding 1 van 1
    • Using a spudger, gently pry up the connector near the left edge of the motherboard.

  12. Huawei Honor 8 Rear Facing Camera Replacement: stap 12, afbeelding 1 van 1
    • Use a spudger to gently pry off the small connection on the far left edge of the motherboard.

  13. Huawei Honor 8 Rear Facing Camera Replacement: stap 13, afbeelding 1 van 2 Huawei Honor 8 Rear Facing Camera Replacement: stap 13, afbeelding 2 van 2
    • Use a spudger to pry up a corner of the motherboard.

    • Lift the motherboard to remove it from the body of the phone.

  14. Huawei Honor 8 Rear Facing Camera Replacement, Rear Facing Camera: stap 14, afbeelding 1 van 2 Huawei Honor 8 Rear Facing Camera Replacement, Rear Facing Camera: stap 14, afbeelding 2 van 2
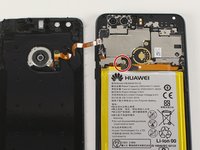
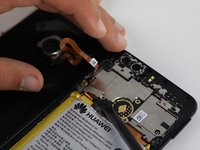
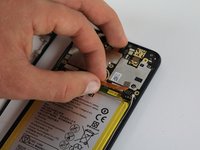
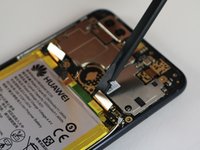
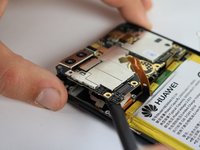
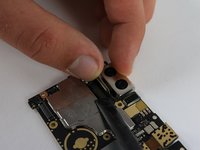
    • Using a spudger, gently pry off the connection between the dual rear cameras and the motherboard.

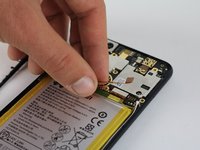
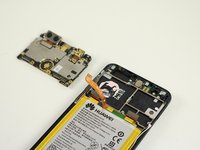
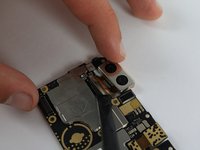
    • Lift the cameras away from the motherboard.

Conclusie

To reassemble your device, follow these instructions in reverse order.

3 andere personen hebben deze handleiding voltooid.

Jaret Wedow

Lid sinds: 09/25/17

1.752 Reputatie

4 handleidingen geschreven

Team

Cal Poly, Team S18-G2, Forte Fall 2017 Lid van Cal Poly, Team S18-G2, Forte Fall 2017

CPSU-FORTE-F17S18G2

4 Leden

24 handleidingen geschreven

0 opmerkingen

Voeg opmerking toe

Weergavestatistieken:

Afgelopen 24 uren: 0

Afgelopen 7 dagen: 0

Afgelopen 30 dagen: 2

Altijd: 465