Ga door naar hoofdinhoud

Deze versie kan foutieve bewerkingen bevatten. Schakel over naar de recentste gecontroleerde momentopname.

Wat je nodig hebt

  1. Deze stap is niet vertaald. Help het te vertalen

    : stap 1, afbeelding 1 van 3 : stap 1, afbeelding 2 van 3 : stap 1, afbeelding 3 van 3
    • First you want to see how many thermal pads there are and locate their position.

    • The pads may either stick to the frame, the motherboard or broke in two.

    • Remember, you just need to place new pads on either the motherboard or the frame.

    • On some frames there may be markings giving you also an idea of the size and position for the new pads.

  2. Deze stap is niet vertaald. Help het te vertalen

    : stap 2, afbeelding 1 van 3 : stap 2, afbeelding 2 van 3 : stap 2, afbeelding 3 van 3
    • Grab your new piece of thermal pad and cut it to the sizes you need using a pair of scissors.

    • Some residue might cover a larger area than the marking which is due to the fact that the thermal pad will be squished down flat. In this case stick to the size of the marking for the new pad not the size of the residue.

  3. Deze stap is niet vertaald. Help het te vertalen

    : stap 3, afbeelding 1 van 3 : stap 3, afbeelding 2 van 3 : stap 3, afbeelding 3 van 3
    • If you are replacing the frame (e.g. in a display assembly with frame guide) you can skip this step since your new part should be clean.

    • Scrape off the old thermal pads with an opening tool or a spudger.

    • If you want to go the extra mile you can clean the rest with a Q-tip and some isopropyl alcohol (>97%).

  4. Deze stap is niet vertaald. Help het te vertalen

    : stap 4, afbeelding 1 van 3 : stap 4, afbeelding 2 van 3 : stap 4, afbeelding 3 van 3
    • Carefully scrape off the thermal pads and the remains with an opening tool or a spudger.

    • Apply only little pressure to not damage any components on the motherboard in case you might slip with the tool. Also make sure you do not press the thermal pads in between small components as it is very cumbersome to get them out afterwards.

    • You might want to clean any remaining residue with a Q-tip and some isopropyl alcohol (>97%).

    • Be sure to only dab on the small components so the fibers of the Q-tip won't get caught.

  5. Deze stap is niet vertaald. Help het te vertalen

    : stap 5, afbeelding 1 van 3 : stap 5, afbeelding 2 van 3 : stap 5, afbeelding 3 van 3
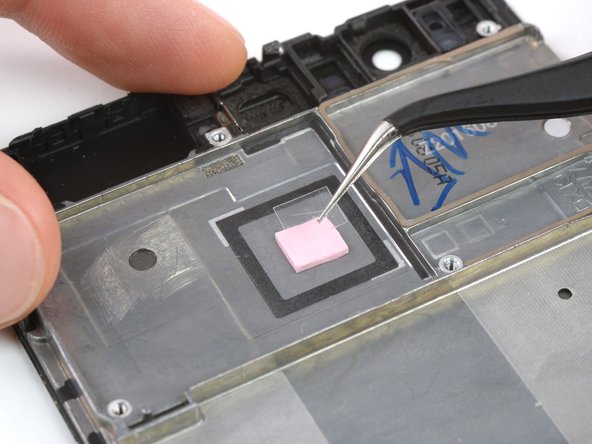
    • Repeat for every thermal pad:

    • Remove the film from one side of the thermal pad.

    • Place the thermal pad on the frame and press it down a little to make sure it sticks.

    • Remove the remaining film from the thermal pad.

  6. Deze stap is niet vertaald. Help het te vertalen

    : stap 6, afbeelding 1 van 1
    • When you have placed every thermal pad and removed the top film you can reassemble your device.

Eindstreep

5 andere personen hebben deze handleiding voltooid.

Tobias Isakeit

Lid sinds: 03/31/14

117.504 Reputatie

188 handleidingen geschreven

Team

Master Techs Lid van Master Techs

Community

322 Leden

2.528 handleidingen geschreven

0 opmerkingen

Voeg opmerking toe

Weergavestatistieken:

Afgelopen 24 uren: 3

Afgelopen 7 dagen: 39

Afgelopen 30 dagen: 178

Altijd: 13,845