Ga door naar hoofdinhoud

How to Tie a Tie: Trinity

Wat je nodig hebt

  1. How to Tie a Tie: Trinity, Preparation: stap 1, afbeelding 1 van 1
    • Fold the collar of your shirt up.

  2. How to Tie a Tie: Trinity: stap 2, afbeelding 1 van 1
    • Wrap the tie around the back of your neck with the wide end on the left side of your body and the narrow end on the right side.

    • The narrow end of the tie will be your active end.

    • Note: The wide end of the tie should be around the height of your belly button or a little higher. It may need to adjusted for personal height.

  3. How to Tie a Tie: Trinity, Tying: stap 3, afbeelding 1 van 1
    • Take the active end and it cross over the wide end, so it is pointing to the left.

    • Note: be sure that the tie always lays flat so that there are no twists in the fabric.

    • Note: Be sure to keep this wrap and all subsequent wraps tight against one another.

  4. How to Tie a Tie: Trinity: stap 4, afbeelding 1 van 2 How to Tie a Tie: Trinity: stap 4, afbeelding 2 van 2
    • Wrap active end under the left side and up through the neck loop, so that it points up.

  5. How to Tie a Tie: Trinity: stap 5, afbeelding 1 van 2 How to Tie a Tie: Trinity: stap 5, afbeelding 2 van 2
    • Wrap the active end over the left side again, so that it now points down.

  6. How to Tie a Tie: Trinity: stap 6, afbeelding 1 van 1
    • Wrap the active end under the wide end of the tie, so that it now points towards the right.

  7. How to Tie a Tie: Trinity: stap 7, afbeelding 1 van 1
    • Wrap the active end over the knot, so that it now points up.

  8. How to Tie a Tie: Trinity: stap 8, afbeelding 1 van 1
    • Wrap the active end down through the neck loop, and pull to the left side, so that it now points left.

  9. How to Tie a Tie: Trinity: stap 9, afbeelding 1 van 1
    • Wrap the active end over the wide end of your tie.

    • Note: leave this wrap a little loose as it will be used in step 11.

  10. How to Tie a Tie: Trinity: stap 10, afbeelding 1 van 1
    • Wrap the active end under the right side and up through the neck loop, so that it points up.

  11. How to Tie a Tie: Trinity: stap 11, afbeelding 1 van 2 How to Tie a Tie: Trinity: stap 11, afbeelding 2 van 2
    • Pull the active end down through the wrap you made in step 9 (see picture 2). Then pull the active end so that it points left.

    • Note: leave this new wrap a little loose as it will be used in step 13.

  12. How to Tie a Tie: Trinity: stap 12, afbeelding 1 van 2 How to Tie a Tie: Trinity: stap 12, afbeelding 2 van 2
    • Wrap the active end under the wide tie to the right, so that the active end is pointing right.

    • Note: be sure that is tucked completely behind the wide end.

  13. How to Tie a Tie: Trinity: stap 13, afbeelding 1 van 3 How to Tie a Tie: Trinity: stap 13, afbeelding 2 van 3 How to Tie a Tie: Trinity: stap 13, afbeelding 3 van 3
    • Wrap active end over the knot and pull through the diagonal wrap you made in step 11 (see picture 3).

  14. How to Tie a Tie: Trinity, Finishing: stap 14, afbeelding 1 van 1
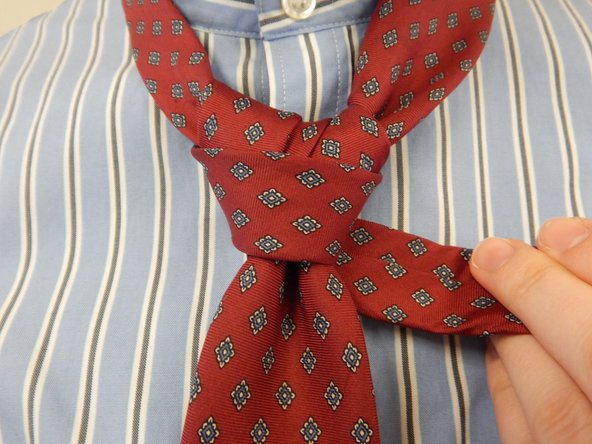
    • Tighten the neck knot by holding the knot and pulling on the narrow end of the tie away from you.

  15. How to Tie a Tie: Trinity: stap 15, afbeelding 1 van 1
    • Tighten the neck loop by pulling down on the wide end of the tie and sliding the knot up toward your neck.

  16. How to Tie a Tie: Trinity: stap 16, afbeelding 1 van 3 How to Tie a Tie: Trinity: stap 16, afbeelding 2 van 3 How to Tie a Tie: Trinity: stap 16, afbeelding 3 van 3
    • Tuck the rest of the narrow end into your collar and fold your collar down.

Conclusie

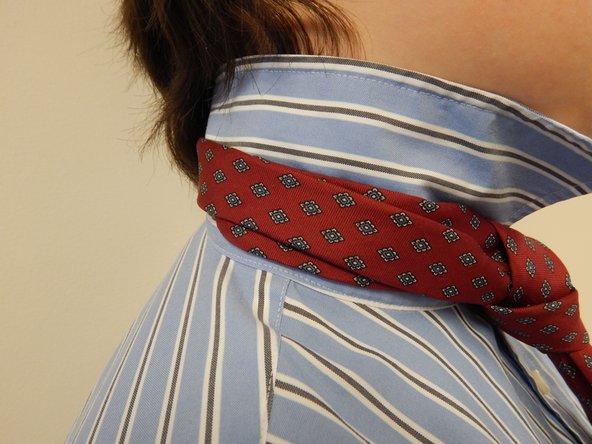
Congratulations! You've successful tied the Trinity knot!

2 andere personen hebben deze handleiding voltooid.

Electric Warthogs

Lid sinds: 03/19/17

776 Reputatie

3 handleidingen geschreven

Team

The Electric Warthogs Lid van The Electric Warthogs

Community

3 Leden

5 handleidingen geschreven

0 opmerkingen

Voeg opmerking toe

Weergavestatistieken:

Afgelopen 24 uren: 2

Afgelopen 7 dagen: 8

Afgelopen 30 dagen: 22

Altijd: 495