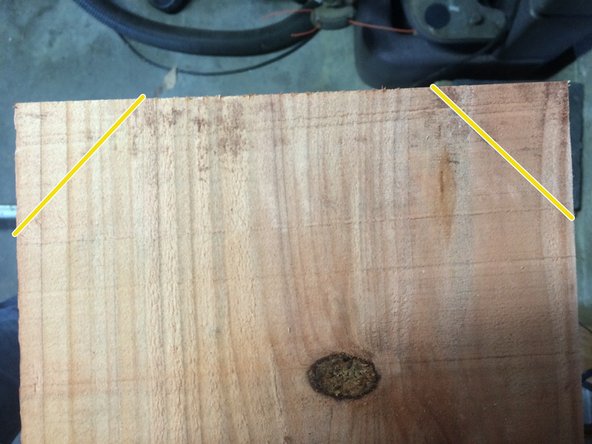
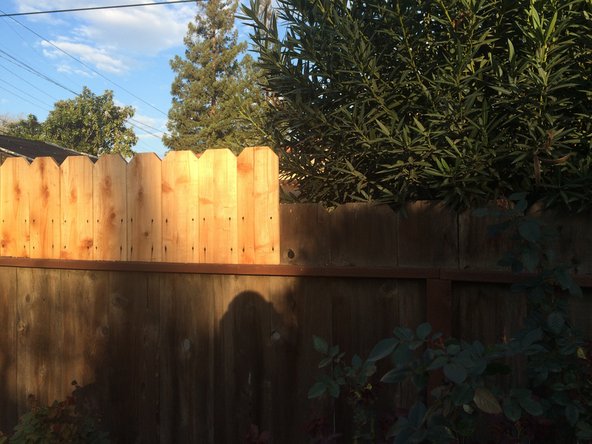
Ga door naar hoofdinhoud

How to Add Privacy to a Wood Fence

Wat je nodig hebt

  1. How to Add Privacy to a Wood Fence, How to Add Privacy to a Wood Fence: stap 1, afbeelding 1 van 1
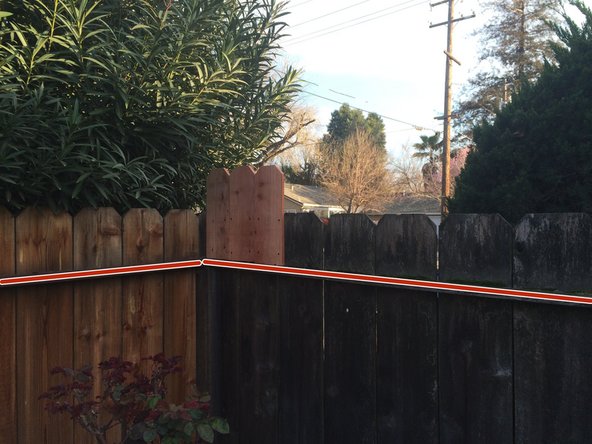
    • After buying my home, I realized that anybody could walk by my back fence and look right into my backyard. I'm sure I'm not the only one who feels a little uneasy about such a lack of privacy.

  2. How to Add Privacy to a Wood Fence: stap 2, afbeelding 1 van 1
    • To add privacy and provide stability to an older fence, I headed to my local hardware store and bought a few fence boards. The boards pictured cost $3.85 a board and, depending on how tall you need your boards cut, one fence board provides approximately three privacy boards.

  3. How to Add Privacy to a Wood Fence: stap 3, afbeelding 1 van 2 How to Add Privacy to a Wood Fence: stap 3, afbeelding 2 van 2
    • Once I purchased my boards, it was time to cut them. I used a miter saw, but a hand saw works just fine. In order to find the length of your privacy boards, measure from the top rail of your existing fence to the future height that you would like to extend your fence.

  4. How to Add Privacy to a Wood Fence: stap 4, afbeelding 1 van 2 How to Add Privacy to a Wood Fence: stap 4, afbeelding 2 van 2
    • Once you have your measurement, mark your board (measure twice, cut once) and then make your cut.

  5. How to Add Privacy to a Wood Fence: stap 5, afbeelding 1 van 3 How to Add Privacy to a Wood Fence: stap 5, afbeelding 2 van 3 How to Add Privacy to a Wood Fence: stap 5, afbeelding 3 van 3
    • After you mark the board in order to notch it, move your miter saw to a 45 degree angle to make the first cut.

    • Then flip the board and shift the saw to make the second cut.

  6. How to Add Privacy to a Wood Fence: stap 6, afbeelding 1 van 1
    • You should now have a board that is ready to be installed (I suggest doing as many as you need and then installing them rather than doing one at a time).

  7. How to Add Privacy to a Wood Fence: stap 7, afbeelding 1 van 2 How to Add Privacy to a Wood Fence: stap 7, afbeelding 2 van 2
    • Using a drill and screws (any screws will work, but for aesthetics, I suggest deck screws). I use a four-screw pattern simply for looks and stability, but it is up to you how you would like to attach your new privacy boards.

  8. How to Add Privacy to a Wood Fence: stap 8, afbeelding 1 van 1
    • Voila! Your backyard has transformed into a personal/private oasis. Congratulations! Enjoy your newfound security and privacy (plus it was cheap).

Conclusie

This is a fun and easy weekend project, so if you have little ones around that you are trying to teach creativity or woodworking to, have them help out. Remember, safety should be your #1 priority. Enjoy.

4 andere personen hebben deze handleiding voltooid.

Brett

Lid sinds: 02/19/15

236 Reputatie

1 Handleiding geschreven

Team

CSU Stanislaus, Team 1-2, Moberly Winter 2015 Lid van CSU Stanislaus, Team 1-2, Moberly Winter 2015

CSUS-MOBERLY-W15S1G2

4 Leden

1 handleiding geschreven

Één opmerking

Great idea, for added privacy & security.

Jose - Antwoord

Voeg opmerking toe

Weergavestatistieken:

Afgelopen 24 uren: 1

Afgelopen 7 dagen: 9

Afgelopen 30 dagen: 54

Altijd: 6,617