Deze versie kan foutieve bewerkingen bevatten. Schakel over naar de recentste gecontroleerde momentopname.
Wat je nodig hebt
-
Deze stap is niet vertaald. Help het te vertalen
-
Open the Visor Edge and place it on a table facing down.
-
Gently push the tab that connects the flip cover (top half) to the PDA (bottom half) upward, lift the pieces apart to detach them.
-
-
Deze stap is niet vertaald. Help het te vertalen
-
Remove the six 4.1 mm Phillips screws from the back plate using the #00 Phillips Scewdriver.
-
-
Deze stap is niet vertaald. Help het te vertalen
-
Remove the four 2.6 mm Philips screws that are on the sides of the frame.
-
Remove the 3.9 mm Philips screw holding the stylus holster to the frame.
-
-
Deze stap is niet vertaald. Help het te vertalen
-
Remove the four 2.6 mm Philips screws on the top and bottom of the frame.
-
-
Deze stap is niet vertaald. Help het te vertalen
-
Gently remove the white frame from the back of the PDA.
-
-
Deze stap is niet vertaald. Help het te vertalen
-
Gently use your finger or tweezers to push the brown lock away from the side of the circuit board that is holding the ribbon cable.
-
Remove the ribbon cable with tweezers.
-
-
Deze stap is niet vertaald. Help het te vertalen
-
Using the tweezers, pull back the ribbon cable on the top of the device.
-
-
Deze stap is niet vertaald. Help het te vertalen
-
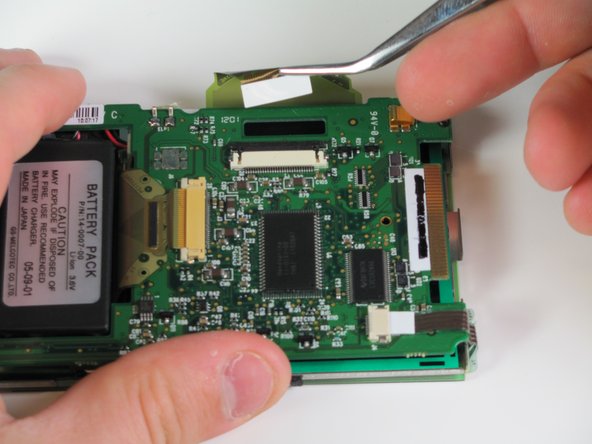
Using the same technique as with the other ribbons, locate and disconnect the ribbon cable above the battery pack.
-
-
Deze stap is niet vertaald. Help het te vertalen
-
Remove the four 3.6 mm Phillips #00 screws located at each corner of the device.
-
-
Deze stap is niet vertaald. Help het te vertalen
-
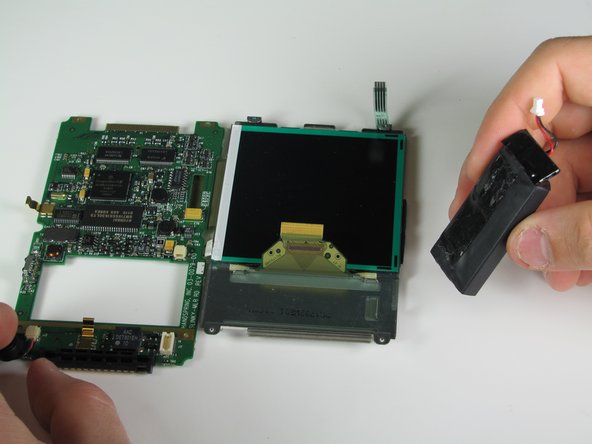
Carefully separate the circuit board and the screen. (Be careful of soldered wires when separating)
-
Disconnect the wire that connects the battery pack to the motherboard using tweezers.
-
-
Deze stap is niet vertaald. Help het te vertalen
-
Wedge the spudger under the battery to pry it apart from the adhesive.
-


Team

Cal Poly, Team 11-28, Maness Winter 2011 Lid van Cal Poly, Team 11-28, Maness Winter 2011
CPSU-MANESS-W11S11G28
4 Leden
7 handleidingen geschreven