Deze handleiding heeft recentere wijzigingen. Schakel over naar de nieuwste niet-geverifieerde versie.
Inleiding
This guide describes the steps to separate the HTC myTouch motherboard from the glass screen for replacement or repair. This guide will require you to unscrew a T5 Torx screw with a VOID label. Unfastening this screw will void any warranty the phone may have.
Wat je nodig hebt
-
-
Press both thumbs on each side of the upper corners, and apply pressure in a downward motion.
-
While applying pressure, slide the back cover down.
-
-
-
Remove the four 6-mm T5 torx screws located at the four corners on the back of the phone.
-
Remove the two 4-mm T5 torx screws located at the middle of the back of the phone.
-
-
-
Dislodge the antenna cover from the phone.
-
Pull out the antenna cover to access the motherboard.
-
-
-
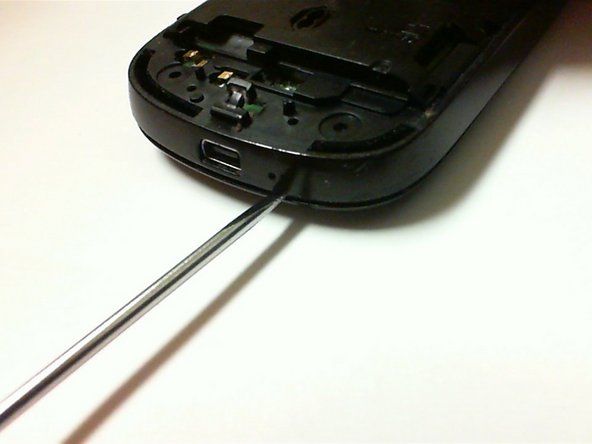
Insert a precision flathead screwdriver into the slit between the frame and cover, and push downward to dislodge the back plate from the phone.
-
Use the screwdriver to go around the edges of the phone to further dislodge the back plate.
-
-
-
Remove the 3-mm Phillips head screw located on the side of the bottom left-hand corner of the phone.
-
Remove the 3-mm Phillips head screw located on the top right-hand corner of the phone.
-
-
-
Place a finger between the circuit board and front cover, and lift up gently.
-
Separate the circuit board from the front cover and screen. A ribbon cable should detach.
-
Finish separating the circuit board from the front panel.
-


To reassemble your device, follow these instructions in reverse order.
To reassemble your device, follow these instructions in reverse order.
Annuleren: ik heb deze handleiding niet afgemaakt.
2 andere personen hebben deze handleiding voltooid.
Team

Cal Poly, Team 2-9, Propen Fall 2012 Lid van Cal Poly, Team 2-9, Propen Fall 2012
CPSU-PROPEN-F12S2G9
3 Leden
10 handleidingen geschreven