Deze versie kan foutieve bewerkingen bevatten. Schakel over naar de recentste gecontroleerde momentopname.
Wat je nodig hebt
-
Deze stap is niet vertaald. Help het te vertalen
-
Press both thumbs on each side of the upper corners, and apply pressure in a downward motion.
-
While applying downward pressure, slide the back cover down and off the phone.
-
-
Deze stap is niet vertaald. Help het te vertalen
-
Push the SD card in to eject it.
-
Pull the SD card out.
-
-
Deze stap is niet vertaald. Help het te vertalen
-
Remove the four 6 mm T5 Torx screws from the four corners on the back of the phone.
-
Remove the two 4 mm T5 Torx screws from the middle of the back of the phone.
-
-
Deze stap is niet vertaald. Help het te vertalen
-
Pull out the antenna cover to access the motherboard.
-
-
-
Deze stap is niet vertaald. Help het te vertalen
-
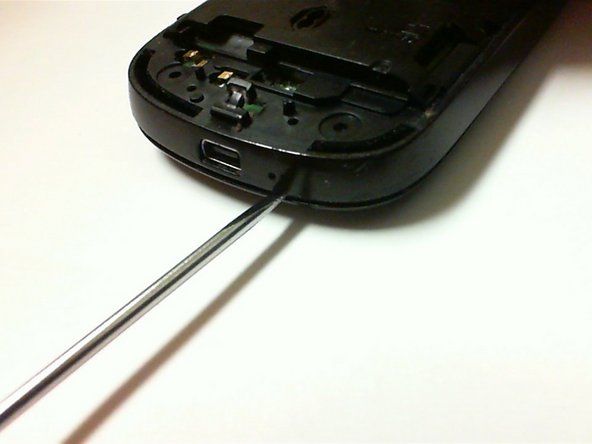
Insert a spudger into the gap between the frame and cover. Push downward with the spudger to separate the back plate from the phone.
-
With the spudger in the gap between the frame and cover, move the spudger around the edge of the of the phone to finish removing the back plate.
-
-
Deze stap is niet vertaald. Help het te vertalen
-
Remove the 3 mm Phillips screw located on the side of the bottom left-hand corner of the phone.
-
Remove the 3 mm Phillips screw located on the top right-hand corner of the phone.
-
-
Deze stap is niet vertaald. Help het te vertalen
-
Place a finger between the circuit board and front cover, and lift the circuit board gently.
-
Separate the circuit board from the front cover and screen to access the ribbon cable holding them together. Detach the ribbon cable.
-
Finish separating the circuit board from the front panel.
-
-
Deze stap is niet vertaald. Help het te vertalen
-
Turn the device housing the circuit boards over to the side with the mounted camera.
-
Remove the three 3 mm Phillips head screws located on the top circuit board.
-
-
Deze stap is niet vertaald. Help het te vertalen
-
Locate the ribbon cable on the top circuit board.
-
Use a precision screwdriver to flip open the ribbon cable.
-
-
Deze stap is niet vertaald. Help het te vertalen
-
Locate the two wired connections on the top circuit board.
-
-
Deze stap is niet vertaald. Help het te vertalen
-
Remove the wired connections by using a squeeze-and-pull action.
-
-
Deze stap is niet vertaald. Help het te vertalen
-
Slowly lift the circuit board from the left.
-
Continue to flip the circuit board all the way over to the right; it will maintain a connection to the device.
-
-
Deze stap is niet vertaald. Help het te vertalen
-
The other side of the camera and circuit board should now be exposed.
-
Disconnect the ribbon cable with a precision screwdriver.
-
Remove the faulty camera and install a new one.
-


Annuleren: ik heb deze handleiding niet afgemaakt.
Één andere persoon heeft deze handleiding voltooid.
Team

Cal Poly, Team 2-9, Propen Fall 2012 Lid van Cal Poly, Team 2-9, Propen Fall 2012
CPSU-PROPEN-F12S2G9
3 Leden
10 handleidingen geschreven