Ga door naar hoofdinhoud

HTC Rhyme Battery Replacement

Wat je nodig hebt

  1. HTC Rhyme Battery Replacement, Removing Back Cover: stap 1, afbeelding 1 van 2 HTC Rhyme Battery Replacement, Removing Back Cover: stap 1, afbeelding 2 van 2
    • Slide the bottom back cover off of the phone.

  2. HTC Rhyme Battery Replacement: stap 2, afbeelding 1 van 1
    • Locate the four screws on the plastic cover and unscrew them.

  3. HTC Rhyme Battery Replacement: stap 3, afbeelding 1 van 2 HTC Rhyme Battery Replacement: stap 3, afbeelding 2 van 2
    • Pry the sticker off from the sides.

    • You can use a metal spudger to do this.

    • Peel the sticker off with your hands.

  4. HTC Rhyme Battery Replacement, Remove the plastic cover: stap 4, afbeelding 1 van 1
    • Remove the plastic cover using your hands.

  5. HTC Rhyme Battery Replacement: stap 5, afbeelding 1 van 1
    • Remove the yellow ribbon.

  6. HTC Rhyme Battery Replacement: stap 6, afbeelding 1 van 3 HTC Rhyme Battery Replacement: stap 6, afbeelding 2 van 3 HTC Rhyme Battery Replacement: stap 6, afbeelding 3 van 3
    • Lift up the blue flaps underneath the battery.

    • Lift up the black flap at the top of the phone.

    • Lift up the black flap at the bottom of the phone.

  7. HTC Rhyme Battery Replacement, Remove the Motherboard: stap 7, afbeelding 1 van 2 HTC Rhyme Battery Replacement, Remove the Motherboard: stap 7, afbeelding 2 van 2
    • Remove all 4 screws.

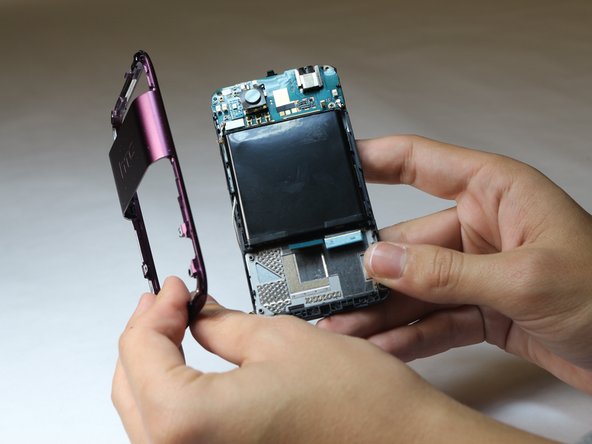
    • Carefully remove the motherboard with your hands.

  8. HTC Rhyme Battery Replacement, Removing the Back Plastic Casing: stap 8, afbeelding 1 van 3 HTC Rhyme Battery Replacement, Removing the Back Plastic Casing: stap 8, afbeelding 2 van 3 HTC Rhyme Battery Replacement, Removing the Back Plastic Casing: stap 8, afbeelding 3 van 3
    • Pry the back plastic casing off with your hands.

  9. HTC Rhyme Battery Replacement, Removing the Battery: stap 9, afbeelding 1 van 3 HTC Rhyme Battery Replacement, Removing the Battery: stap 9, afbeelding 2 van 3 HTC Rhyme Battery Replacement, Removing the Battery: stap 9, afbeelding 3 van 3
    • Remove the screws.

    • Use a metal spudger to remove the battery.

Conclusie

To reassemble your device, follow these instructions in reverse order.

2 andere personen hebben deze handleiding voltooid.

Elizabeth Steiner

Lid sinds: 10/08/14

435 Reputatie

3 handleidingen geschreven

Team

USF Tampa, Team 9-6, Leahy Fall 2014 Lid van USF Tampa, Team 9-6, Leahy Fall 2014

USFT-LEAHY-F14S9G6

3 Leden

10 handleidingen geschreven

0 opmerkingen

Voeg opmerking toe

Weergavestatistieken:

Afgelopen 24 uren: 0

Afgelopen 7 dagen: 1

Afgelopen 30 dagen: 3

Altijd: 5,039