Deze versie kan foutieve bewerkingen bevatten. Schakel over naar de recentste gecontroleerde momentopname.
Wat je nodig hebt
-
Deze stap is niet vertaald. Help het te vertalen
-
Gently insert an iPod opening tool between the rear panel and the inner rear frame near the headphone jack.
-
Use your iPod opening tool to pry up the rear case around the perimeter of the Evo.
-
-
Deze stap is niet vertaald. Help het te vertalen
-
Using the tip of your finger, lift the battery from the end closest to the camera.
-
Remove the battery from the rear inner frame.
-
-
Deze stap is niet vertaald. Help het te vertalen
-
Use the flat end of a spudger to pry up the red MicroSD retainer attached to the inner frame.
-
-
Deze stap is niet vertaald. Help het te vertalen
-
Use a pair of tweezers to carefully pull the MicroSD card out of its slot in the inner rear frame.
-
-
Deze stap is niet vertaald. Help het te vertalen
-
Remove six T5 Torx screws securing the rear inner frame to the inner case.
-
-
Deze stap is niet vertaald. Help het te vertalen
-
Gently insert an iPod opening tool between the rear inner frame and its plastic surround near the Micro HDMI port.
-
Carefully pry the top edge of the rear inner frame away from the front surround of the Evo.
-
-
Deze stap is niet vertaald. Help het te vertalen
-
Insert the iPod opening tool between the rear inner frame and its plastic surround and pry up at several points along the left edge of the Evo.
-
-
Deze stap is niet vertaald. Help het te vertalen
-
Continue the prying procedure, now focusing on detaching the plastic surround from the bottom of the Evo.
-
Pry up the rear inner frame along the right edge using the method described in previous steps.
-
Eventually work around the entire perimeter of the rear inner frame until it is lifted slightly from the inner case.
-
-
Deze stap is niet vertaald. Help het te vertalen
-
Remove the rear inner frame from the rest of the Evo.
-
-
Deze stap is niet vertaald. Help het te vertalen
-
Remove the single Phillips screw securing the motherboard to the inner case near the headphone jack.
-
-
Deze stap is niet vertaald. Help het te vertalen
-
Use the flat end of a spudger to pry the motherboard off the posts securing it to the metal display tray.
-
-
-
Deze stap is niet vertaald. Help het te vertalen
-
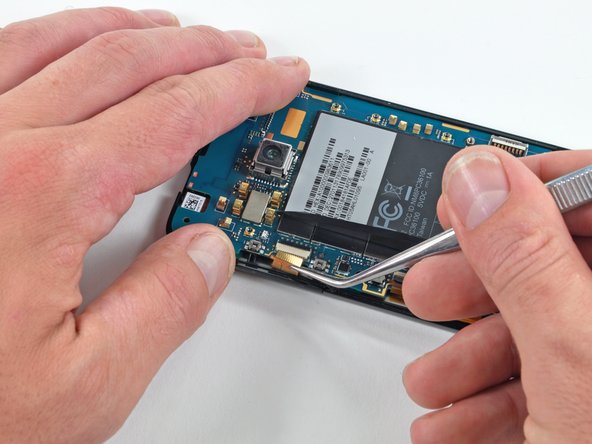
Carefully peel the device information sticker off the left edge of the motherboard and EMI shield to reveal three connectors covered with tape.
-
-
Deze stap is niet vertaald. Help het te vertalen
-
Remove the pieces of tape covering the following ribbon cables:
-
Front-facing camera
-
Front panel ribbon cable
-
Display ribbon cable
-
-
Deze stap is niet vertaald. Help het te vertalen
-
Using the tip of an iPod opening tool, flip up the front-facing camera ribbon cable retaining flap.
-
Be very careful and gentle with these flaps. They are very easy to break or dislodge and equally difficult to reinstall.
-
Use a pair of tweezers to pull the front-facing camera ribbon cable straight out of its socket.
-
-
Deze stap is niet vertaald. Help het te vertalen
-
Using the tip of an iPod opening tool, flip up the front panel ribbon cable retaining flap.
-
Use a pair of tweezers to pull the front panel ribbon cable straight out of its socket.
-
-
Deze stap is niet vertaald. Help het te vertalen
-
Using the tip of an iPod opening tool, flip up the display ribbon cable retaining flap.
-
Grasp the display ribbon cable with a pair of tweezers and pull it straight out of its socket.
-
-
Deze stap is niet vertaald. Help het te vertalen
-
Carefully lift the motherboard out of the inner case, minding any cables that may get caught.
-
-
Deze stap is niet vertaald. Help het te vertalen
-
Gently lift the front-facing camera out of its recess in the inner case and remove it from the Evo.
-
-
Deze stap is niet vertaald. Help het te vertalen
-
With the heat gun set to low, start by heating the outer black border near the upper left corner of the glass panel.
-
Try not to excessively heat the outer plastic edge of the Evo.
-
-
Deze stap is niet vertaald. Help het te vertalen
-
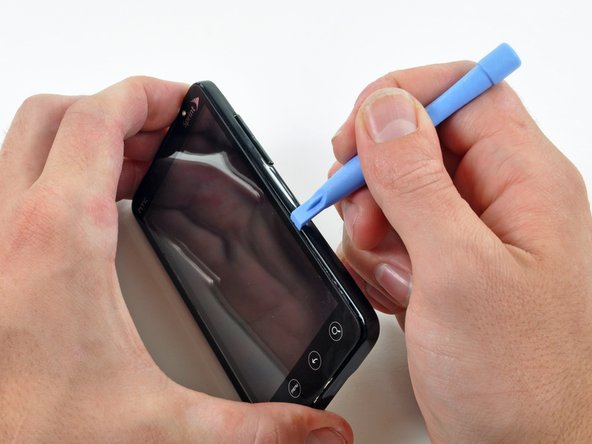
Gently insert an iPod opening tool between the glass front panel and its plastic surround near the upper top left corner of the Evo.
-
Carefully pry up the glass, being careful not to bend it excessively.
-
-
Deze stap is niet vertaald. Help het te vertalen
-
Use a heat gun to soften the adhesive along the left side of the front glass panel.
-
-
Deze stap is niet vertaald. Help het te vertalen
-
Insert the iPod opening tool between the front panel and its plastic surround and pry up at several points along the left edge of the Evo.
-
-
Deze stap is niet vertaald. Help het te vertalen
-
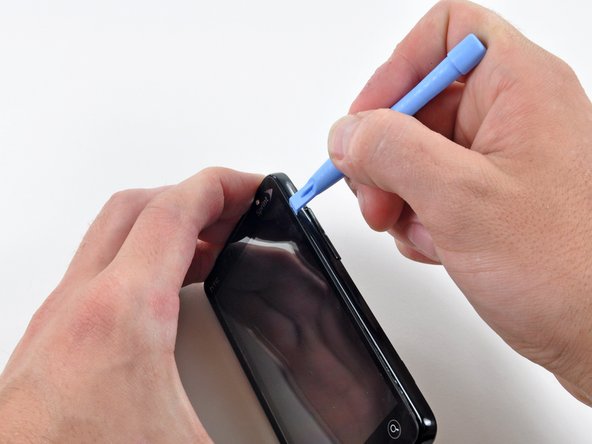
Continue the heating and prying procedure, now focusing on detaching the bottom of the front panel from the plastic surround.
-
Pry along the bottom edge of the Evo to further separate the front panel from the rest of the device.
-
-
Deze stap is niet vertaald. Help het te vertalen
-
Use a heat gun to soften the adhesive along the right side of the front glass panel.
-
-
Deze stap is niet vertaald. Help het te vertalen
-
Pry up the front panel along the right edge using the method described in previous steps.
-
Eventually work around the entire perimeter of the front panel until it is lifted slightly from the inner case.
-
-
Deze stap is niet vertaald. Help het te vertalen
-
Peel the front panel ribbon cable off the adhesive securing it to the metal underside of the inner case.
-
-
Deze stap is niet vertaald. Help het te vertalen
-
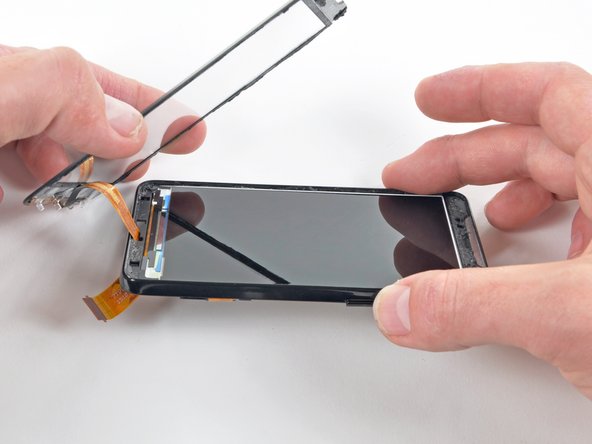
Lift the front panel out of the inner case, minding the cable still routed through the bottom of the Evo.
-
Carefully de-route the front panel ribbon cable through the slot in the inner case.
-
Remove the front panel.
-
Notice the four (4) clear plastic hooks that are adhered behind the menu buttons. Look closely. Each one is shaped differently and in a particular orientation.
-
If the replacement front panel does not have these installed already, carefully remove and transfer them from the old panel to the replacement.
-
-
Deze stap is niet vertaald. Help het te vertalen
-
Peel the piece of tape connecting the underside of the LCD metal tray to the bottom of the inner case.
-
-
Deze stap is niet vertaald. Help het te vertalen
-
Use your heat gun to soften the adhesive under the LCD panel along its left edge.
-
-
Deze stap is niet vertaald. Help het te vertalen
-
Insert an iPod opening tool with the edge angled up toward the underside of the display between the backlight and the metal shield beneath it.
-
-
Deze stap is niet vertaald. Help het te vertalen
-
Gently insert an iPod opening tool between the LCD panel and its plastic surround near the top left corner of the Evo.
-
Use the iPod opening tool as a lever to pry the LCD panel away from its plastic surround.
-
-
Deze stap is niet vertaald. Help het te vertalen
-
Use your heat gun to soften the adhesive under the LCD panel along its right edge.
-
-
Deze stap is niet vertaald. Help het te vertalen
-
Insert an iPod opening tool between the LCD panel and its plastic surround and pry up at several points along the right edge of the Evo.
-


Annuleren: ik heb deze handleiding niet afgemaakt.
30 andere personen hebben deze handleiding voltooid.

2 opmerkingen
This instruction does work, I follow this and I have my phone back, the only thing now the back camera is show negative view, i reset but still the same, however the front camera does does perfect. one more thing I drop my phone and the screen crack will that be the program? and I bought the assembly screen. Very important you must use a heat gun if you going to go all the way, other wise a nice shape screw drive will do