Ga door naar hoofdinhoud

HP w2216h Power Supply Replacement

Wat je nodig hebt

  1. HP w2216h Power Supply Replacement, Screen: stap 1, afbeelding 1 van 1
    • 'Make sure you are grounded, the power supply is not connected and you are wearing safety goggles.

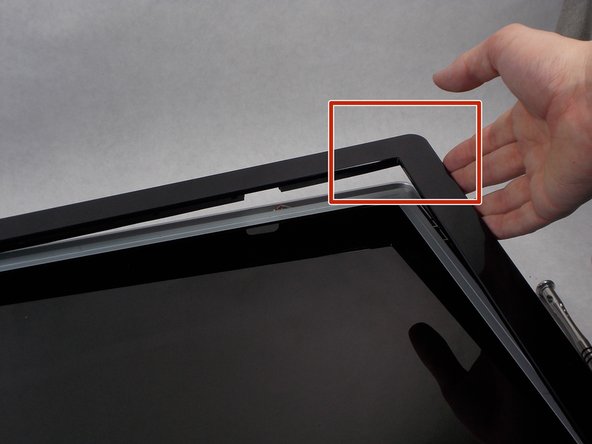
    • Use the Philips #000 screwdriver to remove the 4 round12mm screws on the back panel.

  2. HP w2216h Power Supply Replacement: stap 2, afbeelding 1 van 2 HP w2216h Power Supply Replacement: stap 2, afbeelding 2 van 2
    • Using a Philips #000 head remove 2 flat 12 mm screws above stand mounting bracket.

    • Using a PH1 Philips head with the 150 mm flexible extension remove 1 Philips head screw under the stand mounting bracket.

    • Stand will easily pull off.

  3. HP w2216h Power Supply Replacement: stap 3, afbeelding 1 van 3 HP w2216h Power Supply Replacement: stap 3, afbeelding 2 van 3 HP w2216h Power Supply Replacement: stap 3, afbeelding 3 van 3
    • Do not put the metal spudger between the metal and the glass. It needs to go under the bezel and above the metal.

    • Turn monitor so that the screen is facing you.

    • Pry the black bezel from above the metal by placing your metal spudger between the bezel and the metal and twisting the tool slightly.

    • The best places to pry are in the lower left and lower right corners of the black bezel.

  4. HP w2216h Power Supply Replacement: stap 4, afbeelding 1 van 3 HP w2216h Power Supply Replacement: stap 4, afbeelding 2 van 3 HP w2216h Power Supply Replacement: stap 4, afbeelding 3 van 3
    • Be careful of the wires attaching the power button and the control buttons. Show extreme caution to ensure the button is not damaged.

    • Lift the screen assembly from the plastic housing from the corners.

  5. HP w2216h Power Supply Replacement: stap 5, afbeelding 1 van 2 HP w2216h Power Supply Replacement: stap 5, afbeelding 2 van 2
    • Remove the 4 connectors from the left side of the monitor on the back.

  6. HP w2216h Power Supply Replacement: stap 6, afbeelding 1 van 3 HP w2216h Power Supply Replacement: stap 6, afbeelding 2 van 3 HP w2216h Power Supply Replacement: stap 6, afbeelding 3 van 3
    • Lift the gray tape of the top of the monitor to expose the ribbon cable.

    • Remove the ribbon cable by sliding the connector towards the center of the screen assembly.

    • Lift the reflective tape next to the gray tape.

  7. HP w2216h Power Supply Replacement: stap 7, afbeelding 1 van 3 HP w2216h Power Supply Replacement: stap 7, afbeelding 2 van 3 HP w2216h Power Supply Replacement: stap 7, afbeelding 3 van 3
    • Remove the 4 PH1 8mm Philips round screws on the outer edge of the screen's assembly.

    • Lift the screen from the screen assembly.

  8. HP w2216h Power Supply Replacement, Power Supply: stap 8, afbeelding 1 van 1
    • Monitor power supplies can be dangerous. Read ifixit's monitor safety guide before working with power supplies.

    • Remove the cables connecting the power supply to the display port.

  9. HP w2216h Power Supply Replacement: stap 9, afbeelding 1 van 1
    • Remove the four 8mm Phillips #000 head screws connecting the power supply to the screen assembly.

  10. HP w2216h Power Supply Replacement: stap 10, afbeelding 1 van 1
    • Lift the power supply vertically out of the screen assembly

Conclusie

To reassemble your device, follow these instructions in reverse order.

Één andere persoon heeft deze handleiding voltooid.

Branflakes222

Lid sinds: 03/25/16

396 Reputatie

2 handleidingen geschreven

Team

UMass Dartmouth, Team 1-1, Miles Spring 2016 Lid van UMass Dartmouth, Team 1-1, Miles Spring 2016

UMASSD-MILES-S16S1G1

4 Leden

12 handleidingen geschreven

0 opmerkingen

Voeg opmerking toe

Weergavestatistieken:

Afgelopen 24 uren: 1

Afgelopen 7 dagen: 6

Afgelopen 30 dagen: 10

Altijd: 767