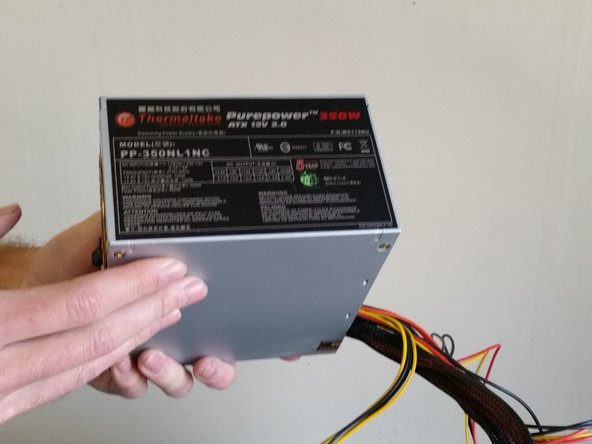
Ga door naar hoofdinhoud

HP m8226x Power Supply Replacement

Wat je nodig hebt

  1. HP m8226x Power Supply Replacement, HP m8226x Power Supply: stap 1, afbeelding 1 van 3 HP m8226x Power Supply Replacement, HP m8226x Power Supply: stap 1, afbeelding 2 van 3 HP m8226x Power Supply Replacement, HP m8226x Power Supply: stap 1, afbeelding 3 van 3
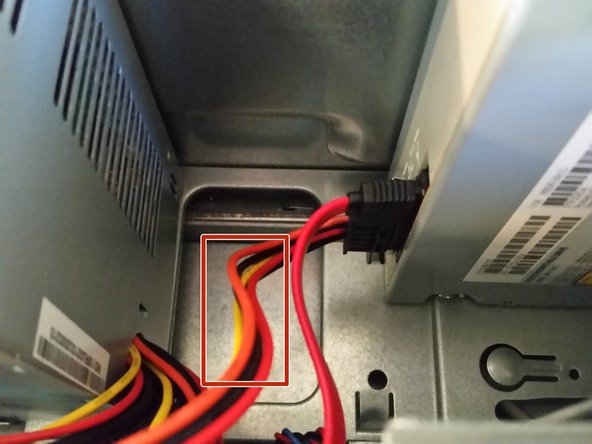
    • Turn off your computer and remove the power cord by pulling it straight out of its socket.

  2. HP m8226x Power Supply Replacement: stap 2, afbeelding 1 van 3 HP m8226x Power Supply Replacement: stap 2, afbeelding 2 van 3 HP m8226x Power Supply Replacement: stap 2, afbeelding 3 van 3
    • Remove the two screws holding the right (from the back) case door to the computer.

  3. HP m8226x Power Supply Replacement: stap 3, afbeelding 1 van 3 HP m8226x Power Supply Replacement: stap 3, afbeelding 2 van 3 HP m8226x Power Supply Replacement: stap 3, afbeelding 3 van 3
    • Remove the side case door by pulling the tab towards the back of the computer with your hand.

    • Pull the door outward to remove it.

  4. HP m8226x Power Supply Replacement: stap 4, afbeelding 1 van 2 HP m8226x Power Supply Replacement: stap 4, afbeelding 2 van 2
    • Remove the four screws holding in the power supply.

  5. HP m8226x Power Supply Replacement: stap 5, afbeelding 1 van 1
    • Lay the computer on its side to make it easier to remove the wiring.

  6. HP m8226x Power Supply Replacement: stap 6, afbeelding 1 van 3 HP m8226x Power Supply Replacement: stap 6, afbeelding 2 van 3 HP m8226x Power Supply Replacement: stap 6, afbeelding 3 van 3
    • Remove the computer processor's power cord by pinching the clip on the connector and pulling it straight out.

  7. HP m8226x Power Supply Replacement: stap 7, afbeelding 1 van 3 HP m8226x Power Supply Replacement: stap 7, afbeelding 2 van 3 HP m8226x Power Supply Replacement: stap 7, afbeelding 3 van 3
    • Remove the power cord from the optical disc drive by pulling it straight out.

  8. HP m8226x Power Supply Replacement: stap 8, afbeelding 1 van 3 HP m8226x Power Supply Replacement: stap 8, afbeelding 2 van 3 HP m8226x Power Supply Replacement: stap 8, afbeelding 3 van 3
    • If the hard drive doesn't have a SATA port connector then move to step 9.

    • Disconnect the SATA port connector from the hard drive by pulling it straight out.

  9. HP m8226x Power Supply Replacement: stap 9, afbeelding 1 van 2 HP m8226x Power Supply Replacement: stap 9, afbeelding 2 van 2
    • If the hard drive has a 4-pin Molex connector, pinch the two clips on the connector and pull it straight out to remove it.

  10. HP m8226x Power Supply Replacement: stap 10, afbeelding 1 van 3 HP m8226x Power Supply Replacement: stap 10, afbeelding 2 van 3 HP m8226x Power Supply Replacement: stap 10, afbeelding 3 van 3
    • Remove the power to the motherboard by pinching the clip and pulling it straight out.

  11. HP m8226x Power Supply Replacement: stap 11, afbeelding 1 van 2 HP m8226x Power Supply Replacement: stap 11, afbeelding 2 van 2
    • Remove the power supply by pushing it out from the back of the computer and lifting it out of the computer.

Conclusie

To reassemble your device, follow these instructions in reverse order.

Één andere persoon heeft deze handleiding voltooid.

Scott Fisher

Lid sinds: 03/30/16

128 Reputatie

1 Handleiding geschreven

Team

0 opmerkingen

Voeg opmerking toe

Weergavestatistieken:

Afgelopen 24 uren: 0

Afgelopen 7 dagen: 5

Afgelopen 30 dagen: 18

Altijd: 803