Ga door naar hoofdinhoud

HP Z2 Mini G3 Power On/Off and HDD Activity LED Replacement

  1. HP Z2 Mini G3 Power On/Off and HDD Activity LED Replacement, Access Panel: stap 1, afbeelding 1 van 1
    • Turn the device so the back-side of the device is facing you.

    • Be sure that the power is off and the A/C power cord has been disconnected before starting. Removing hardware while the power is on could damage the device or harm yourself.

    • Components of the device are subject to static damage. Work on a hard, grounded surface to prevent damage to the workstation.

  2. HP Z2 Mini G3 Power On/Off and HDD Activity LED Replacement: stap 2, afbeelding 1 van 2 HP Z2 Mini G3 Power On/Off and HDD Activity LED Replacement: stap 2, afbeelding 2 van 2
    • Slide and hold the latch in the direction of the engraved arrow (to the right).

  3. HP Z2 Mini G3 Power On/Off and HDD Activity LED Replacement: stap 3, afbeelding 1 van 2 HP Z2 Mini G3 Power On/Off and HDD Activity LED Replacement: stap 3, afbeelding 2 van 2
    • While holding the latch, lift the access panel upwards and towards yourself and set it aside upside-down.

  4. HP Z2 Mini G3 Power On/Off and HDD Activity LED Replacement, CPU Fan: stap 4, afbeelding 1 van 1
    • Rotate the device so the front side is facing you (the side with the power button) and locate the CPU fan.

  5. HP Z2 Mini G3 Power On/Off and HDD Activity LED Replacement: stap 5, afbeelding 1 van 1
    • Swing the fan upward, to a 90-degree angle.

  6. HP Z2 Mini G3 Power On/Off and HDD Activity LED Replacement: stap 6, afbeelding 1 van 2 HP Z2 Mini G3 Power On/Off and HDD Activity LED Replacement: stap 6, afbeelding 2 van 2
    • Carefully disconnect the CPU fan by pulling out the wires from the motherboard.

  7. HP Z2 Mini G3 Power On/Off and HDD Activity LED Replacement: stap 7, afbeelding 1 van 1
    • Swing the fan back down and carefully unhook the CPU fan notches by pulling each tab away from the heat sink holes.

  8. HP Z2 Mini G3 Power On/Off and HDD Activity LED Replacement: stap 8, afbeelding 1 van 1
    • Swing the fan up again and pull it out.

  9. HP Z2 Mini G3 Power On/Off and HDD Activity LED Replacement, Power on/off Button and HDD Activity LED: stap 9, afbeelding 1 van 1
    • Remove HDD activity LED from retaining clip.

  10. HP Z2 Mini G3 Power On/Off and HDD Activity LED Replacement: stap 10, afbeelding 1 van 1
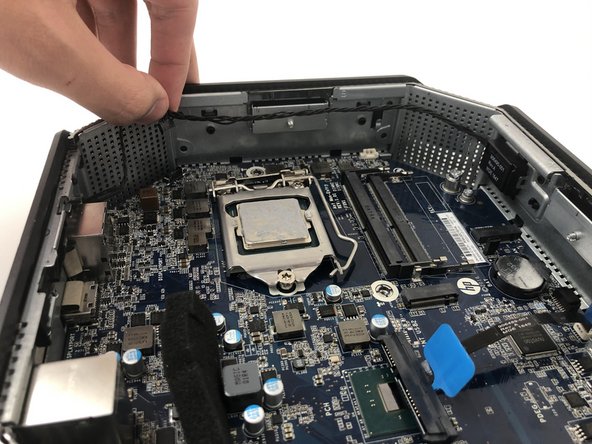
    • Grab and lift the cable off of the motherboard and chassis.

  11. HP Z2 Mini G3 Power On/Off and HDD Activity LED Replacement: stap 11, afbeelding 1 van 1
    • Pull the HDD activity LED out of the chassis.

  12. HP Z2 Mini G3 Power On/Off and HDD Activity LED Replacement: stap 12, afbeelding 1 van 1
    • Pull the cable from the motherboard to finish removing the component.

Conclusie

To reassemble your device, follow these instructions in reverse order.

0 opmerkingen

Voeg opmerking toe

Weergavestatistieken:

Afgelopen 24 uren: 2

Afgelopen 7 dagen: 4

Afgelopen 30 dagen: 25

Altijd: 968