Ga door naar hoofdinhoud

HP Spectre x360 15-bl012dx Keyboard Replacement

Wat je nodig hebt

  1. HP Spectre x360 15-bl012dx Keyboard Replacement, Battery Replacement: stap 1, afbeelding 1 van 2 HP Spectre x360 15-bl012dx Keyboard Replacement, Battery Replacement: stap 1, afbeelding 2 van 2
    • Power off the device before beginning disassembly.

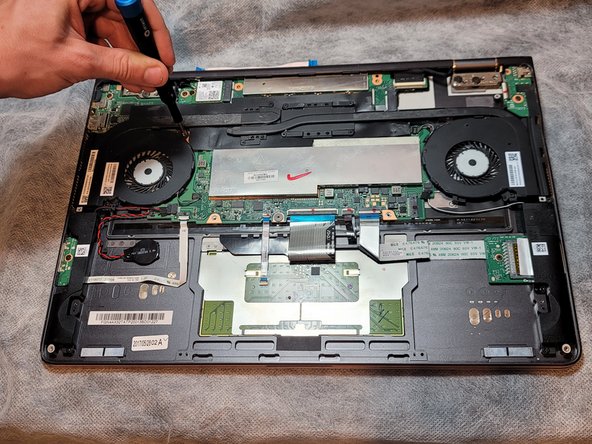
    • Place the computer so that the back panel is facing up. Begin by removing the two visible Torx T5 9 mm screws near the hinges.

    • Next, remove the four visible Torx T5 3 mm on the sides.

    • Keep track of all screws.

  2. HP Spectre x360 15-bl012dx Keyboard Replacement: stap 2, afbeelding 1 van 3 HP Spectre x360 15-bl012dx Keyboard Replacement: stap 2, afbeelding 2 van 3 HP Spectre x360 15-bl012dx Keyboard Replacement: stap 2, afbeelding 3 van 3
    • Please note the upper two feet are already removed. The device was given to us this way.

    • Remove the two upper feet using an opening tool or spudger if they are still in place. The upper feet are closer to the hinges for the screen.

    • Remove the two 8 mm Phillips #1 screws under the feet.

    • These are the final screws to remove from the back panel. In total, you should remove eight screws between Steps 1 and 2.

  3. HP Spectre x360 15-bl012dx Keyboard Replacement: stap 3, afbeelding 1 van 1
    • Use a spudger to pry the back panel off of the laptop. Work your way around the perimeter of the device to loosen the connection.

    • Take the back panel off of the laptop.

  4. HP Spectre x360 15-bl012dx Keyboard Replacement: stap 4, afbeelding 1 van 1
    • Use a Phillips #1 screwdriver to remove six 4 mm screws securing the battery.

  5. HP Spectre x360 15-bl012dx Keyboard Replacement: stap 5, afbeelding 1 van 3 HP Spectre x360 15-bl012dx Keyboard Replacement: stap 5, afbeelding 2 van 3 HP Spectre x360 15-bl012dx Keyboard Replacement: stap 5, afbeelding 3 van 3
    • Unplug the battery connector located on the motherboard.

    • Remove the battery from the laptop.

  6. HP Spectre x360 15-bl012dx Keyboard Replacement, Solid State Drive (SSD): stap 6, afbeelding 1 van 3 HP Spectre x360 15-bl012dx Keyboard Replacement, Solid State Drive (SSD): stap 6, afbeelding 2 van 3 HP Spectre x360 15-bl012dx Keyboard Replacement, Solid State Drive (SSD): stap 6, afbeelding 3 van 3
    • Using minimal force, lift the locking bars on the USB board ZIF connector using a plastic opening tool or fingernail and pull out the ribbon cable.

  7. HP Spectre x360 15-bl012dx Keyboard Replacement: stap 7, afbeelding 1 van 1
    • Using your fingers, remove the USB ribbon cable from the motherboard above the fan.

  8. HP Spectre x360 15-bl012dx Keyboard Replacement: stap 8, afbeelding 1 van 2 HP Spectre x360 15-bl012dx Keyboard Replacement: stap 8, afbeelding 2 van 2
    • Remove the 3 mm Phillips #1 screw that secures the solid state drive to the board.

    • Please note this laptop was not supplied with an SSD, so this is not the same SSD you will find in your device.

  9. HP Spectre x360 15-bl012dx Keyboard Replacement: stap 9, afbeelding 1 van 1
    • Slide the SSD card out of the connection at a 45 degree angle so that the SSD teeth are not bent.

  10. HP Spectre x360 15-bl012dx Keyboard Replacement, Motherboard: stap 10, afbeelding 1 van 2 HP Spectre x360 15-bl012dx Keyboard Replacement, Motherboard: stap 10, afbeelding 2 van 2
    • Use a Phillips #1 screwdriver to remove two 3 mm screws from each fan.

  11. HP Spectre x360 15-bl012dx Keyboard Replacement: stap 11, afbeelding 1 van 2 HP Spectre x360 15-bl012dx Keyboard Replacement: stap 11, afbeelding 2 van 2
    • Remove the six 2.5 mm Phillips #1 screws holding the heat sink in.

  12. HP Spectre x360 15-bl012dx Keyboard Replacement: stap 12, afbeelding 1 van 2 HP Spectre x360 15-bl012dx Keyboard Replacement: stap 12, afbeelding 2 van 2
    • Pop up the eight tabs on all the ZIF connectors on the motherboard. This can either be done with a spudger or your finger nail.

    • Looking at the back of the laptop, there are two ZIF connectors in the top right (one should already be disconnected from the SSD removal), one in the top left, and 5 on the bottom. Indicated by red squares.

  13. HP Spectre x360 15-bl012dx Keyboard Replacement: stap 13, afbeelding 1 van 3 HP Spectre x360 15-bl012dx Keyboard Replacement: stap 13, afbeelding 2 van 3 HP Spectre x360 15-bl012dx Keyboard Replacement: stap 13, afbeelding 3 van 3
    • Remove the five remaining connectors from the motherboard. Two on the bottom left, one on the bottom right, and one on the top right. These connectors pull up off the motherboard with no clips.

  14. HP Spectre x360 15-bl012dx Keyboard Replacement: stap 14, afbeelding 1 van 2 HP Spectre x360 15-bl012dx Keyboard Replacement: stap 14, afbeelding 2 van 2
    • Use a Phillips #1 screwdriver to remove the 2 mm screw from the Wi-Fi card that secures it to the motherboard.

    • Slide the Wi-Fi card out of the slot.

  15. HP Spectre x360 15-bl012dx Keyboard Replacement: stap 15, afbeelding 1 van 3 HP Spectre x360 15-bl012dx Keyboard Replacement: stap 15, afbeelding 2 van 3 HP Spectre x360 15-bl012dx Keyboard Replacement: stap 15, afbeelding 3 van 3
    • Snake the speaker wires out of the plastic routings on the fans that hold the wires in place.

    • Lift the fans and heat sink out.

    • Remove the black heat shield under the heat sink.

  16. HP Spectre x360 15-bl012dx Keyboard Replacement: stap 16, afbeelding 1 van 3 HP Spectre x360 15-bl012dx Keyboard Replacement: stap 16, afbeelding 2 van 3 HP Spectre x360 15-bl012dx Keyboard Replacement: stap 16, afbeelding 3 van 3
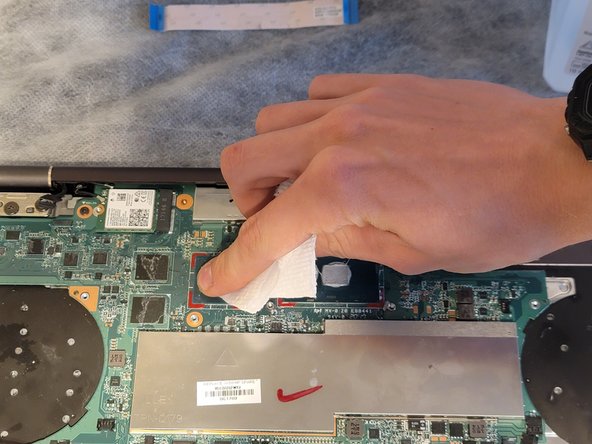
    • Clean the old thermal paste off of the heat sink, cpu, and gpu using isopropyl alcohol and a paper towel. The higher the percentage of the alcohol, the better. I used 91%.

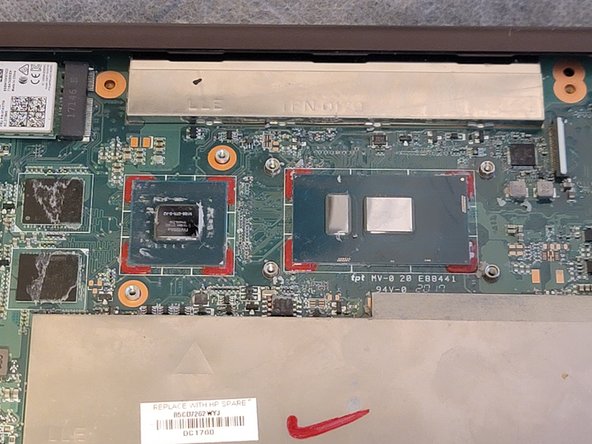
    • Remember to apply thermal paste before installing the new motherboard with fresh thermal paste! A pea sized amount is plenty.

  17. HP Spectre x360 15-bl012dx Keyboard Replacement: stap 17, afbeelding 1 van 2 HP Spectre x360 15-bl012dx Keyboard Replacement: stap 17, afbeelding 2 van 2
    • Using a Phillips #1 screwdriver, remove four screws from the motherboard.

    • Two 3 mm screws

    • Two 2 mm screws

  18. HP Spectre x360 15-bl012dx Keyboard Replacement: stap 18, afbeelding 1 van 1
    • Remove the motherboard. Pull up the right side first, then pull it out.

  19. HP Spectre x360 15-bl012dx Keyboard Replacement, Display Assembly and Camera: stap 19, afbeelding 1 van 2 HP Spectre x360 15-bl012dx Keyboard Replacement, Display Assembly and Camera: stap 19, afbeelding 2 van 2
    • Open the laptop so the screen is facing you.

    • Using a Phillips #1 screwdriver, remove two 5 mm screws from each hinge.

  20. HP Spectre x360 15-bl012dx Keyboard Replacement: stap 20, afbeelding 1 van 1
    • Remove the display assembly by pulling the hinges out of the body.

    • This should not require much effort so make sure not to pull too hard. The cables will come out with the display assembly.

    • The camera and screen are one piece and must be replaced together.

  21. HP Spectre x360 15-bl012dx Keyboard Replacement, Keyboard: stap 21, afbeelding 1 van 3 HP Spectre x360 15-bl012dx Keyboard Replacement, Keyboard: stap 21, afbeelding 2 van 3 HP Spectre x360 15-bl012dx Keyboard Replacement, Keyboard: stap 21, afbeelding 3 van 3
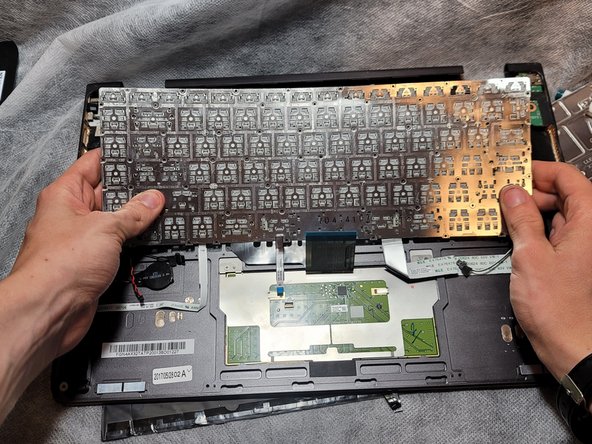
    • Use a Phillips #00 screwdriver to remove sixteen 2 mm screws from the two metal plates on the back of the keyboard.

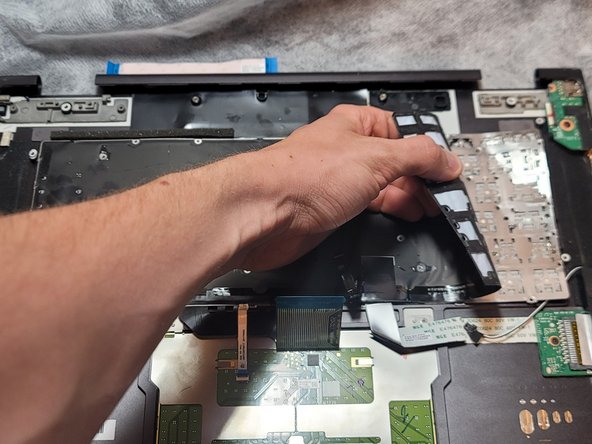
    • Remove the metal plates.

  22. HP Spectre x360 15-bl012dx Keyboard Replacement: stap 22, afbeelding 1 van 2 HP Spectre x360 15-bl012dx Keyboard Replacement: stap 22, afbeelding 2 van 2
    • Use a spudger to get started and remove the black sheet from the back of the keyboard.

  23. HP Spectre x360 15-bl012dx Keyboard Replacement: stap 23, afbeelding 1 van 3 HP Spectre x360 15-bl012dx Keyboard Replacement: stap 23, afbeelding 2 van 3 HP Spectre x360 15-bl012dx Keyboard Replacement: stap 23, afbeelding 3 van 3
    • Use a Phillips #00 screwdriver to remove the forty-two 2 mm screws from the keyboard and then pull it out from the laptop body.

    • Please note you will have to replace the keyboard with a new one. Reinstalling this keyboard may not function correctly.

Conclusie

To reassemble your device, follow these instructions in reverse order.

Peyton Stewart

Lid sinds: 02/22/22

282 Reputatie

2 handleidingen geschreven

Team

Clemson, Team 1-1, Hunter Spring 2022 Lid van Clemson, Team 1-1, Hunter Spring 2022

CLEM-HUNTER-S22S1G1

5 Leden

5 handleidingen geschreven

0 opmerkingen

Voeg opmerking toe

Weergavestatistieken:

Afgelopen 24 uren: 0

Afgelopen 7 dagen: 14

Afgelopen 30 dagen: 70

Altijd: 2,408