Ga door naar hoofdinhoud

HP Pavilion x360 m3-u001dx Hard Drive Replacement

Wat je nodig hebt

  1. HP Pavilion x360 m3-u001dx Hard Drive Replacement, Keyboard: stap 1, afbeelding 1 van 1
    • Shut down the computer.

    • Disconnect the power and all external devices connected to the computer.

    • Working on your device while it is turned on may result in electric shock.

  2. HP Pavilion x360 m3-u001dx Hard Drive Replacement: stap 2, afbeelding 1 van 2 HP Pavilion x360 m3-u001dx Hard Drive Replacement: stap 2, afbeelding 2 van 2
    • Use a Metal Spudger and remove the rubber foot closet from the bottom of the laptop.

  3. HP Pavilion x360 m3-u001dx Hard Drive Replacement: stap 3, afbeelding 1 van 1
    • Remove all of the screws located on the bottom of the laptop:

    • 5 Phillips 2.4 x 5.7 mm screws

    • 5 Phillips 2.0 x 5.0 mm screws

    • Make special note of each screw and screw lock size and location during removal and replacement.

  4. HP Pavilion x360 m3-u001dx Hard Drive Replacement: stap 4, afbeelding 1 van 1
    • Turn the computer over onto its base, with the computer open and the keyboard facing upward.

  5. HP Pavilion x360 m3-u001dx Hard Drive Replacement: stap 5, afbeelding 1 van 2 HP Pavilion x360 m3-u001dx Hard Drive Replacement: stap 5, afbeelding 2 van 2
    • The keyboard is attached internally by clips. Use a small amount of force when removing the keyboard.

    • Use the Plastic Opening Tool to separate the keyboard from the base of the laptop.

  6. HP Pavilion x360 m3-u001dx Hard Drive Replacement: stap 6, afbeelding 1 van 1
    • Raise the keyboard slightly to access the touch pad and keyboard cables.

    • Raising the keyboard too far or with excessive force may cause damage to the keyboard, touch pad cables, or their connectors.

  7. HP Pavilion x360 m3-u001dx Hard Drive Replacement: stap 7, afbeelding 1 van 1
    • Disconnect the ribbon cables attaching the touch pad and keyboard to the system board (motherboard).

    • Using the Heavy-Duty Spudger lift up the plastic locks connecting the ribbon cable to the motherboard.

    • Use the blue plastic tab on the ribbon cable to pull it out from the lock on the motherboard.

  8. HP Pavilion x360 m3-u001dx Hard Drive Replacement: stap 8, afbeelding 1 van 1
    • Lift the keyboard away from the base of the laptop.

  9. HP Pavilion x360 m3-u001dx Hard Drive Replacement, Battery: stap 9, afbeelding 1 van 1
    • Using the Phillips 00 Screwdriver, remove 6 Phillips 2.0 x 4.6 mm screws from the perimeter of the battery.

    • Make special note of each screw and screw lock size and location during removal and replacement.

  10. HP Pavilion x360 m3-u001dx Hard Drive Replacement: stap 10, afbeelding 1 van 1
    • Carefully lift the battery up from lower right corner and disconnect it from the motherboard.

  11. HP Pavilion x360 m3-u001dx Hard Drive Replacement, Hard Drive: stap 11, afbeelding 1 van 1
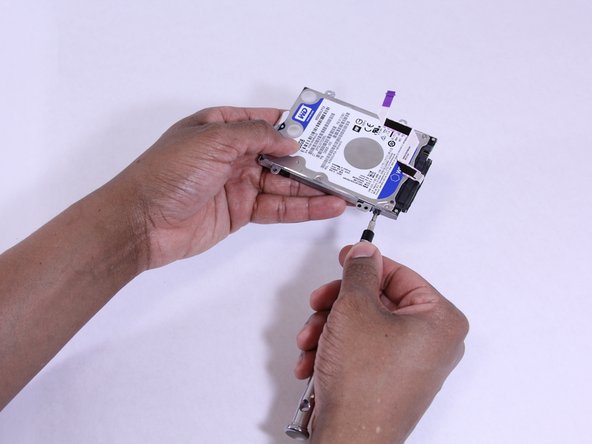
    • Disconnect the ribbon cables attaching the hard drive to the system board (motherboard).

    • Using the Heavy-Duty Spudger lift up the plastic locks connecting the ribbon cable to the motherboard.

    • Use the purple plastic tab on the ribbon cable to pull it out from the lock on the motherboard.

  12. HP Pavilion x360 m3-u001dx Hard Drive Replacement: stap 12, afbeelding 1 van 2 HP Pavilion x360 m3-u001dx Hard Drive Replacement: stap 12, afbeelding 2 van 2
    • Using the Phillips00 Screw Driver, remove 4 Phillips 2.0 x 4.6 mm screws around the perimeter of the hard drive.

    • Make special note of each screw and screw lock size and location during removal and replacement.

  13. HP Pavilion x360 m3-u001dx Hard Drive Replacement: stap 13, afbeelding 1 van 1
    • Using the tab provided, lift and remove the hard drive out of the laptop base.

  14. HP Pavilion x360 m3-u001dx Hard Drive Replacement: stap 14, afbeelding 1 van 2 HP Pavilion x360 m3-u001dx Hard Drive Replacement: stap 14, afbeelding 2 van 2
    • Using the Phillips00 Screw Driver, remove 4 Phillips 3.0 x 3.7 mm screws on exterior mounting bracket.

    • There are 2 Phillips screws on each side of the hard drive bracket.

    • Make special note of each screw and screw lock size and location during removal and replacement.

  15. HP Pavilion x360 m3-u001dx Hard Drive Replacement: stap 15, afbeelding 1 van 1
    • Remove the mounting bracket.

Conclusie

Follow these instructions in reverse order to reassemble your device.

9 andere personen hebben deze handleiding voltooid.

Subhleen

Lid sinds: 02/01/17

1.268 Reputatie

5 handleidingen geschreven

Team

UW Tacoma, Team 1-6, Rose Winter 2017 Lid van UW Tacoma, Team 1-6, Rose Winter 2017

UWT-ROSE-W17S1G6

4 Leden

8 handleidingen geschreven

8 opmerkingen

Awesome. Thanks. This helped me a lot.

Gouse Khan - Antwoord

Can anyone tell me the model number of the hdd ribbon cable please :)

James Harris - Antwoord

I need to replace the data ribbon as well.

KurwynK -

Found it. part# 856011–001

KurwynK - Antwoord

My HP Pavilion X360 M3-u00ldx is not recognizing my brand new Samsung 860 Evo 500GB ssd. Upon start up I get  3F0 error which states there is no hard drive. When I boot to a Windows 10 disc it also doesn't recognize it.


Any suggestions on how it can be recognized is appreciated.


Thank you for looking.

downdog89 - Antwoord

Voeg opmerking toe

Weergavestatistieken:

Afgelopen 24 uren: 3

Afgelopen 7 dagen: 10

Afgelopen 30 dagen: 68

Altijd: 22,242