Ga door naar hoofdinhoud

HP Pavilion 15-p214dx Display Replacement

Wat je nodig hebt

  1. HP Pavilion 15-p214dx Display Replacement, Disk Drive: stap 1, afbeelding 1 van 3 HP Pavilion 15-p214dx Display Replacement, Disk Drive: stap 1, afbeelding 2 van 3 HP Pavilion 15-p214dx Display Replacement, Disk Drive: stap 1, afbeelding 3 van 3
    • Place your laptop on a flat surface with the bottom facing upwards. The HP logo should be facing downwards.

    • Locate the disk drive screw. It is a 7mm screw that can be found to the upper left on label on the bottom of the computer and is marked with a disk drive symbol.

    • Remove this screw using a Philips #0 screwdriver.

  2. HP Pavilion 15-p214dx Display Replacement: stap 2, afbeelding 1 van 2 HP Pavilion 15-p214dx Display Replacement: stap 2, afbeelding 2 van 2
    • Place your thumbnail between the disk drive exterior and your laptop's bottom cover.

    • If your nail is not long enough to do this, you can use a prying tool instead.

    • Pull outwards to slide the disk drive out of its slot.

    • Due to how the disk drive's slot is constructed, the drive must be properly aligned to fit back in. It may take a couple attempts to properly align it.

  3. HP Pavilion 15-p214dx Display Replacement, Top Cover: stap 3, afbeelding 1 van 1
    • Using a magnetic screwdriver with a Philips #0 head, remove all of the visible screws on your laptop's bottom face. These screws are all about 7.5mm long.

  4. HP Pavilion 15-p214dx Display Replacement: stap 4, afbeelding 1 van 2 HP Pavilion 15-p214dx Display Replacement: stap 4, afbeelding 2 van 2
    • Remove the 5.5mm screws holding the computer's end caps in place. The end caps are located to the left and right of the battery.

    • These screws are normally hidden underneath the end caps' rubber feet, which are not shown in the pictures. To remove these, gently pry them out of their slots with a plastic opening tool or a flathead screwdriver.

  5. HP Pavilion 15-p214dx Display Replacement: stap 5, afbeelding 1 van 3 HP Pavilion 15-p214dx Display Replacement: stap 5, afbeelding 2 van 3 HP Pavilion 15-p214dx Display Replacement: stap 5, afbeelding 3 van 3
    • Lift both end caps from their respective corners.

    • Use a Philips #0 screwdriver to remove the 4.3mm screw that is underneath both end caps.

  6. HP Pavilion 15-p214dx Display Replacement: stap 6, afbeelding 1 van 3 HP Pavilion 15-p214dx Display Replacement: stap 6, afbeelding 2 van 3 HP Pavilion 15-p214dx Display Replacement: stap 6, afbeelding 3 van 3
    • Use a Philips #0 screwdriver to remove the three 5.5mm screws in on the edge of the disk drive slot.

    • These three screws are missing from the pictures.

  7. HP Pavilion 15-p214dx Display Replacement: stap 7, afbeelding 1 van 1
    • Flip your computer so that the bottom is now on the surface. Open the laptop like you normally would if you were about to use it.

    • Use a plastic opening tool to separate the top cover from the bottom cover.

    • Be careful when prying the cover off since it is susceptible to bending and cracking.

    • There are several cables connecting the top cover to the computer's motherboard that need to be disconnected before the cover can be completely removed.

  8. HP Pavilion 15-p214dx Display Replacement: stap 8, afbeelding 1 van 2 HP Pavilion 15-p214dx Display Replacement: stap 8, afbeelding 2 van 2
    • While lifting the top cover, undo the clip holding the keyboard cable in place.

    • Slide the cable out of its port.

  9. HP Pavilion 15-p214dx Display Replacement: stap 9, afbeelding 1 van 1
    • Undo the clip holding the touchpad cable in place.

    • Remove the touchpad cable from its port.

  10. HP Pavilion 15-p214dx Display Replacement: stap 10, afbeelding 1 van 2 HP Pavilion 15-p214dx Display Replacement: stap 10, afbeelding 2 van 2
    • Undo the clip holding the power button cable in place.

    • Disconnect the power button cable from its port.

    • Gently lift the top cover to remove it from the computer.

  11. HP Pavilion 15-p214dx Display Replacement, Motherboard: stap 11, afbeelding 1 van 3 HP Pavilion 15-p214dx Display Replacement, Motherboard: stap 11, afbeelding 2 van 3 HP Pavilion 15-p214dx Display Replacement, Motherboard: stap 11, afbeelding 3 van 3
    • Notice that the motherboard is connected to multiple components of the computer that need to be disconnected first

  12. HP Pavilion 15-p214dx Display Replacement: stap 12, afbeelding 1 van 3 HP Pavilion 15-p214dx Display Replacement: stap 12, afbeelding 2 van 3 HP Pavilion 15-p214dx Display Replacement: stap 12, afbeelding 3 van 3
    • Use a plastic opening tool to separate the speaker's cable from the mother board, by pushing on the speaker's plugged cable

  13. HP Pavilion 15-p214dx Display Replacement: stap 13, afbeelding 1 van 3 HP Pavilion 15-p214dx Display Replacement: stap 13, afbeelding 2 van 3 HP Pavilion 15-p214dx Display Replacement: stap 13, afbeelding 3 van 3
    • Dismount the power supply cable holding the motherboard, by removing the 5.5 mm screws shown in the first picture on the right, using a Philips #0 screwdriver to remove the screws.

  14. HP Pavilion 15-p214dx Display Replacement: stap 14, afbeelding 1 van 3 HP Pavilion 15-p214dx Display Replacement: stap 14, afbeelding 2 van 3 HP Pavilion 15-p214dx Display Replacement: stap 14, afbeelding 3 van 3
    • Remove the metal cover to free the motherboard supply cable.

  15. HP Pavilion 15-p214dx Display Replacement: stap 15, afbeelding 1 van 3 HP Pavilion 15-p214dx Display Replacement: stap 15, afbeelding 2 van 3 HP Pavilion 15-p214dx Display Replacement: stap 15, afbeelding 3 van 3
    • Undo the clip holding the display cable.

    • Gently remove and disconnect the display cable.

  16. HP Pavilion 15-p214dx Display Replacement: stap 16, afbeelding 1 van 3 HP Pavilion 15-p214dx Display Replacement: stap 16, afbeelding 2 van 3 HP Pavilion 15-p214dx Display Replacement: stap 16, afbeelding 3 van 3
    • Disconnect the disc drive cable by undoing the clip.

    • Repeat the same step for the the hard drive cable.

    • Note there is no need to completely remove the hard drive, just undoing the cable from the motherboard should be sufficient.

  17. HP Pavilion 15-p214dx Display Replacement: stap 17, afbeelding 1 van 3 HP Pavilion 15-p214dx Display Replacement: stap 17, afbeelding 2 van 3 HP Pavilion 15-p214dx Display Replacement: stap 17, afbeelding 3 van 3
    • Remove the 7mm screws holding the computer's motherboard in place.

    • Using a magnetic screwdriver with a Philips #0 head, remove all of the visible screws on your laptop's motherboard corners.

  18. HP Pavilion 15-p214dx Display Replacement: stap 18, afbeelding 1 van 3 HP Pavilion 15-p214dx Display Replacement: stap 18, afbeelding 2 van 3 HP Pavilion 15-p214dx Display Replacement: stap 18, afbeelding 3 van 3
    • After the motherboard is dismounted and all the cable are disconnected, remove the motherboard from the device.

  19. HP Pavilion 15-p214dx Display Replacement, Display: stap 19, afbeelding 1 van 3 HP Pavilion 15-p214dx Display Replacement, Display: stap 19, afbeelding 2 van 3 HP Pavilion 15-p214dx Display Replacement, Display: stap 19, afbeelding 3 van 3
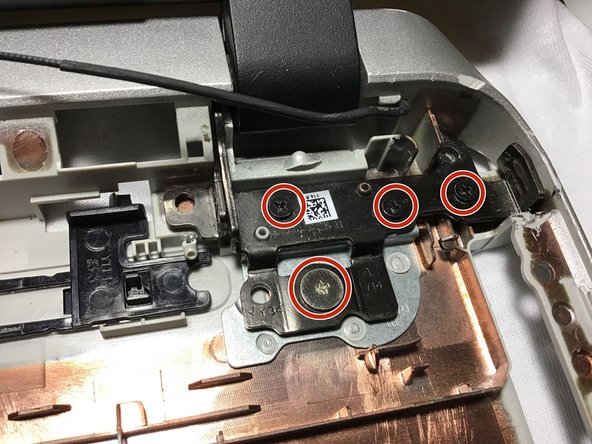
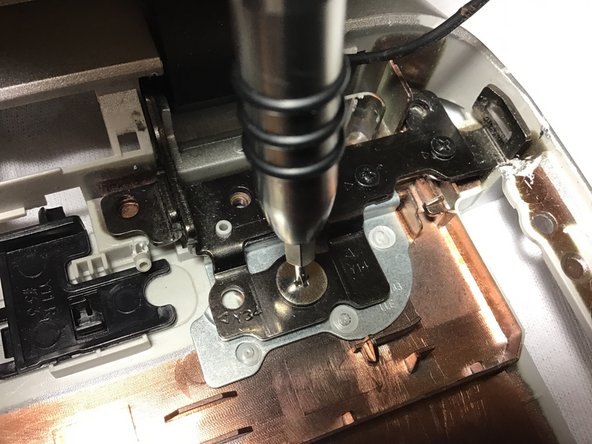
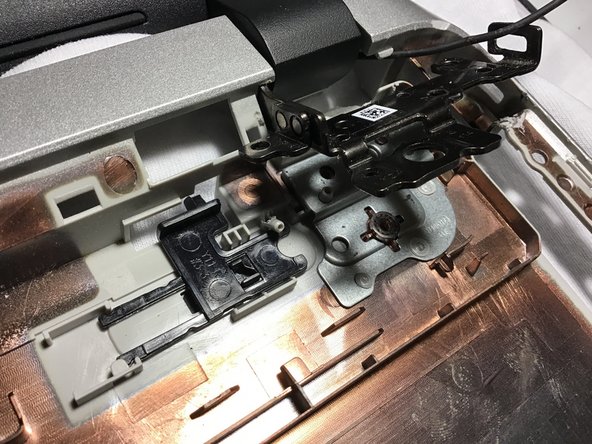
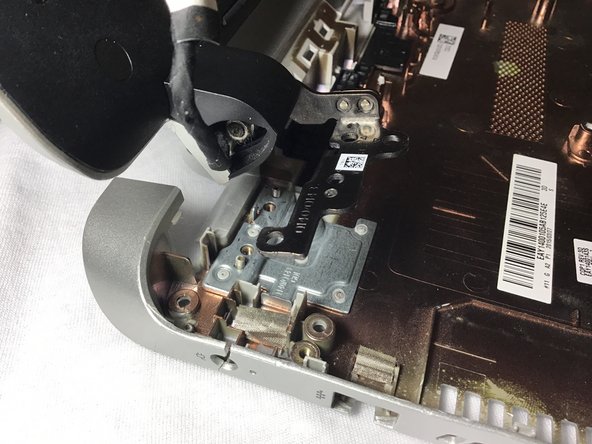
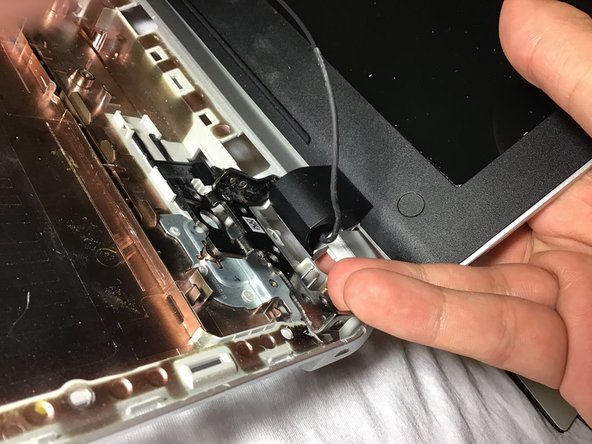
    • Dismount the display corners by removing the labeled 5.5 mm screws on the corners using a Philips #0 screwdriver to remove the screws.

  20. HP Pavilion 15-p214dx Display Replacement: stap 20, afbeelding 1 van 2 HP Pavilion 15-p214dx Display Replacement: stap 20, afbeelding 2 van 2
    • Notice after removing the screws the screen become able to move easily.

  21. HP Pavilion 15-p214dx Display Replacement: stap 21, afbeelding 1 van 3 HP Pavilion 15-p214dx Display Replacement: stap 21, afbeelding 2 van 3 HP Pavilion 15-p214dx Display Replacement: stap 21, afbeelding 3 van 3
    • Line up with the side of the laptop.

    • Push the hinges from left to right to unhook it from it's place.

    • Remove the screen from the device.

Conclusie

To reassemble your device, follow these instructions in reverse order.

Één andere persoon heeft deze handleiding voltooid.

Patrick Seaver

Lid sinds: 03/25/19

1.001 Reputatie

8 handleidingen geschreven

Team

UMass Dartmouth, Team S2-G1, Simcock Spring 2019 Lid van UMass Dartmouth, Team S2-G1, Simcock Spring 2019

UMASSD-SIMCOCK-S19S2G1

4 Leden

8 handleidingen geschreven

0 opmerkingen

Voeg opmerking toe

Weergavestatistieken:

Afgelopen 24 uren: 0

Afgelopen 7 dagen: 1

Afgelopen 30 dagen: 5

Altijd: 1,057