Ga door naar hoofdinhoud

HP Pavilion 15-p046nr Display Screen Replacement

Wat je nodig hebt

  1. HP Pavilion 15-p046nr Display Screen Replacement, Battery: stap 1, afbeelding 1 van 3 HP Pavilion 15-p046nr Display Screen Replacement, Battery: stap 1, afbeelding 2 van 3 HP Pavilion 15-p046nr Display Screen Replacement, Battery: stap 1, afbeelding 3 van 3
    • Flip the laptop over so the bottom is facing up.

    • Place your finger on the top left-hand slide button with the lock symbol.

    • Moving the slide does require some force.

    • Slide the button to the right so that an unlocked symbol is visible.

  2. HP Pavilion 15-p046nr Display Screen Replacement: stap 2, afbeelding 1 van 3 HP Pavilion 15-p046nr Display Screen Replacement: stap 2, afbeelding 2 van 3 HP Pavilion 15-p046nr Display Screen Replacement: stap 2, afbeelding 3 van 3
    • Place your finger or thumb on the top right-hand slide with the battery symbol visible.

    • Slide the button to the left.

    • Moving the slide will require some force.

    • Lift the battery off the computer with your thumb.

    • You will not need to slide the right button with the battery to reinstall the battery.

  3. HP Pavilion 15-p046nr Display Screen Replacement, Integrated Keyboard: stap 3, afbeelding 1 van 3 HP Pavilion 15-p046nr Display Screen Replacement, Integrated Keyboard: stap 3, afbeelding 2 van 3 HP Pavilion 15-p046nr Display Screen Replacement, Integrated Keyboard: stap 3, afbeelding 3 van 3
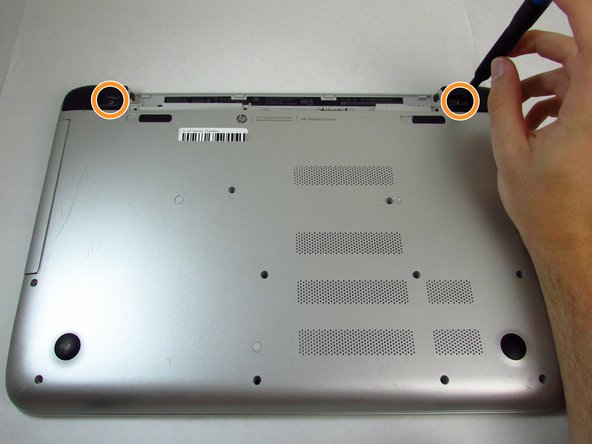
    • Remove screw covers from the hinge covers on the upper left and right side.

    • Unscrew one 7 mm screw from each hinge cover using the Phillips #00 screwdriver.

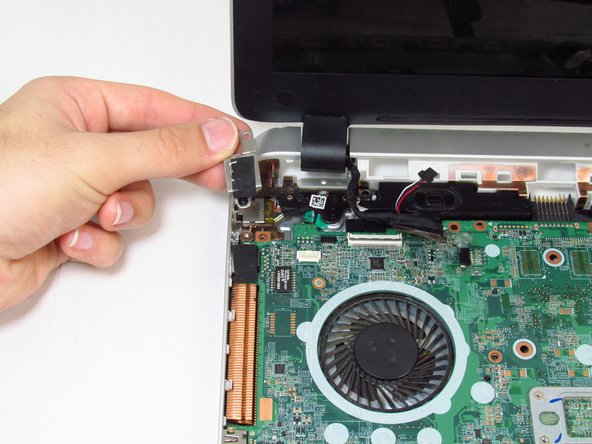
    • Remove hinge covers by pulling up and out on the top of the cover.

  4. HP Pavilion 15-p046nr Display Screen Replacement: stap 4, afbeelding 1 van 3 HP Pavilion 15-p046nr Display Screen Replacement: stap 4, afbeelding 2 van 3 HP Pavilion 15-p046nr Display Screen Replacement: stap 4, afbeelding 3 van 3
    • Remove thirteen 7 mm screws from the back panel using the Phillips #00 screwdriver.

    • Remove three 5 mm screws from the back panel using the Phillips #00 screwdriver.

    • Grab the disk drive on the left side and pull the disk drive out completely.

    • Flip the laptop over and open the display.

  5. HP Pavilion 15-p046nr Display Screen Replacement: stap 5, afbeelding 1 van 2 HP Pavilion 15-p046nr Display Screen Replacement: stap 5, afbeelding 2 van 2
    • Run the plastic opening tool along the entire edge of the keyboard to separate the keyboard from the base of the laptop.

    • Gently lift the keyboard tray up.

    • Use care to lift the keyboard off of the device. The keyboard is still attached by ribbon cables.

  6. HP Pavilion 15-p046nr Display Screen Replacement: stap 6, afbeelding 1 van 2 HP Pavilion 15-p046nr Display Screen Replacement: stap 6, afbeelding 2 van 2
    • Use the tip of the blue plastic opening tool to gently flip-up the grey locking flap of the two ribbon cables connecting the keyboard to the device.

    • Make sure to only lift the flap and not the connector socket because the socket easily breaks off.

    • Grab the ribbon cable and gently pull away from the socket.

    • To reinstall, insert the ribbon cable into the connector and close the flap on the black line.

  7. HP Pavilion 15-p046nr Display Screen Replacement: stap 7, afbeelding 1 van 3 HP Pavilion 15-p046nr Display Screen Replacement: stap 7, afbeelding 2 van 3 HP Pavilion 15-p046nr Display Screen Replacement: stap 7, afbeelding 3 van 3
    • Lift the keyboard up and away from the device.

    • Removing the keyboard exposes the motherboard and its sensitive components. Ensure no tools or items are set on the motherboard or it could cause damage.

  8. HP Pavilion 15-p046nr Display Screen Replacement, Display Screen: stap 8, afbeelding 1 van 2 HP Pavilion 15-p046nr Display Screen Replacement, Display Screen: stap 8, afbeelding 2 van 2
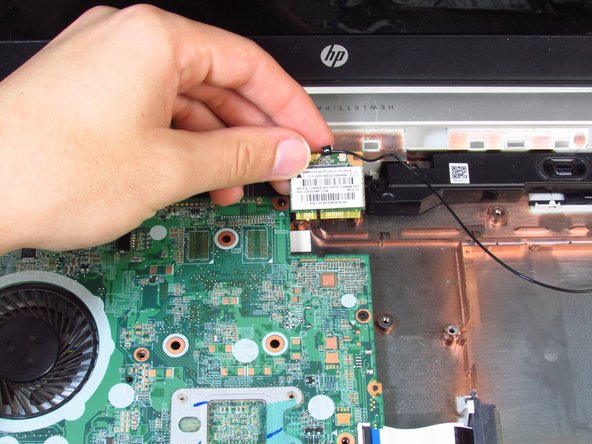
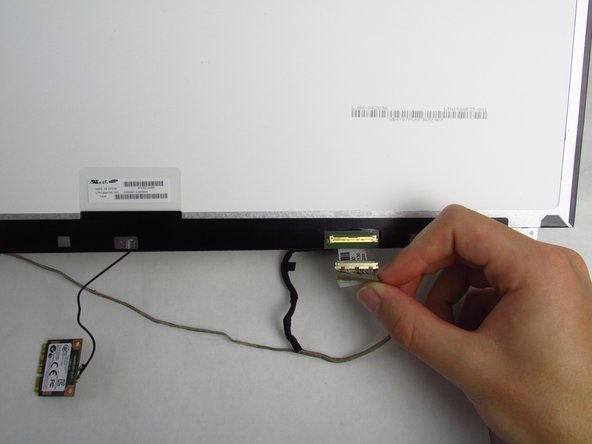
    • Use the tip of the blue plastic opening tool to gently flip-up the black locking flap of the cable connecting the motherboard to the display.

    • Make sure to only lift the flap and not the connector socket because the socket easily breaks off.

    • Grab the cable and gently pull away from the socket.

  9. HP Pavilion 15-p046nr Display Screen Replacement: stap 9, afbeelding 1 van 2 HP Pavilion 15-p046nr Display Screen Replacement: stap 9, afbeelding 2 van 2
    • Unscrew one captive screw on the wireless card using the Phillips #00 screwdriver. The wireless card will angle upwards when the screw is removed.

    • Gently pull the sound chip away from the motherboard at the same angle at which it rests.

  10. HP Pavilion 15-p046nr Display Screen Replacement: stap 10, afbeelding 1 van 2 HP Pavilion 15-p046nr Display Screen Replacement: stap 10, afbeelding 2 van 2
    • In the upper left corner of the motherboard, unscrew one captive screw from the charger port cover using the Phillips #00 screwdriver.

    • Remove the charger port cover from the device.

  11. HP Pavilion 15-p046nr Display Screen Replacement: stap 11, afbeelding 1 van 1
    • Remove all of the screws from the black hinge mounts on either side of the device using a Phillips #00 screwdriver.

  12. HP Pavilion 15-p046nr Display Screen Replacement: stap 12, afbeelding 1 van 2 HP Pavilion 15-p046nr Display Screen Replacement: stap 12, afbeelding 2 van 2
    • Carefully separate the top of the laptop and its hinges from the bottom half by pulling forward and up.

    • Ensure the wires protruding from the hinges do not get cut. You may need to maneuver the wires out of the way when separating the hinges.

    • Some force is required to pop the hinges out from the casing.

    • Remove the display from the device.

  13. HP Pavilion 15-p046nr Display Screen Replacement: stap 13, afbeelding 1 van 3 HP Pavilion 15-p046nr Display Screen Replacement: stap 13, afbeelding 2 van 3 HP Pavilion 15-p046nr Display Screen Replacement: stap 13, afbeelding 3 van 3
    • Use the blue plastic opening tool to remove the two small screw covers on the bottom corners of the display.

    • Remove the two 4 mm screws under each cover using the Phillips #00 screwdriver.

  14. HP Pavilion 15-p046nr Display Screen Replacement: stap 14, afbeelding 1 van 3 HP Pavilion 15-p046nr Display Screen Replacement: stap 14, afbeelding 2 van 3 HP Pavilion 15-p046nr Display Screen Replacement: stap 14, afbeelding 3 van 3
    • Use the tip of the blue plastic opening tool to separate the outer edge of the screen from the laptop.

    • It may be easier to use the opening tool on both the inside and outside perimeter of the cover. Be sure to go around all edges before lifting the outer edge off.

    • Remove the display screen cover from the device.

  15. HP Pavilion 15-p046nr Display Screen Replacement: stap 15, afbeelding 1 van 3 HP Pavilion 15-p046nr Display Screen Replacement: stap 15, afbeelding 2 van 3 HP Pavilion 15-p046nr Display Screen Replacement: stap 15, afbeelding 3 van 3
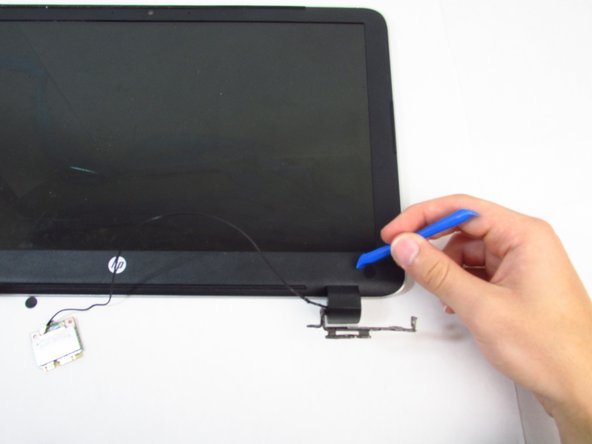
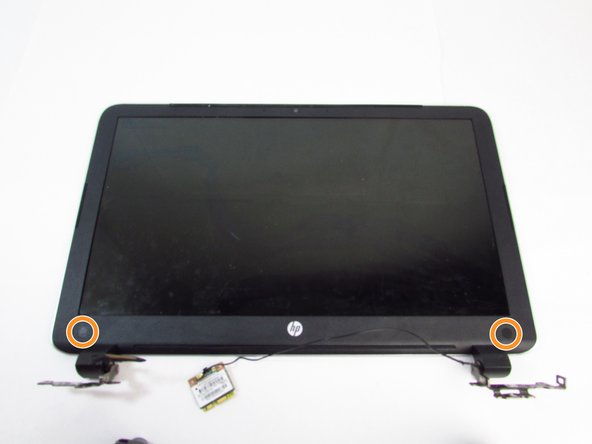
    • Remove the two 2 mm screws from around the display using the Phillips #00 screwdriver.

    • Remove two 1.5 mm screws from around the display using the Phillips #00 screwdriver.

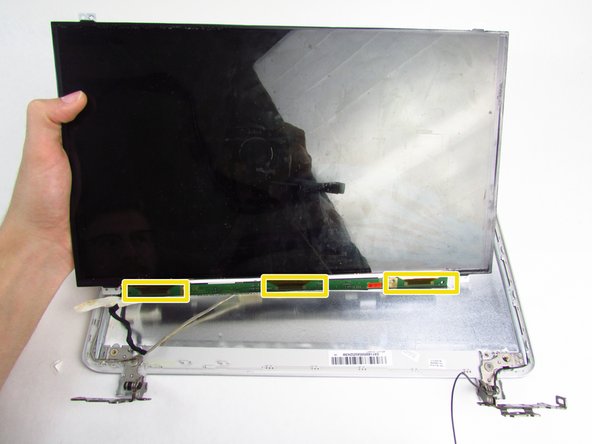
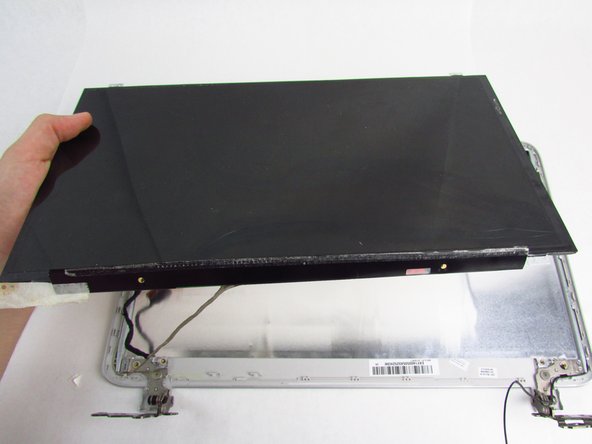
    • Carefully peel off the tape at the bottom of the screen to separate the green chip from the screen.

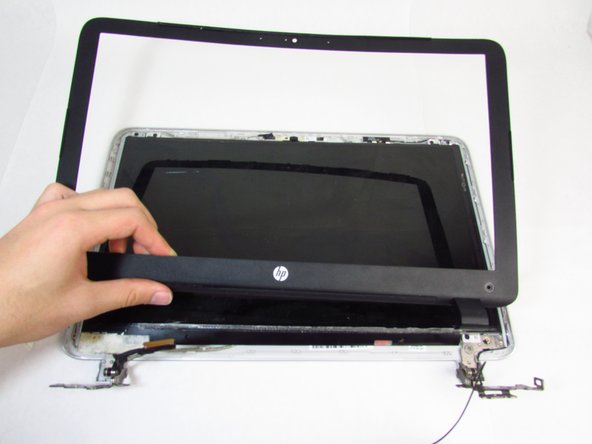
    • Remove the screen from the display.

  16. HP Pavilion 15-p046nr Display Screen Replacement: stap 16, afbeelding 1 van 3 HP Pavilion 15-p046nr Display Screen Replacement: stap 16, afbeelding 2 van 3 HP Pavilion 15-p046nr Display Screen Replacement: stap 16, afbeelding 3 van 3
    • Flip the screen over so that the screen is face down.

    • Remove white video chip from screen by peeling off the tape and gently pulling on the white cable.

    • Be careful not to yank or jerk the cables because they can be easily broken.

    • Remove the screen.

Conclusie

To reassemble your device, follow these instructions in reverse order.

0 opmerkingen

Voeg opmerking toe

Weergavestatistieken:

Afgelopen 24 uren: 0

Afgelopen 7 dagen: 4

Afgelopen 30 dagen: 15

Altijd: 580