Ga door naar hoofdinhoud

HP Pavilion 15-ab165us Fan Replacement

Wat je nodig hebt

  1. HP Pavilion 15-ab165us Fan Replacement, Battery and Back Cover: stap 1, afbeelding 1 van 2 HP Pavilion 15-ab165us Fan Replacement, Battery and Back Cover: stap 1, afbeelding 2 van 2
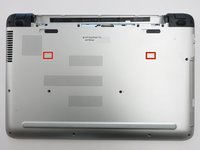
    • Flip the computer over so that the bottom cover is facing you.

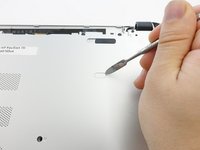
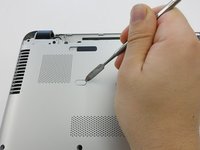
    • Slide the two locks to the "unlock" position and remove the battery.

  2. HP Pavilion 15-ab165us Fan Replacement: stap 2, afbeelding 1 van 3 HP Pavilion 15-ab165us Fan Replacement: stap 2, afbeelding 2 van 3 HP Pavilion 15-ab165us Fan Replacement: stap 2, afbeelding 3 van 3
    • Remove the two 8mm screws underneath with a Phillips #1 screwdriver.

    • Use a plastic opening tool to remove the plastic feet.

  3. HP Pavilion 15-ab165us Fan Replacement: stap 3, afbeelding 1 van 3 HP Pavilion 15-ab165us Fan Replacement: stap 3, afbeelding 2 van 3 HP Pavilion 15-ab165us Fan Replacement: stap 3, afbeelding 3 van 3
    • Remove the two plastic tabs with a metal spudger.

  4. HP Pavilion 15-ab165us Fan Replacement: stap 4, afbeelding 1 van 1
    • Remove the sixteen 8mm screws that hold the bottom cover with a Phillips #1 screwdriver.

  5. HP Pavilion 15-ab165us Fan Replacement: stap 5, afbeelding 1 van 1
    • Pull the Optical Drive out.

  6. HP Pavilion 15-ab165us Fan Replacement: stap 6, afbeelding 1 van 1
    • Remove the 3mm screws that were hidden under the Optical Drive with a Phillips #0 screwdriver.

  7. HP Pavilion 15-ab165us Fan Replacement: stap 7, afbeelding 1 van 2 HP Pavilion 15-ab165us Fan Replacement: stap 7, afbeelding 2 van 2
    • Flip the computer back over.

    • Use a plastic opening tool to release the clips holding the keyboard section in place.

  8. HP Pavilion 15-ab165us Fan Replacement: stap 8, afbeelding 1 van 1
    • Close the lid and pull the screen and keyboard section up and away from the disconnected bottom cover.

    • The hard drive is NOT screwed into place on the underside of the keyboard section.

  9. HP Pavilion 15-ab165us Fan Replacement, Fan: stap 9, afbeelding 1 van 1
    • Disconnect the fan from the motherboard.

  10. HP Pavilion 15-ab165us Fan Replacement: stap 10, afbeelding 1 van 3 HP Pavilion 15-ab165us Fan Replacement: stap 10, afbeelding 2 van 3 HP Pavilion 15-ab165us Fan Replacement: stap 10, afbeelding 3 van 3
    • Remove the the three 3mm screws with the Phillips#00 screwdriver.

  11. HP Pavilion 15-ab165us Fan Replacement: stap 11, afbeelding 1 van 2 HP Pavilion 15-ab165us Fan Replacement: stap 11, afbeelding 2 van 2
    • Remove the fan from the motherboard.

Conclusie

To reassemble your device, follow these instructions in reverse order.

Chad Christy

Lid sinds: 11/07/19

205 Reputatie

2 handleidingen geschreven

Team

IUPUI, Team S3-G1, Harley Fall 2019 Lid van IUPUI, Team S3-G1, Harley Fall 2019

IUPUI-HARLEY-F19S3G1

4 Leden

2 handleidingen geschreven

0 opmerkingen

Voeg opmerking toe

Weergavestatistieken:

Afgelopen 24 uren: 0

Afgelopen 7 dagen: 1

Afgelopen 30 dagen: 4

Altijd: 638