Ga door naar hoofdinhoud

HP Pavilion 15-ab165us Battery and Back Cover Replacement

Wat je nodig hebt

  1. HP Pavilion 15-ab165us Battery and Back Cover Replacement, Battery and Back Cover: stap 1, afbeelding 1 van 2 HP Pavilion 15-ab165us Battery and Back Cover Replacement, Battery and Back Cover: stap 1, afbeelding 2 van 2
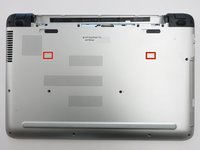
    • Flip the computer over so that the bottom cover is facing you.

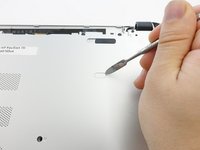
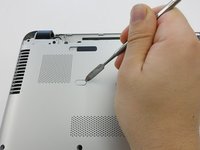
    • Slide the two locks to the "unlock" position and remove the battery.

  2. HP Pavilion 15-ab165us Battery and Back Cover Replacement: stap 2, afbeelding 1 van 3 HP Pavilion 15-ab165us Battery and Back Cover Replacement: stap 2, afbeelding 2 van 3 HP Pavilion 15-ab165us Battery and Back Cover Replacement: stap 2, afbeelding 3 van 3
    • Remove the two 8mm screws underneath with a Phillips #1 screwdriver.

    • Use a plastic opening tool to remove the plastic feet.

  3. HP Pavilion 15-ab165us Battery and Back Cover Replacement: stap 3, afbeelding 1 van 3 HP Pavilion 15-ab165us Battery and Back Cover Replacement: stap 3, afbeelding 2 van 3 HP Pavilion 15-ab165us Battery and Back Cover Replacement: stap 3, afbeelding 3 van 3
    • Remove the two plastic tabs with a metal spudger.

  4. HP Pavilion 15-ab165us Battery and Back Cover Replacement: stap 4, afbeelding 1 van 1
    • Remove the sixteen 8mm screws that hold the bottom cover with a Phillips #1 screwdriver.

  5. HP Pavilion 15-ab165us Battery and Back Cover Replacement: stap 5, afbeelding 1 van 1
    • Pull the Optical Drive out.

  6. HP Pavilion 15-ab165us Battery and Back Cover Replacement: stap 6, afbeelding 1 van 1
    • Remove the 3mm screws that were hidden under the Optical Drive with a Phillips #0 screwdriver.

  7. HP Pavilion 15-ab165us Battery and Back Cover Replacement: stap 7, afbeelding 1 van 2 HP Pavilion 15-ab165us Battery and Back Cover Replacement: stap 7, afbeelding 2 van 2
    • Flip the computer back over.

    • Use a plastic opening tool to release the clips holding the keyboard section in place.

  8. HP Pavilion 15-ab165us Battery and Back Cover Replacement: stap 8, afbeelding 1 van 1
    • Close the lid and pull the screen and keyboard section up and away from the disconnected bottom cover.

    • The hard drive is NOT screwed into place on the underside of the keyboard section.

Conclusie

To reassemble your device, follow these instructions in reverse order.

10 andere personen hebben deze handleiding voltooid.

Dillon Hubble

Lid sinds: 10/20/17

653 Reputatie

3 handleidingen geschreven

Team

UW Tacoma, Team S1-G2, Rose Fall 2017 Lid van UW Tacoma, Team S1-G2, Rose Fall 2017

UWT-ROSE-F17S1G2

5 Leden

14 handleidingen geschreven

Één opmerking

Where can i buy the case? I couldn’t anywhere online??

Model - HP Pavilion 15 8th gen B&O

Jackson Beno - Antwoord

Voeg opmerking toe

Weergavestatistieken:

Afgelopen 24 uren: 0

Afgelopen 7 dagen: 21

Afgelopen 30 dagen: 87

Altijd: 66,492