Ga door naar hoofdinhoud

HP Laserjet Pro 200 Color MFP Fan Replacement

Wat je nodig hebt

  1. HP Laserjet Pro 200 Color MFP Fan Replacement, Fan: stap 1, afbeelding 1 van 2 HP Laserjet Pro 200 Color MFP Fan Replacement, Fan: stap 1, afbeelding 2 van 2
    • Turn the printer so that the front is facing to your left.

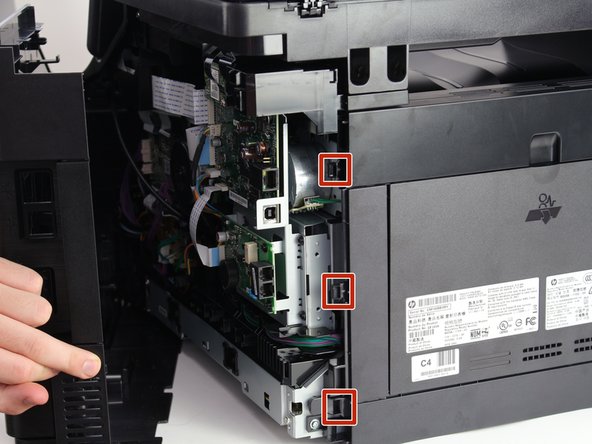
    • Flip the printer so that it is laying with its right side facing down and the bottom facing you.

  2. HP Laserjet Pro 200 Color MFP Fan Replacement: stap 2, afbeelding 1 van 1
    • Remove the 8 mm screw on the top edge of the printer using a #2 Phillips head screwdriver.

  3. HP Laserjet Pro 200 Color MFP Fan Replacement: stap 3, afbeelding 1 van 3 HP Laserjet Pro 200 Color MFP Fan Replacement: stap 3, afbeelding 2 van 3 HP Laserjet Pro 200 Color MFP Fan Replacement: stap 3, afbeelding 3 van 3
    • There are three tabs along the back right corner of the printer underneath the panel shown (location is displayed in second picture).

    • Use a flathead screwdriver to depress these tabs while lightly pulling the panel towards you.

    • Begin with the upmost tab and move your way down, individually depressing the tabs while simultaneously pulling the panel towards you, removing it from the printer.

  4. HP Laserjet Pro 200 Color MFP Fan Replacement: stap 4, afbeelding 1 van 1
    • Rotate the printer so you are facing the open side.

  5. HP Laserjet Pro 200 Color MFP Fan Replacement: stap 5, afbeelding 1 van 1
    • Gently pull out the plug that supplies power to the fan from the socket on the circuit board.

    • Be careful when removing the plug as the components are fragile.

  6. HP Laserjet Pro 200 Color MFP Fan Replacement: stap 6, afbeelding 1 van 3 HP Laserjet Pro 200 Color MFP Fan Replacement: stap 6, afbeelding 2 van 3 HP Laserjet Pro 200 Color MFP Fan Replacement: stap 6, afbeelding 3 van 3
    • There are three tabs that hold the fan in place, as shown in the first picture. These steps may require an extra pair of hands in order to depress all the tabs.

    • Push each tab outwards from the fan.

    • Simultaneously pull the fan towards you until the fan clears the face of the printer.

Conclusie

To reassemble your device, follow the instructions in reverse order.

2 andere personen hebben deze handleiding voltooid.

Kendall Gentzen

Lid sinds: 04/18/19

981 Reputatie

5 handleidingen geschreven

Team

Cal Poly, Team S9-G14, Maness Spring 2019 Lid van Cal Poly, Team S9-G14, Maness Spring 2019

CPSU-MANESS-S19S9G14

4 Leden

11 handleidingen geschreven

0 opmerkingen

Voeg opmerking toe

Weergavestatistieken:

Afgelopen 24 uren: 2

Afgelopen 7 dagen: 3

Afgelopen 30 dagen: 16

Altijd: 1,070