Ga door naar hoofdinhoud

HP Envy x360 15m-bp112dx Speaker Replacement

Wat je nodig hebt

  1. HP Envy x360 15m-bp112dx Speaker Replacement, Hard Drive: stap 1, afbeelding 1 van 1
    • Power off the laptop before starting the disassembly.

    • Start by facing the device upside down with the hinge facing away from you.

    • Remove the seven 1 mm Phillips screws.

  2. HP Envy x360 15m-bp112dx Speaker Replacement: stap 2, afbeelding 1 van 3 HP Envy x360 15m-bp112dx Speaker Replacement: stap 2, afbeelding 2 van 3 HP Envy x360 15m-bp112dx Speaker Replacement: stap 2, afbeelding 3 van 3
    • Use an opening tool to pry the back panel by pushing the bottom cover upwards.

    • Place the bottom cover away from the laptop.

  3. HP Envy x360 15m-bp112dx Speaker Replacement: stap 3, afbeelding 1 van 3 HP Envy x360 15m-bp112dx Speaker Replacement: stap 3, afbeelding 2 van 3 HP Envy x360 15m-bp112dx Speaker Replacement: stap 3, afbeelding 3 van 3
    • Carefully remove the sata ribbon cable from the hard drive, pulling it out horizontally.

    • To avoid injury, ensure that you disconnect the battery prior to removing any of the cables in the laptop.

  4. HP Envy x360 15m-bp112dx Speaker Replacement: stap 4, afbeelding 1 van 3 HP Envy x360 15m-bp112dx Speaker Replacement: stap 4, afbeelding 2 van 3 HP Envy x360 15m-bp112dx Speaker Replacement: stap 4, afbeelding 3 van 3
    • Remove the hard drive by pulling it out vertically.

    • Remove the plastic casing around the hard drive by peeling it back.

  5. HP Envy x360 15m-bp112dx Speaker Replacement: stap 5, afbeelding 1 van 2 HP Envy x360 15m-bp112dx Speaker Replacement: stap 5, afbeelding 2 van 2
    • Disconnect the ribbon cable by pulling it away horizontally from the hard drive.

  6. HP Envy x360 15m-bp112dx Speaker Replacement, Fan: stap 6, afbeelding 1 van 2 HP Envy x360 15m-bp112dx Speaker Replacement, Fan: stap 6, afbeelding 2 van 2
    • Carefully peel back the tape connecting the heat sink to the fan assembly.

    • Loosen the four 1 mm Phillips screws retaining the fan assembly.

    • Remove the three 2 mm Phillips screws.

  7. HP Envy x360 15m-bp112dx Speaker Replacement: stap 7, afbeelding 1 van 3 HP Envy x360 15m-bp112dx Speaker Replacement: stap 7, afbeelding 2 van 3 HP Envy x360 15m-bp112dx Speaker Replacement: stap 7, afbeelding 3 van 3
    • Unplug the thin cable connected to the fan, pulling horizontally.

    • Carefully peel back the connected tape.

  8. HP Envy x360 15m-bp112dx Speaker Replacement: stap 8, afbeelding 1 van 2 HP Envy x360 15m-bp112dx Speaker Replacement: stap 8, afbeelding 2 van 2
    • Carefully remove the fan assembly by pulling on it upwards.

    • When reassembling, ensure that you clean off and replace the thermal paste on the fan assembly.

  9. HP Envy x360 15m-bp112dx Speaker Replacement, Motherboard: stap 9, afbeelding 1 van 3 HP Envy x360 15m-bp112dx Speaker Replacement, Motherboard: stap 9, afbeelding 2 van 3 HP Envy x360 15m-bp112dx Speaker Replacement, Motherboard: stap 9, afbeelding 3 van 3
    • Remove the two 5 mm Phillips screws from the first speaker.

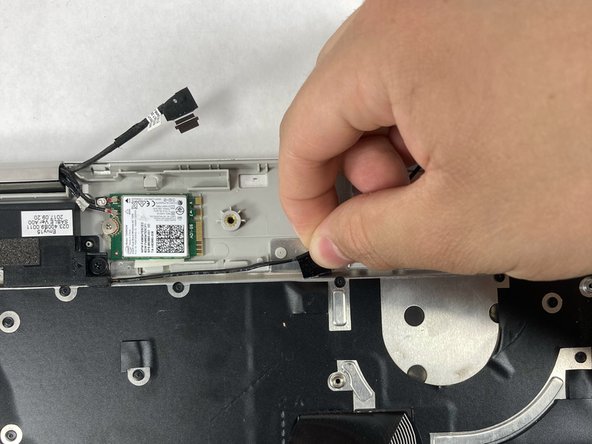
    • Carefully peel back the tape.

  10. HP Envy x360 15m-bp112dx Speaker Replacement: stap 10, afbeelding 1 van 3 HP Envy x360 15m-bp112dx Speaker Replacement: stap 10, afbeelding 2 van 3 HP Envy x360 15m-bp112dx Speaker Replacement: stap 10, afbeelding 3 van 3
    • Open the tab connected to the right speaker cord, prying it with a plastic opening tool upwards.

    • Pull out the speaker cord horizontally.

  11. HP Envy x360 15m-bp112dx Speaker Replacement: stap 11, afbeelding 1 van 3 HP Envy x360 15m-bp112dx Speaker Replacement: stap 11, afbeelding 2 van 3 HP Envy x360 15m-bp112dx Speaker Replacement: stap 11, afbeelding 3 van 3
    • Remove the thin cable from the speaker, pulling it out horizontally.

  12. HP Envy x360 15m-bp112dx Speaker Replacement: stap 12, afbeelding 1 van 3 HP Envy x360 15m-bp112dx Speaker Replacement: stap 12, afbeelding 2 van 3 HP Envy x360 15m-bp112dx Speaker Replacement: stap 12, afbeelding 3 van 3
    • Remove the right speaker, pulling upward carefully.

    • While pulling on the speaker, unwind the cord around the plastic clips to free the speaker and place it to the side.

  13. HP Envy x360 15m-bp112dx Speaker Replacement: stap 13, afbeelding 1 van 1
    • Remove the twelve 2.5 mm Phillips screws.

  14. HP Envy x360 15m-bp112dx Speaker Replacement: stap 14, afbeelding 1 van 3 HP Envy x360 15m-bp112dx Speaker Replacement: stap 14, afbeelding 2 van 3 HP Envy x360 15m-bp112dx Speaker Replacement: stap 14, afbeelding 3 van 3
    • Unclip the ribbon cable using a plastic opening tool to flip up the black ZIF connector locking flap.

    • Remove the ribbon cable by pulling it out horizontally.

  15. HP Envy x360 15m-bp112dx Speaker Replacement: stap 15, afbeelding 1 van 3 HP Envy x360 15m-bp112dx Speaker Replacement: stap 15, afbeelding 2 van 3 HP Envy x360 15m-bp112dx Speaker Replacement: stap 15, afbeelding 3 van 3
    • Unclip the second ribbon cable using a plastic opening tool to flip the black ZIF connector locking flap up.

    • Remove the ribbon cable by pulling it out horizontally.

  16. HP Envy x360 15m-bp112dx Speaker Replacement: stap 16, afbeelding 1 van 3 HP Envy x360 15m-bp112dx Speaker Replacement: stap 16, afbeelding 2 van 3 HP Envy x360 15m-bp112dx Speaker Replacement: stap 16, afbeelding 3 van 3
    • Unclip the third ribbon cable using a plastic opening tool to flip up the black ZIF connector locking flap.

    • Remove the ribbon cable by pulling it out horizontally.

  17. HP Envy x360 15m-bp112dx Speaker Replacement: stap 17, afbeelding 1 van 2 HP Envy x360 15m-bp112dx Speaker Replacement: stap 17, afbeelding 2 van 2
    • Remove the thin cable carefully by pulling out horizontally in line with its slot.

  18. HP Envy x360 15m-bp112dx Speaker Replacement: stap 18, afbeelding 1 van 3 HP Envy x360 15m-bp112dx Speaker Replacement: stap 18, afbeelding 2 van 3 HP Envy x360 15m-bp112dx Speaker Replacement: stap 18, afbeelding 3 van 3
    • Unclip the fourth ribbon cable using a plastic opening tool to flip up the black ZIF connector.

    • Remove the ribbon cable by pulling it out horizontally.

  19. HP Envy x360 15m-bp112dx Speaker Replacement: stap 19, afbeelding 1 van 2 HP Envy x360 15m-bp112dx Speaker Replacement: stap 19, afbeelding 2 van 2
    • Carefully remove the motherboard by pulling upwards on it.

  20. HP Envy x360 15m-bp112dx Speaker Replacement, Speakers: stap 20, afbeelding 1 van 3 HP Envy x360 15m-bp112dx Speaker Replacement, Speakers: stap 20, afbeelding 2 van 3 HP Envy x360 15m-bp112dx Speaker Replacement, Speakers: stap 20, afbeelding 3 van 3
    • The removal of the right speaker is located in the motherboard guide during steps 1-4.

    • Remove the two 1.5 mm Phillips screws.

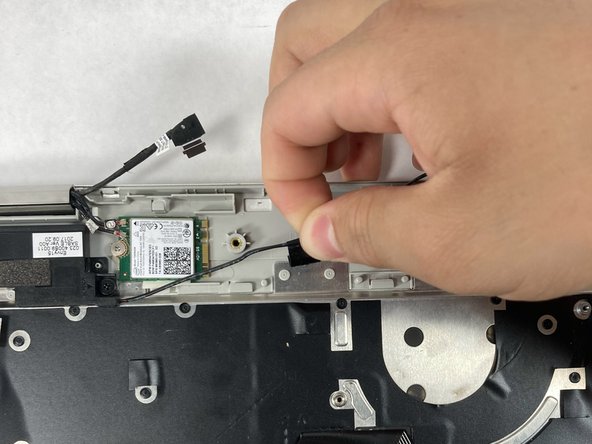
    • Carefully peel the tape back.

    • Pull the left speaker cord around the plastic clips.

  21. HP Envy x360 15m-bp112dx Speaker Replacement: stap 21, afbeelding 1 van 2 HP Envy x360 15m-bp112dx Speaker Replacement: stap 21, afbeelding 2 van 2
    • Carefully remove the left speaker by pulling up vertically.

Conclusie

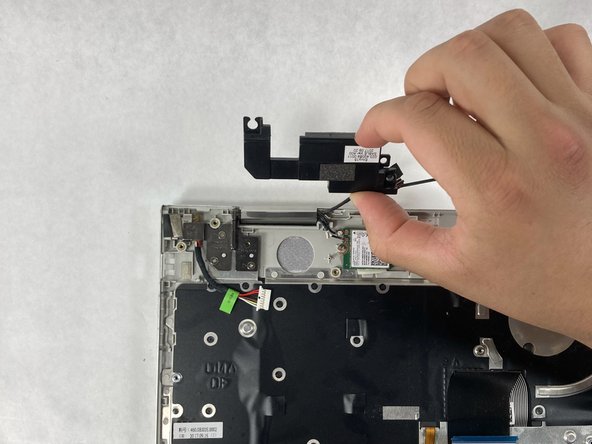
To reassemble your device, follow these instructions in reverse order.

James Bonnell

Lid sinds: 03/20/23

331 Reputatie

2 handleidingen geschreven

Team

UMass Dartmouth, Team 6-2, Botvin Spring 2023 Lid van UMass Dartmouth, Team 6-2, Botvin Spring 2023

UMASSD-BOTVIN-S23S6G2

4 Leden

5 handleidingen geschreven

0 opmerkingen

Voeg opmerking toe

Weergavestatistieken:

Afgelopen 24 uren: 0

Afgelopen 7 dagen: 4

Afgelopen 30 dagen: 26

Altijd: 132