Ga door naar hoofdinhoud

HP Envy x360 15m-bp111dx Charging Port Replacement

Wat je nodig hebt

  1. HP Envy x360 15m-bp111dx Charging Port Replacement, Back Panel: stap 1, afbeelding 1 van 2 HP Envy x360 15m-bp111dx Charging Port Replacement, Back Panel: stap 1, afbeelding 2 van 2
    • Remove the rubber feet to access the screws.

    • Using a Phillips #0 screwdriver, remove the four 7 mm screws.

    • Using a T5 Torx screwdriver, remove the three 5 mm screws.

  2. HP Envy x360 15m-bp111dx Charging Port Replacement: stap 2, afbeelding 1 van 3 HP Envy x360 15m-bp111dx Charging Port Replacement: stap 2, afbeelding 2 van 3 HP Envy x360 15m-bp111dx Charging Port Replacement: stap 2, afbeelding 3 van 3
    • Insert opening picks or an opening tool inside the edge of the chassis to separate the back panel from the rest of the computer.

    • You may hear snapping as the clips are released while you work your way around the perimeter of the computer. This is normal.

    • Remove the back case.

  3. HP Envy x360 15m-bp111dx Charging Port Replacement, Charging Port: stap 3, afbeelding 1 van 3 HP Envy x360 15m-bp111dx Charging Port Replacement, Charging Port: stap 3, afbeelding 2 van 3 HP Envy x360 15m-bp111dx Charging Port Replacement, Charging Port: stap 3, afbeelding 3 van 3
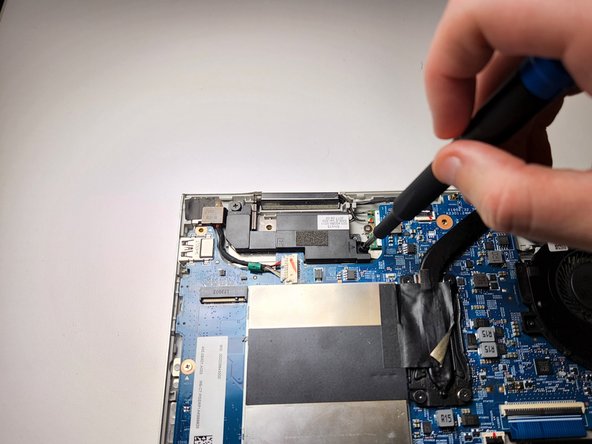
    • Use a Phillips #0 screwdriver to remove the two M2x3.1 screws that secure the speaker in place.

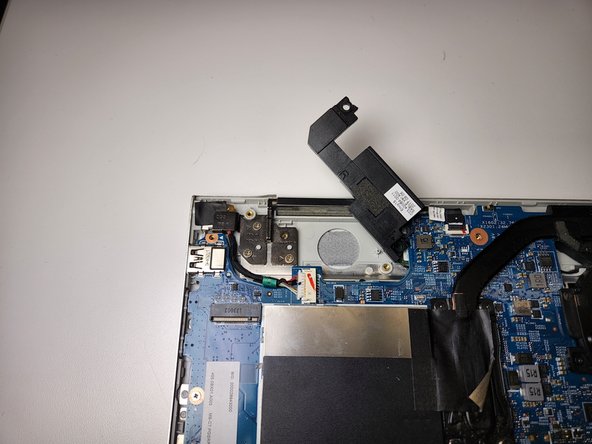
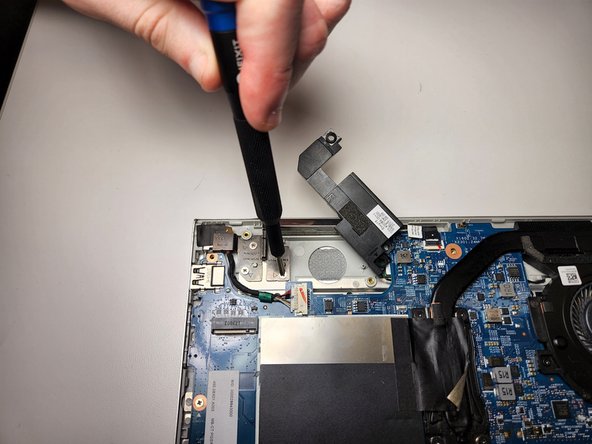
    • Lift and move the speaker to the side.

    • Do not pull too hard on the speaker. It is connected by thin wires that run under the motherboard.

  4. HP Envy x360 15m-bp111dx Charging Port Replacement: stap 4, afbeelding 1 van 2 HP Envy x360 15m-bp111dx Charging Port Replacement: stap 4, afbeelding 2 van 2
    • Use a Phillips #0 screwdriver to remove remove three M2.5x4 screws that secure the hinge.

  5. HP Envy x360 15m-bp111dx Charging Port Replacement: stap 5, afbeelding 1 van 1
    • Use the opening tool to raise the hinge.

    • Then lift the hinge by hand to provide enough clearance to remove the charging port.

    • Be careful when lifting the hinge. The back can be bent and damaged if raised too far.

  6. HP Envy x360 15m-bp111dx Charging Port Replacement: stap 6, afbeelding 1 van 2 HP Envy x360 15m-bp111dx Charging Port Replacement: stap 6, afbeelding 2 van 2
    • Gently slide the charging port connector out of the port, and lift it above the hinge.

  7. HP Envy x360 15m-bp111dx Charging Port Replacement: stap 7, afbeelding 1 van 3 HP Envy x360 15m-bp111dx Charging Port Replacement: stap 7, afbeelding 2 van 3 HP Envy x360 15m-bp111dx Charging Port Replacement: stap 7, afbeelding 3 van 3
    • Grasp the sliding connector on the motherboard and remove it from the socket.

  8. HP Envy x360 15m-bp111dx Charging Port Replacement: stap 8, afbeelding 1 van 1
    • Remove the charging port.

Conclusie

To reassemble your device, follow these instructions in reverse order.

Één andere persoon heeft deze handleiding voltooid.

Tori Luongo

Lid sinds: 02/22/22

268 Reputatie

2 handleidingen geschreven

Team

Clemson, Team 2-2, Hunter Spring 2022 Lid van Clemson, Team 2-2, Hunter Spring 2022

CLEM-HUNTER-S22S2G2

5 Leden

6 handleidingen geschreven

Één opmerking

What is a typical charge for a technician to replace the charging port and what should a typical charging port cost?

Robert Ford - Antwoord

Voeg opmerking toe

Weergavestatistieken:

Afgelopen 24 uren: 0

Afgelopen 7 dagen: 2

Afgelopen 30 dagen: 11

Altijd: 539