Ga door naar hoofdinhoud

HP Envy x2 13-j002dx Motherboard Replacement

Wat je nodig hebt

  1. HP Envy x2 13-j002dx Motherboard Replacement, Battery: stap 1, afbeelding 1 van 1
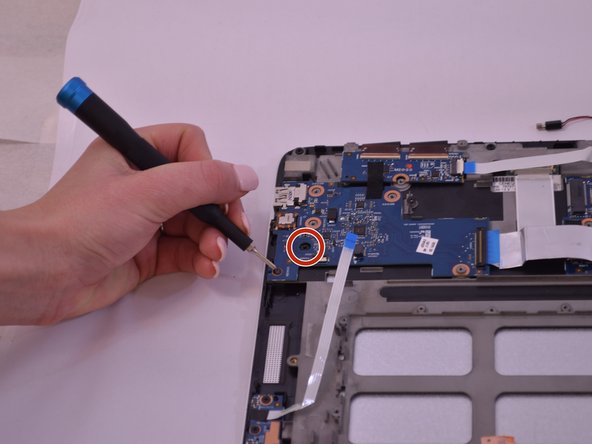
    • Remove five 4mm Phillips #0 screws securing the lower case to the HP Envy x2 13-j002dx.

  2. HP Envy x2 13-j002dx Motherboard Replacement: stap 2, afbeelding 1 van 1
    • Use a Phillips #00 screwdriver to remove the two 3.5 mm screws from the bottom of the device—one on each side of the keyboard dock.

  3. HP Envy x2 13-j002dx Motherboard Replacement: stap 3, afbeelding 1 van 1
    • Use a pair of tweezers to remove the screw covers on the bottom of the device.

    • Use a Phillips #0 screwdriver to remove the two 4mm screws.

  4. HP Envy x2 13-j002dx Motherboard Replacement: stap 4, afbeelding 1 van 2 HP Envy x2 13-j002dx Motherboard Replacement: stap 4, afbeelding 2 van 2
    • Use an opening pick to remove the plastic cover above the back stand.

    • Pry the cover off.

    • Use a Phillips #0 screwdriver to remove the four 4 mm screws.

  5. HP Envy x2 13-j002dx Motherboard Replacement: stap 5, afbeelding 1 van 1
    • Use an opening pick and a prying tool, and go around the device to remove the back cover from the rest of the assembly.

  6. HP Envy x2 13-j002dx Motherboard Replacement: stap 6, afbeelding 1 van 1
    • Unplug the battery from the motherboard.

  7. HP Envy x2 13-j002dx Motherboard Replacement: stap 7, afbeelding 1 van 2 HP Envy x2 13-j002dx Motherboard Replacement: stap 7, afbeelding 2 van 2
    • Carefully pull up on the battery connector from the speaker.

    • Use a pair of tweezers and remove the taped down wire for the speaker.

    • Use a Phillips #00 screwdriver to remove the seven 3mm screws around the battery.

  8. HP Envy x2 13-j002dx Motherboard Replacement: stap 8, afbeelding 1 van 1
    • Carefully lift up and remove the battery.

  9. HP Envy x2 13-j002dx Motherboard Replacement, Motherboard: stap 9, afbeelding 1 van 1
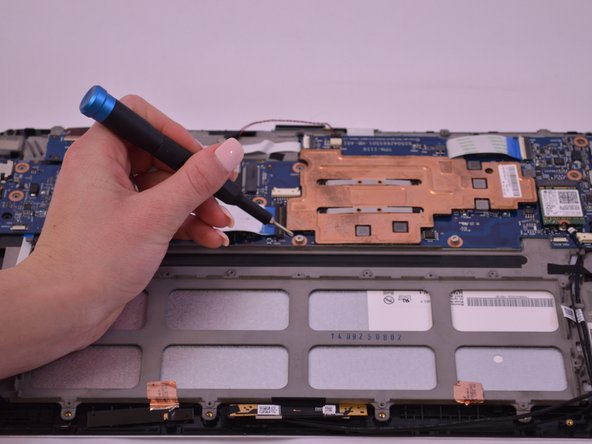
    • Before removing the motherboard, clear away any dust, and ensure that the battery is already removed.

  10. HP Envy x2 13-j002dx Motherboard Replacement: stap 10, afbeelding 1 van 2 HP Envy x2 13-j002dx Motherboard Replacement: stap 10, afbeelding 2 van 2
    • Using a Phillips #0 screwdriver, remove the three 3.8 mm screws along the edge of the motherboard.

  11. HP Envy x2 13-j002dx Motherboard Replacement: stap 11, afbeelding 1 van 2 HP Envy x2 13-j002dx Motherboard Replacement: stap 11, afbeelding 2 van 2
    • Disconnect the cable connectors from the motherboard. This can be done with either tweezers or with your fingers.

  12. HP Envy x2 13-j002dx Motherboard Replacement: stap 12, afbeelding 1 van 2 HP Envy x2 13-j002dx Motherboard Replacement: stap 12, afbeelding 2 van 2
    • Using the Phillips #0 screwdriver, remove the 3.2mm screws within the copper rings in the circuit board.

    • Using the Phillips #0 screwdriver, remove the 2.5mm and 4.25mm black screws on the motherboard.

  13. HP Envy x2 13-j002dx Motherboard Replacement: stap 13, afbeelding 1 van 1
    • Once the screws and cables are disconnected and removed, remove the motherboard from the frame.

Conclusie

To reassemble your device, follow these instructions in reverse order.

Één andere persoon heeft deze handleiding voltooid.

Colton Moon

Lid sinds: 11/04/19

241 Reputatie

2 handleidingen geschreven

0 opmerkingen

Voeg opmerking toe

Weergavestatistieken:

Afgelopen 24 uren: 0

Afgelopen 7 dagen: 1

Afgelopen 30 dagen: 5

Altijd: 552