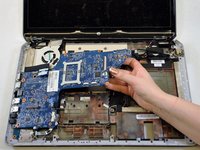
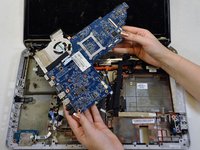
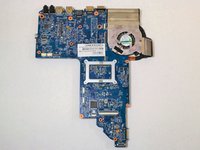
Ga door naar hoofdinhoud

HP Envy dv7t-7200 Motherboard Replacement

Wat je nodig hebt

  1. HP Envy dv7t-7200 Motherboard Replacement, Battery: stap 1, afbeelding 1 van 1
    • Turn the power off and disconnect all cables and cords from the laptop.

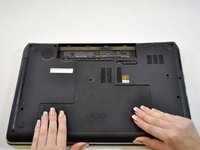
    • Place the computer on its top on a flat surface with the hinges facing away from you.

  2. HP Envy dv7t-7200 Motherboard Replacement: stap 2, afbeelding 1 van 3 HP Envy dv7t-7200 Motherboard Replacement: stap 2, afbeelding 2 van 3 HP Envy dv7t-7200 Motherboard Replacement: stap 2, afbeelding 3 van 3
    • Slide the battery release latch to the left which is located on the right-hand side of the battery.

  3. HP Envy dv7t-7200 Motherboard Replacement: stap 3, afbeelding 1 van 1
    • Tilt the battery away from you and lift out.

  4. HP Envy dv7t-7200 Motherboard Replacement, Service Cover: stap 4, afbeelding 1 van 1
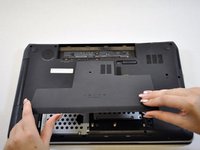
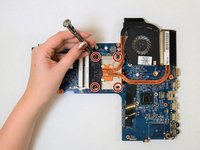
    • Using a Phillips #01 screwdriver, remove the Phillips PM2.5×5.5 screw on the service cover.

    • This screw does not come out of the service cover completely once loosened.

  5. HP Envy dv7t-7200 Motherboard Replacement: stap 5, afbeelding 1 van 2 HP Envy dv7t-7200 Motherboard Replacement: stap 5, afbeelding 2 van 2
    • Slide the service cover toward the front of the laptop.

    • Lift the service cover to remove it from the laptop.

  6. HP Envy dv7t-7200 Motherboard Replacement, Hard Drive: stap 6, afbeelding 1 van 1
    • Remove the 2 Phillips PM2.5×5.5 top screws from brackets on both hard drives.

  7. HP Envy dv7t-7200 Motherboard Replacement: stap 7, afbeelding 1 van 1
    • Remove the primary drive first located on the right hand side.

    • Use the black tab to lift the drive up and out.

  8. HP Envy dv7t-7200 Motherboard Replacement: stap 8, afbeelding 1 van 1
    • Remove the 2 Phillips PM2.5×5.5 screws on each side of the drive bracket.

  9. HP Envy dv7t-7200 Motherboard Replacement: stap 9, afbeelding 1 van 1
    • Remove the hard drive connector cable.

    • This cable can be difficult to remove. Try to pull this cable firmly and carefully.

  10. HP Envy dv7t-7200 Motherboard Replacement: stap 10, afbeelding 1 van 1
    • Repeat steps 6-9 for the secondary hard drive.

  11. HP Envy dv7t-7200 Motherboard Replacement, Optical Disc Drive: stap 11, afbeelding 1 van 1
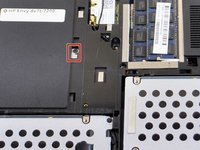
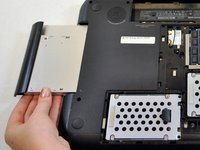
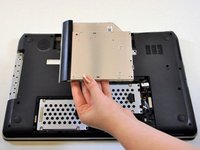
    • Remove the Phillips PM2.5×4.0 screw that attaches the optical drive to the laptop.

  12. HP Envy dv7t-7200 Motherboard Replacement: stap 12, afbeelding 1 van 2 HP Envy dv7t-7200 Motherboard Replacement: stap 12, afbeelding 2 van 2
    • Press the tab with a metal spudger that is located next to the screw to release the optical drive.

  13. HP Envy dv7t-7200 Motherboard Replacement: stap 13, afbeelding 1 van 2 HP Envy dv7t-7200 Motherboard Replacement: stap 13, afbeelding 2 van 2
    • Slide the disk drive out of the laptop.

  14. HP Envy dv7t-7200 Motherboard Replacement, Keyboard Assembly: stap 14, afbeelding 1 van 1
    • Place the laptop on it’s top

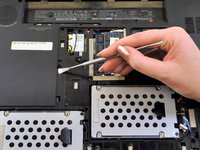
    • Remove the two screws that secure the keyboard to the laptop.

  15. HP Envy dv7t-7200 Motherboard Replacement: stap 15, afbeelding 1 van 1
    • Stand the laptop on it’s left side with it’s top open.

    • Locate the circular opening in the optical drive slot.

    • Using a plastic opener, press on the keyboard through this opening until it lifts the keyboard away.

  16. HP Envy dv7t-7200 Motherboard Replacement: stap 16, afbeelding 1 van 1
    • Place the laptop on it’s back with the front facing you.

    • Using a plastic opener, lift the back of the keyboard towards you releasing it from the lip that holds it.

    • You will hear slight popping noises as the keyboard separates.

  17. HP Envy dv7t-7200 Motherboard Replacement: stap 17, afbeelding 1 van 1
    • The keyboard is still attached by two ribbon cables. Lift the keyboard slowly during this step.

    • Lift keyboard up and place upside down on laptop.

  18. HP Envy dv7t-7200 Motherboard Replacement: stap 18, afbeelding 1 van 1
    • Release the connectors that attach the keyboard to the laptop.

  19. HP Envy dv7t-7200 Motherboard Replacement: stap 19, afbeelding 1 van 1
    • Remove the keyboard.

  20. HP Envy dv7t-7200 Motherboard Replacement, Motherboard: stap 20, afbeelding 1 van 1
    • Disconnect the four tabs shown from the laptop.

  21. HP Envy dv7t-7200 Motherboard Replacement: stap 21, afbeelding 1 van 1
    • Remove the screw located to the upper left of the disc drive.

  22. HP Envy dv7t-7200 Motherboard Replacement: stap 22, afbeelding 1 van 1
    • Pry open the top panel of the laptop with a metal spudger.

  23. HP Envy dv7t-7200 Motherboard Replacement: stap 23, afbeelding 1 van 1
    • Remove the screws that hold the motherboard to the frame

  24. HP Envy dv7t-7200 Motherboard Replacement: stap 24, afbeelding 1 van 2 HP Envy dv7t-7200 Motherboard Replacement: stap 24, afbeelding 2 van 2
    • Lift the right side of the motherboard

    • Slide the motherboard at this angle toward the right

  25. HP Envy dv7t-7200 Motherboard Replacement: stap 25, afbeelding 1 van 2 HP Envy dv7t-7200 Motherboard Replacement: stap 25, afbeelding 2 van 2
    • Turn the motherboard over

    • Remove the screws that hold the motherboard and the fan together.

Conclusie

To reassemble your device, follow these instructions in reverse order.

Één andere persoon heeft deze handleiding voltooid.

Krystal

Lid sinds: 10/16/17

882 Reputatie

8 handleidingen geschreven

Team

UW Tacoma, Team S3-G3, Liner Fall 2017 Lid van UW Tacoma, Team S3-G3, Liner Fall 2017

UWT-LINER-F17S3G3

5 Leden

8 handleidingen geschreven

0 opmerkingen

Voeg opmerking toe

Weergavestatistieken:

Afgelopen 24 uren: 1

Afgelopen 7 dagen: 4

Afgelopen 30 dagen: 8

Altijd: 736