Deze versie kan foutieve bewerkingen bevatten. Schakel over naar de recentste gecontroleerde momentopname.
Wat je nodig hebt
-
Deze stap is niet vertaald. Help het te vertalen
-
Slide the switch to release the battery and remove it.
-
-
Deze stap is niet vertaald. Help het te vertalen
-
Remove the screw from the access panel. Gently lift and remove the panel.
-
-
Deze stap is niet vertaald. Help het te vertalen
-
Remove the hard drive and disconnect its ribbon cable from both the hard drive and the motherboard.
-
-
-
Deze stap is niet vertaald. Help het te vertalen
-
Remove the screws to loosen the bottom casing.
-
Remove the two feet to reveal the screws underneath.
-
-
Deze stap is niet vertaald. Help het te vertalen
-
Gently pry the edges to loosen the case.
-
Once loose, lift and remove the plastic casing to reveal the motherboard.
-
-
Deze stap is niet vertaald. Help het te vertalen
-
Lift and detach the wireless antenna cables.
-
Lift and de-route the wires from their tracks until you reach the display hinges.
-
-
Deze stap is niet vertaald. Help het te vertalen
-
Detach the two cables. Lift the tab for the ribbon cable before pulling it out.
-
-
Deze stap is niet vertaald. Help het te vertalen
-
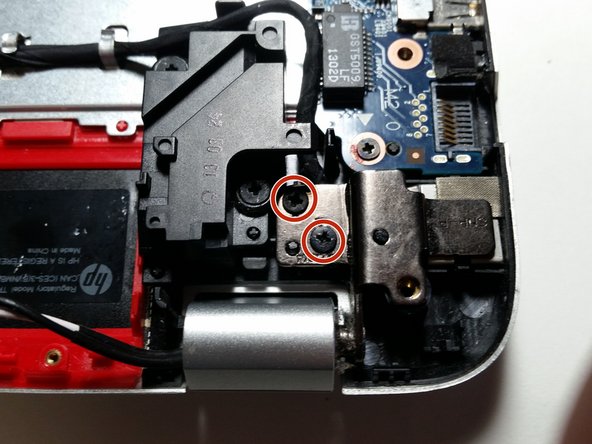
Remove the screws from each hinge.
-
Lift the hinges with pliers until they are perpendicular to the case.
-
Lift and remove the bottom of the laptop from the screen.
-
-
Deze stap is niet vertaald. Help het te vertalen
-
Lift the tabs in both the bottom corners and remove the screws beneath.
-
-
Deze stap is niet vertaald. Help het te vertalen
-
Using a pry tool as necessary, remove the digitizer from the rest of the screen panel. Be careful around the top edge as there are delicate components beneath.
-
-
Deze stap is niet vertaald. Help het te vertalen
-
Using a heat gun, carefully loosen the adhesive connecting the digitizer to its plastic border.
-
Gently peel the digitizer away from the plastic border.
-


Annuleren: ik heb deze handleiding niet afgemaakt.
5 andere personen hebben deze handleiding voltooid.
Team

Michigan Tech, Team 1-12, Lauer Spring 2016 Lid van Michigan Tech, Team 1-12, Lauer Spring 2016
MTU-LAUER-S16S1G12
1 Lid
1 handleiding geschreven
4 opmerkingen
Amazing,
My name is Nevelson, I have exactly same laptop and mine also is broke, but I don't know where to get the replacement; only the sensor, please I need help and willing to pay handsomely.
Nevelson, I have updated this page to included a link to the part on amazon.