Ga door naar hoofdinhoud

HP Envy 14 Hard Drive Replacement

Wat je nodig hebt

  1. HP Envy 14 Hard Drive Replacement, Hard Drive: stap 1, afbeelding 1 van 2 HP Envy 14 Hard Drive Replacement, Hard Drive: stap 1, afbeelding 2 van 2
    • Slide the battery cover release latch to eject the battery cover outwards.

    • Remove the battery cover.

  2. HP Envy 14 Hard Drive Replacement: stap 2, afbeelding 1 van 2 HP Envy 14 Hard Drive Replacement: stap 2, afbeelding 2 van 2
    • Slide the top right battery latch to the unlocked position as indicated by the unlocked symbol.

    • Simultaneously slide the top left battery latch, pull on the battery tab, and remove the battery.

  3. HP Envy 14 Hard Drive Replacement: stap 3, afbeelding 1 van 1
    • Using a Phillips #0 screwdriver, remove the four 2.0x3.0 mm screws that hold the hard drive compartment in place.

    • Consider setting the screws aside in a small bowl or other container to prevent from losing them.

  4. HP Envy 14 Hard Drive Replacement: stap 4, afbeelding 1 van 2 HP Envy 14 Hard Drive Replacement: stap 4, afbeelding 2 van 2
    • Hold the edges of the hard drive component and gently slide the hard drive out of its socket.

  5. HP Envy 14 Hard Drive Replacement: stap 5, afbeelding 1 van 2 HP Envy 14 Hard Drive Replacement: stap 5, afbeelding 2 van 2
    • Once the hard drive compartment is out of the laptop socket, simply lift the hard drive out of the laptop.

    • The hard drive connectors should be face up when inserting back into the laptop.

  6. HP Envy 14 Hard Drive Replacement: stap 6, afbeelding 1 van 3 HP Envy 14 Hard Drive Replacement: stap 6, afbeelding 2 van 3 HP Envy 14 Hard Drive Replacement: stap 6, afbeelding 3 van 3
    • Using a Phillips #1 screwdriver, remove the four 3.0x3.0 mm screws located on the sides of the hard drive compartment.

  7. HP Envy 14 Hard Drive Replacement: stap 7, afbeelding 1 van 3 HP Envy 14 Hard Drive Replacement: stap 7, afbeelding 2 van 3 HP Envy 14 Hard Drive Replacement: stap 7, afbeelding 3 van 3
    • Slowly pull the hard drive apart from the hard drive bracket.

    • This bracket will be used to hold your new hard drive.

  8. HP Envy 14 Hard Drive Replacement: stap 8, afbeelding 1 van 2 HP Envy 14 Hard Drive Replacement: stap 8, afbeelding 2 van 2
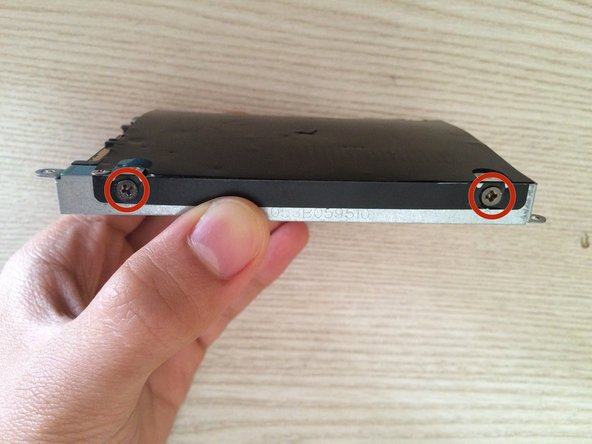
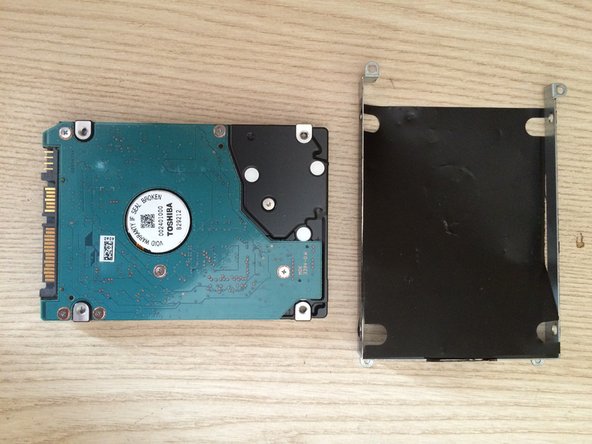
    • Take your new hard drive and insert it into the hard drive bracket in the same position as the original hard drive.

    • When re-attaching, ensure that the hard drive is oriented correctly inside of the hard drive bracket.

    • The hard drive should be face up such that the hard drive connectors can be seen.

    • The screw holders on the open ends of the hard drive bracket should be on the top.

    • The screw holders on the opposite side of the hard drive bracket should be on the bottom.

Conclusie

To reassemble your HP Envy 14 with your new hard drive, follow these instructions in reverse order.

2 andere personen hebben deze handleiding voltooid.

Derek Vallar

Lid sinds: 02/23/15

191 Reputatie

1 Handleiding geschreven

Team

Cal Poly, Team 12-4, Green Winter 2015 Lid van Cal Poly, Team 12-4, Green Winter 2015

CPSU-GREEN-W15S12G4

5 Leden

9 handleidingen geschreven

Één opmerking

Please add a new guide for the newer 2015 hp 14 envy variant(with a hinge lifting mechanism)

Remin jose - Antwoord

Voeg opmerking toe

Weergavestatistieken:

Afgelopen 24 uren: 1

Afgelopen 7 dagen: 1

Afgelopen 30 dagen: 10

Altijd: 8,465