Ga door naar hoofdinhoud

HP EliteOne 800 G1 Fan Assembly Replacement

Wat je nodig hebt

  1. HP EliteOne 800 G1 Fan Assembly Replacement, Removing the Back Cover: stap 1, afbeelding 1 van 3 HP EliteOne 800 G1 Fan Assembly Replacement, Removing the Back Cover: stap 1, afbeelding 2 van 3 HP EliteOne 800 G1 Fan Assembly Replacement, Removing the Back Cover: stap 1, afbeelding 3 van 3
    • Place computer with the screen down on a flat surface.

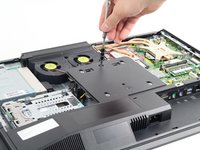
    • Push the two locking latches to the unlocked position.

    • Push the cover toward the top of the computer and lift up.

  2. HP EliteOne 800 G1 Fan Assembly Replacement, Removing Stand: stap 2, afbeelding 1 van 2 HP EliteOne 800 G1 Fan Assembly Replacement, Removing Stand: stap 2, afbeelding 2 van 2
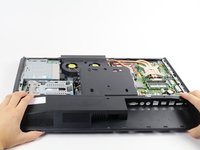
    • Press locking latch on the bottom of the base of the stand.

    • Pull the plastic cover off of the stand.

  3. HP EliteOne 800 G1 Fan Assembly Replacement: stap 3, afbeelding 1 van 2 HP EliteOne 800 G1 Fan Assembly Replacement: stap 3, afbeelding 2 van 2
    • Use a Torx T15 driver and stick it through the holes on the stand in order to remove the two 12mm screws on the back of the main unit.

    • Tilt stand and lift up to remove it.

  4. HP EliteOne 800 G1 Fan Assembly Replacement: stap 4, afbeelding 1 van 2 HP EliteOne 800 G1 Fan Assembly Replacement: stap 4, afbeelding 2 van 2
    • Use a Torx T15 driver to remove the single 10mm screw on the back panel.

    • Pull the back panel toward the bottom of the device to remove it.

  5. HP EliteOne 800 G1 Fan Assembly Replacement, Fan Assembly: stap 5, afbeelding 1 van 1
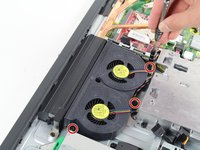
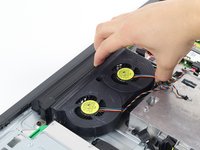
    • Disconnect these two power connectors on the motherboard, one connector is white and the other is black. You can identify the correct wires by their braided colors: red, yellow, blue, and black.

  6. HP EliteOne 800 G1 Fan Assembly Replacement: stap 6, afbeelding 1 van 2 HP EliteOne 800 G1 Fan Assembly Replacement: stap 6, afbeelding 2 van 2
    • Use a Torx T15 driver to remove the three 6mm screws surrounding the fan assembly.

    • Pull the fan assembly up from the case to remove it.

Conclusie

To reassemble your device, follow these instructions in reverse order.

5 andere personen hebben deze handleiding voltooid.

Michael Ewing

Lid sinds: 10/01/15

1.071 Reputatie

4 handleidingen geschreven

Team

Cal Poly, Team 1-24, Maness Fall 2015 Lid van Cal Poly, Team 1-24, Maness Fall 2015

CPSU-MANESS-F15S1G24

4 Leden

14 handleidingen geschreven

0 opmerkingen

Voeg opmerking toe

Weergavestatistieken:

Afgelopen 24 uren: 5

Afgelopen 7 dagen: 13

Afgelopen 30 dagen: 39

Altijd: 6,790