Ga door naar hoofdinhoud

HP EliteBook Folio 1020 G1 Display Replacement

Wat je nodig hebt

  1. Voorzichtig: stappen 1-2 komen van een handleiding die in bewerking is.

    HP EliteBook Folio 1020 G1 Display Replacement, Lower Case: stap 1, afbeelding 1 van 1
    • Use a TR8 Torx screwdriver to remove:

    • Six 5.3 mm screws

    • Four 3.3 mm screws

  2. HP EliteBook Folio 1020 G1 Display Replacement: stap 2, afbeelding 1 van 1
    • Use a nylon spudger to gently pry the lower case up and off.

  3. HP EliteBook Folio 1020 G1 Display Replacement, Battery: stap 3, afbeelding 1 van 2 HP EliteBook Folio 1020 G1 Display Replacement, Battery: stap 3, afbeelding 2 van 2
    • Gently pull and free the battery's bundled cable connector that leads from the battery to the motherboard.

  4. HP EliteBook Folio 1020 G1 Display Replacement: stap 4, afbeelding 1 van 1
    • Use a Phillips #1 screwdriver to unscrew and remove the six 4 mm screws that secure the battery.

  5. HP EliteBook Folio 1020 G1 Display Replacement, Motherboard: stap 5, afbeelding 1 van 2 HP EliteBook Folio 1020 G1 Display Replacement, Motherboard: stap 5, afbeelding 2 van 2
    • Remove:

    • Eight 4.6 mm screws shown in the circles using Phillips #0.

  6. HP EliteBook Folio 1020 G1 Display Replacement: stap 6, afbeelding 1 van 3 HP EliteBook Folio 1020 G1 Display Replacement: stap 6, afbeelding 2 van 3 HP EliteBook Folio 1020 G1 Display Replacement: stap 6, afbeelding 3 van 3
    • Disconnect the keyboard connections from the motherboard.

    • Disconnect by lifting the underside of the white tabs with a spudger.

  7. HP EliteBook Folio 1020 G1 Display Replacement: stap 7, afbeelding 1 van 3 HP EliteBook Folio 1020 G1 Display Replacement: stap 7, afbeelding 2 van 3 HP EliteBook Folio 1020 G1 Display Replacement: stap 7, afbeelding 3 van 3
    • Disconnect circled terminals. Disconnect by lifting the underside of white tabs with spudger.

  8. HP EliteBook Folio 1020 G1 Display Replacement: stap 8, afbeelding 1 van 3 HP EliteBook Folio 1020 G1 Display Replacement: stap 8, afbeelding 2 van 3 HP EliteBook Folio 1020 G1 Display Replacement: stap 8, afbeelding 3 van 3
    • Remove the circled tabs by pulling on the white support edges backward with a pair of tweezers.

  9. HP EliteBook Folio 1020 G1 Display Replacement: stap 9, afbeelding 1 van 3 HP EliteBook Folio 1020 G1 Display Replacement: stap 9, afbeelding 2 van 3 HP EliteBook Folio 1020 G1 Display Replacement: stap 9, afbeelding 3 van 3
    • Gently pull on the black pull tab on the top of the connector.

    • For the wires going to the Wi-fi card, remove both wires going to the top of the card using the tweezers.

  10. HP EliteBook Folio 1020 G1 Display Replacement: stap 10, afbeelding 1 van 2 HP EliteBook Folio 1020 G1 Display Replacement: stap 10, afbeelding 2 van 2
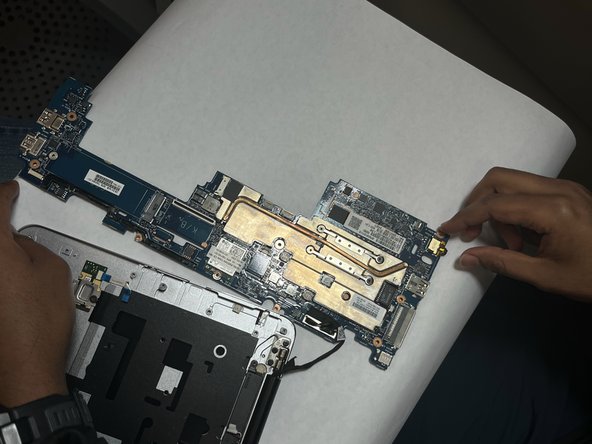
    • Lift the now disconnected motherboard from the side shown in image 1. This side must be lifted to not damage the ports. The disconnected motherboard (aside from port removed in step 12) is shown in image 2.

  11. HP EliteBook Folio 1020 G1 Display Replacement, Display: stap 11, afbeelding 1 van 3 HP EliteBook Folio 1020 G1 Display Replacement, Display: stap 11, afbeelding 2 van 3 HP EliteBook Folio 1020 G1 Display Replacement, Display: stap 11, afbeelding 3 van 3
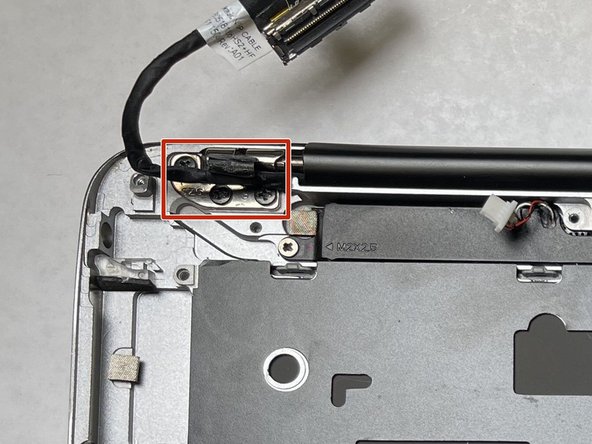
    • To release the display frame from the lower frame, remove:

    • Six 4.1 mm screws using Phillips #0.

  12. HP EliteBook Folio 1020 G1 Display Replacement: stap 12, afbeelding 1 van 2 HP EliteBook Folio 1020 G1 Display Replacement: stap 12, afbeelding 2 van 2
    • Once the screen is separated from the bottom frame, use a plastic opening tool to remove the bottom trim from the screen.

  13. HP EliteBook Folio 1020 G1 Display Replacement: stap 13, afbeelding 1 van 2 HP EliteBook Folio 1020 G1 Display Replacement: stap 13, afbeelding 2 van 2
    • Using the iOpener and spudger, work around the screen bezel to remove it.

  14. HP EliteBook Folio 1020 G1 Display Replacement: stap 14, afbeelding 1 van 2 HP EliteBook Folio 1020 G1 Display Replacement: stap 14, afbeelding 2 van 2
    • To remove the screen, remove:

    • Four 2.2 mm screws using Phillips #0.

  15. HP EliteBook Folio 1020 G1 Display Replacement: stap 15, afbeelding 1 van 1
    • Lift display from the frame.

Conclusie

To reassemble your device, follow these instructions in reverse order.

Steven Duke

Lid sinds: 03/28/23

121 Reputatie

1 Handleiding geschreven

Team

IUPUI, Team 2-1, Harley Spring 2023 Lid van IUPUI, Team 2-1, Harley Spring 2023

IUPUI-HARLEY-S23S2G1

3 Leden

3 handleidingen geschreven

0 opmerkingen

Voeg opmerking toe

Weergavestatistieken:

Afgelopen 24 uren: 0

Afgelopen 7 dagen: 1

Afgelopen 30 dagen: 3

Altijd: 140