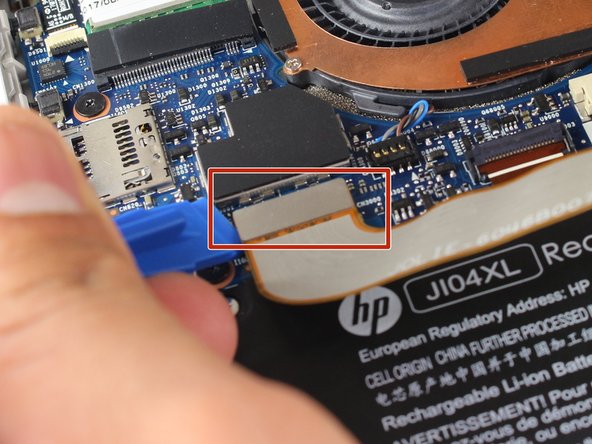
Ga door naar hoofdinhoud

HP Elite x2 1012 G2 Battery Replacement

Wat je nodig hebt

  1. HP Elite x2 1012 G2 Battery Replacement, Screen: stap 1, afbeelding 1 van 1
    • Make sure the device is turned off before starting.

    • Orient the device so the back is facing you, with the kickstand up.

  2. HP Elite x2 1012 G2 Battery Replacement: stap 2, afbeelding 1 van 3 HP Elite x2 1012 G2 Battery Replacement: stap 2, afbeelding 2 van 3 HP Elite x2 1012 G2 Battery Replacement: stap 2, afbeelding 3 van 3
    • Remove the six 3mm Torx T5 screws underneath the kickstand.

  3. HP Elite x2 1012 G2 Battery Replacement: stap 3, afbeelding 1 van 2 HP Elite x2 1012 G2 Battery Replacement: stap 3, afbeelding 2 van 2
    • Turn the device over so the screen is facing you.

    • Place a suction cup firmly onto a corner of the screen.

    • Lift up gently until you see the screen separate from the casing.

    • Repeat this process for all four corners.

  4. HP Elite x2 1012 G2 Battery Replacement: stap 4, afbeelding 1 van 1
    • Lift the screen up and off of the device.

    • Pry each corner up first, otherwise you may damage or crack the screen.

  5. HP Elite x2 1012 G2 Battery Replacement: stap 5, afbeelding 1 van 3 HP Elite x2 1012 G2 Battery Replacement: stap 5, afbeelding 2 van 3 HP Elite x2 1012 G2 Battery Replacement: stap 5, afbeelding 3 van 3
    • Remove the two connectors on the back of the screen by lifting the connector tabs on the motherboard with a plastic opening tool and pulling gently.

  6. HP Elite x2 1012 G2 Battery Replacement: stap 6, afbeelding 1 van 2 HP Elite x2 1012 G2 Battery Replacement: stap 6, afbeelding 2 van 2
    • Remove the screen by gently lifting it off of the device.

  7. HP Elite x2 1012 G2 Battery Replacement, Battery: stap 7, afbeelding 1 van 1
    • Orient the device so that the battery is closest to you.

    • The battery is the large, black rectangle at the bottom of the device.

  8. HP Elite x2 1012 G2 Battery Replacement: stap 8, afbeelding 1 van 2 HP Elite x2 1012 G2 Battery Replacement: stap 8, afbeelding 2 van 2
    • Remove all six Phillips 3 mm screws around the battery by rotating in the counterclockwise direction with a Phillips screwdriver.

  9. HP Elite x2 1012 G2 Battery Replacement: stap 9, afbeelding 1 van 2 HP Elite x2 1012 G2 Battery Replacement: stap 9, afbeelding 2 van 2
    • Remove the battery's connector by pushing both sides of the tab towards yourself with a plastic opening tool.

  10. HP Elite x2 1012 G2 Battery Replacement: stap 10, afbeelding 1 van 1
    • Lift the battery out of the device.

Conclusie

To reassemble your device, follow these instructions in reverse order.

13 andere personen hebben deze handleiding voltooid.

Andy Velazquez

Lid sinds: 04/18/18

314 Reputatie

1 Handleiding geschreven

Team

Cal Poly, Team S18-G5, Livingston Spring 2018 Lid van Cal Poly, Team S18-G5, Livingston Spring 2018

CPSU-LIVINGSTON-S18S18G5

4 Leden

13 handleidingen geschreven

4 opmerkingen

how do you test the battery? what voltage should it be maintaining?

scott kay - Antwoord

Bien tout en image

tech25@hotmail.fr - Antwoord

Hi, after the replacement battery
toch not working, help pls?

Parsa Aghabeikzadeh - Antwoord

PC not coming on, also not charging.

Abiola - Antwoord

Voeg opmerking toe

Weergavestatistieken:

Afgelopen 24 uren: 14

Afgelopen 7 dagen: 80

Afgelopen 30 dagen: 417

Altijd: 22,202