Ga door naar hoofdinhoud

HP Chromebook 11-v011dx Speaker Replacement

Wat je nodig hebt

  1. HP Chromebook 11-v011dx Speaker  Replacement, Key Board: stap 1, afbeelding 1 van 3 HP Chromebook 11-v011dx Speaker  Replacement, Key Board: stap 1, afbeelding 2 van 3 HP Chromebook 11-v011dx Speaker  Replacement, Key Board: stap 1, afbeelding 3 van 3
    • Wedge the spudger between one of the black rubber caps on each of the four corners on the bottom of the HP Chromebook 11-v011dx.

    • Lift up the black rubber cap until it is completely removed.

    • Repeat this until all four of the black rubber caps are removed.

  2. HP Chromebook 11-v011dx Speaker  Replacement: stap 2, afbeelding 1 van 2 HP Chromebook 11-v011dx Speaker  Replacement: stap 2, afbeelding 2 van 2
    • Locate the two smaller black rubber caps on the top corners of the HP ChromeBook 11-v011dx. Wedge the spudger between one of them.

    • Lift up the small black rubber cap until it is completely off.

    • Repeat this step one more time to remove the other small black rubber cap on the other side.

  3. HP Chromebook 11-v011dx Speaker  Replacement: stap 3, afbeelding 1 van 2 HP Chromebook 11-v011dx Speaker  Replacement: stap 3, afbeelding 2 van 2
    • Locate the eleven screws on the bottom the HP ChromeBook. Six are located under the larger black rubber caps and the others are in different locations.

    • Use a Phillips #0 screwdriver to remove eleven 1.3mm screws.

  4. HP Chromebook 11-v011dx Speaker  Replacement: stap 4, afbeelding 1 van 3 HP Chromebook 11-v011dx Speaker  Replacement: stap 4, afbeelding 2 van 3 HP Chromebook 11-v011dx Speaker  Replacement: stap 4, afbeelding 3 van 3
    • Make sure to do steps 1-3 or it will be impossible to lift up the key board and you may also do damage to the hardware.

    • Wedge the spudger between the key board and the bottom panel, carefully go around the keyboards edges gently.

    • Lift the spudger a little in the front of the keyboard until the key board lifts up.

    • With your hands, slowly and carefully lift the key board up.

  5. HP Chromebook 11-v011dx Speaker  Replacement: stap 5, afbeelding 1 van 1
    • Locate the black tab that holds a wire in place that keeps the keyboard connected to the mother board.

    • Slowly unplug this wire that connects to the key board.

  6. HP Chromebook 11-v011dx Speaker  Replacement, Battery: stap 6, afbeelding 1 van 2 HP Chromebook 11-v011dx Speaker  Replacement, Battery: stap 6, afbeelding 2 van 2
    • Remove three of the 1.3mm screws that keep the battery in place with a Phillips #0 screwdriver.

  7. HP Chromebook 11-v011dx Speaker  Replacement: stap 7, afbeelding 1 van 1
    • Make sure to hold the white tab portion of the plug and not the wire itself. If you unplug it by holding the wires, you may rip out the wires.

    • Slowly unplug the wire that connects the battery to the motherboard with your hands.

  8. HP Chromebook 11-v011dx Speaker  Replacement: stap 8, afbeelding 1 van 1
    • There is a thick black wire strip that is going across the battery for a different part of the HP ChromeBook 11-v011dx. Be mindful when removing the motherboard so you do not damage this strip.

    • Remove the battery carefully using your hands.

  9. HP Chromebook 11-v011dx Speaker  Replacement, Speaker: stap 9, afbeelding 1 van 2 HP Chromebook 11-v011dx Speaker  Replacement, Speaker: stap 9, afbeelding 2 van 2
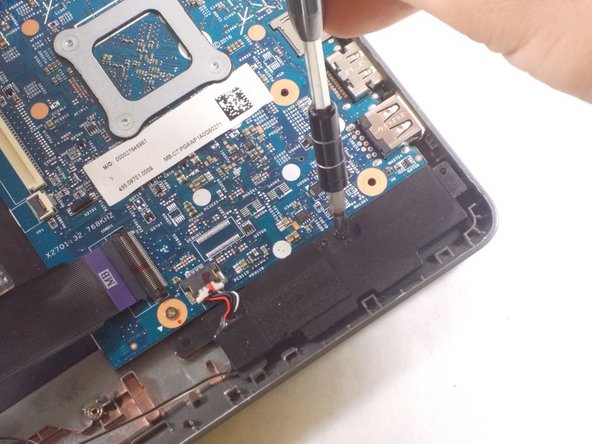
    • Use a Phillips #0 screwdriver to remove the one 1.3mm screw that connects the speakers and the motherboard together.

  10. HP Chromebook 11-v011dx Speaker  Replacement: stap 10, afbeelding 1 van 1
    • Make sure to hold the white part of the plug and not the wire. If unplugged by holding the wires, it can rip out wires.

    • Slowly and cautiously unplug the wire that connects the speakers to the motherboard with your hands.

  11. HP Chromebook 11-v011dx Speaker  Replacement: stap 11, afbeelding 1 van 2 HP Chromebook 11-v011dx Speaker  Replacement: stap 11, afbeelding 2 van 2
    • Be careful with the wire between both end of the speakers. It's between metal parts and can get caught.

    • Slowly remove both ends of the speakers with your hands.

Conclusie

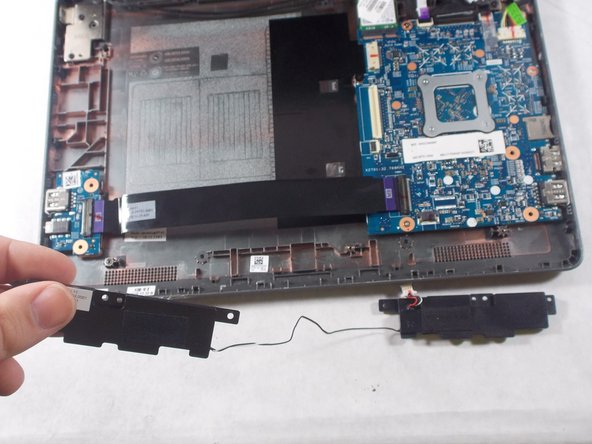
To reassemble your device, follow these instructions in reverse order.

Kyle DeMello

Lid sinds: 10/20/17

542 Reputatie

5 handleidingen geschreven

Team

UMass Dartmouth, Team S4-G2, Julie Fall 2017 Lid van UMass Dartmouth, Team S4-G2, Julie Fall 2017

UMASSD-JULIE-F17S4G2

3 Leden

5 handleidingen geschreven

0 opmerkingen

Voeg opmerking toe

Weergavestatistieken:

Afgelopen 24 uren: 0

Afgelopen 7 dagen: 1

Afgelopen 30 dagen: 1

Altijd: 105