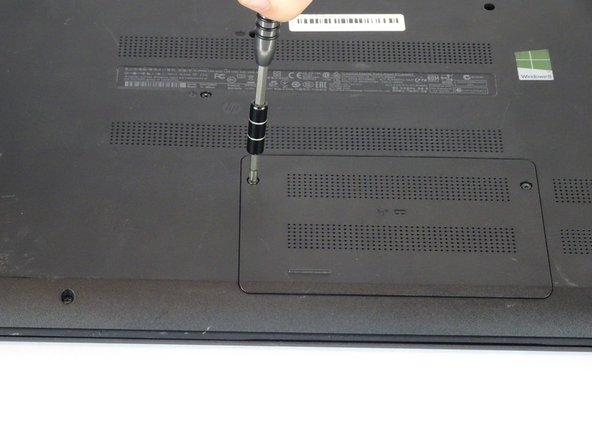
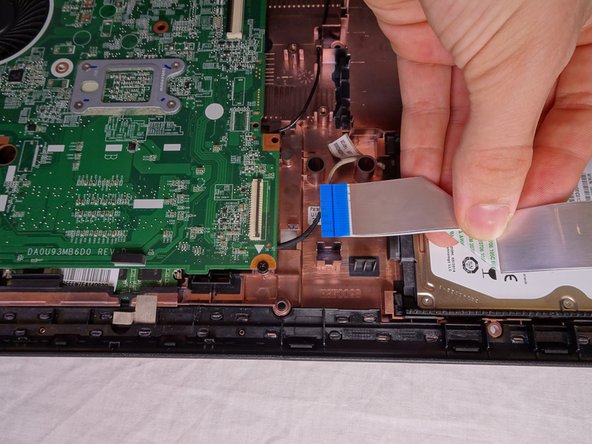
Ga door naar hoofdinhoud

HP 15-f009wm Hard Drive Replacement

Wat je nodig hebt

  1. HP 15-f009wm Hard Drive Replacement, Battery: stap 1, afbeelding 1 van 2 HP 15-f009wm Hard Drive Replacement, Battery: stap 1, afbeelding 2 van 2
    • Turn laptop upside down.

    • Flip the lock switch to the unlocked setting.

  2. HP 15-f009wm Hard Drive Replacement: stap 2, afbeelding 1 van 3 HP 15-f009wm Hard Drive Replacement: stap 2, afbeelding 2 van 3 HP 15-f009wm Hard Drive Replacement: stap 2, afbeelding 3 van 3
    • Flip the release switch.

    • Once the flip is switched, the battery should pop out.

  3. HP 15-f009wm Hard Drive Replacement: stap 3, afbeelding 1 van 2 HP 15-f009wm Hard Drive Replacement: stap 3, afbeelding 2 van 2
    • Slide the battery out.

  4. HP 15-f009wm Hard Drive Replacement, RAM: stap 4, afbeelding 1 van 3 HP 15-f009wm Hard Drive Replacement, RAM: stap 4, afbeelding 2 van 3 HP 15-f009wm Hard Drive Replacement, RAM: stap 4, afbeelding 3 van 3
    • Remove the two Phillips #1 screws from the RAM panel.

  5. HP 15-f009wm Hard Drive Replacement: stap 5, afbeelding 1 van 3 HP 15-f009wm Hard Drive Replacement: stap 5, afbeelding 2 van 3 HP 15-f009wm Hard Drive Replacement: stap 5, afbeelding 3 van 3
    • Use the plastic opening tool to pop the panel off.

  6. HP 15-f009wm Hard Drive Replacement: stap 6, afbeelding 1 van 3 HP 15-f009wm Hard Drive Replacement: stap 6, afbeelding 2 van 3 HP 15-f009wm Hard Drive Replacement: stap 6, afbeelding 3 van 3
    • Release the tabs on each side of the chip by simultaneously pushing each tab away from the RAM.

    • These tabs lock the chip in place and releasing them will cause the chip to "pop" up.

  7. HP 15-f009wm Hard Drive Replacement: stap 7, afbeelding 1 van 1
    • Remove the RAM chip from the laptop.

  8. HP 15-f009wm Hard Drive Replacement, Hard Drive: stap 8, afbeelding 1 van 1
    • Remove the sixteen 7mm Phillips #1 screws from the bottom panel.

  9. HP 15-f009wm Hard Drive Replacement: stap 9, afbeelding 1 van 3 HP 15-f009wm Hard Drive Replacement: stap 9, afbeelding 2 van 3 HP 15-f009wm Hard Drive Replacement: stap 9, afbeelding 3 van 3
    • Pull the disk drive out of the laptop.

  10. HP 15-f009wm Hard Drive Replacement: stap 10, afbeelding 1 van 1
    • Remove the three 2mm Phillips #00 screws found underneath the disk drive.

  11. HP 15-f009wm Hard Drive Replacement: stap 11, afbeelding 1 van 3 HP 15-f009wm Hard Drive Replacement: stap 11, afbeelding 2 van 3 HP 15-f009wm Hard Drive Replacement: stap 11, afbeelding 3 van 3
    • Remove the single 4mm Phillips #1 screw from the Wi-Fi card.

    • Pull the Wi-Fi card out of the motherboard.

  12. HP 15-f009wm Hard Drive Replacement: stap 12, afbeelding 1 van 3 HP 15-f009wm Hard Drive Replacement: stap 12, afbeelding 2 van 3 HP 15-f009wm Hard Drive Replacement: stap 12, afbeelding 3 van 3
    • Open the laptop.

    • Use a plastic opening tool to pop out the keyboard by starting at the top and working your way around the perimeter.

  13. HP 15-f009wm Hard Drive Replacement: stap 13, afbeelding 1 van 2 HP 15-f009wm Hard Drive Replacement: stap 13, afbeelding 2 van 2
    • Open the screen up until it lays flat and rotate the laptop until the screen is closest to you.

    • Lift the keyboard from the laptop.

    • Use a spudger to lift up the black latch on the ZIF connector and remove the ribbon cable.

  14. HP 15-f009wm Hard Drive Replacement: stap 14, afbeelding 1 van 1
    • Remove the five 7mm Phillips #1 screws found underneath the keyboard.

  15. HP 15-f009wm Hard Drive Replacement: stap 15, afbeelding 1 van 3 HP 15-f009wm Hard Drive Replacement: stap 15, afbeelding 2 van 3 HP 15-f009wm Hard Drive Replacement: stap 15, afbeelding 3 van 3
    • Use a spudger to lift the black tabs on the ZIF connectors.

    • Remove the ribbon cables from the ZIF connectors.

  16. HP 15-f009wm Hard Drive Replacement: stap 16, afbeelding 1 van 3 HP 15-f009wm Hard Drive Replacement: stap 16, afbeelding 2 van 3 HP 15-f009wm Hard Drive Replacement: stap 16, afbeelding 3 van 3
    • Use a plastic opening tool to pop the palm rest off of the laptop.

    • Lift and remove the palm rest.

  17. HP 15-f009wm Hard Drive Replacement: stap 17, afbeelding 1 van 3 HP 15-f009wm Hard Drive Replacement: stap 17, afbeelding 2 van 3 HP 15-f009wm Hard Drive Replacement: stap 17, afbeelding 3 van 3
    • Use a spudger to lift up the black latch on the ZIF connector.

    • Remove the USB/AUX port ribbon cable from the ZIF connector on the motherboard.

  18. HP 15-f009wm Hard Drive Replacement: stap 18, afbeelding 1 van 2 HP 15-f009wm Hard Drive Replacement: stap 18, afbeelding 2 van 2
    • Remove the single 7mm Phillips #1 screw from the USB/AUX board.

    • Remove the USB/AUX board from the laptop.

  19. HP 15-f009wm Hard Drive Replacement: stap 19, afbeelding 1 van 3 HP 15-f009wm Hard Drive Replacement: stap 19, afbeelding 2 van 3 HP 15-f009wm Hard Drive Replacement: stap 19, afbeelding 3 van 3
    • Lift the Hard Drive from the laptop.

    • Disconnect the hard drive from the motherboard.

Conclusie

To reassemble your device, follow these instructions in reverse order.

9 andere personen hebben deze handleiding voltooid.

Alex Birchler

Lid sinds: 02/14/18

1.008 Reputatie

5 handleidingen geschreven

Team

USF Tampa, Team S2-G2, Nance Spring 2018 Lid van USF Tampa, Team S2-G2, Nance Spring 2018

USFT-NANCE-S18S2G2

4 Leden

5 handleidingen geschreven

3 opmerkingen

This guide helped me so much with my laptop, thanks m8

Connor Cornelison - Antwoord

Thank you for this excellent write-up!

Dan Snow - Antwoord

Hello, i have a question. How much of capacity and technology i could use to upgrade my hard drive?

Samuel Arreaza - Antwoord

Voeg opmerking toe

Weergavestatistieken:

Afgelopen 24 uren: 0

Afgelopen 7 dagen: 5

Afgelopen 30 dagen: 21

Altijd: 3,853