Ga door naar hoofdinhoud

HP 15-R011DX Cooling Fan Replacement

Wat je nodig hebt

  1. HP 15-R011DX Cooling Fan Replacement, Battery: stap 1, afbeelding 1 van 2 HP 15-R011DX Cooling Fan Replacement, Battery: stap 1, afbeelding 2 van 2
    • Slide the lock mechanism on the left side of the laptop to the right.

  2. HP 15-R011DX Cooling Fan Replacement: stap 2, afbeelding 1 van 1
    • While holding the right slide mechanism, remove the battery from the laptop.

    • The battery is not pictured here because it is missing from this particular device.

  3. HP 15-R011DX Cooling Fan Replacement, How to Access the Internal Components of an HP 15-R011DX: stap 3, afbeelding 1 van 2 HP 15-R011DX Cooling Fan Replacement, How to Access the Internal Components of an HP 15-R011DX: stap 3, afbeelding 2 van 2
    • Flip the laptop over to reveal screw locations.

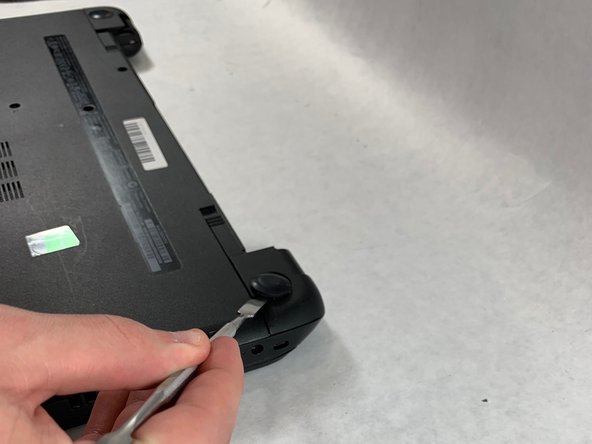
    • Use a metal spudger to remove the two rear rubber feet. There are screws hidden underneath them.

  4. HP 15-R011DX Cooling Fan Replacement: stap 4, afbeelding 1 van 2 HP 15-R011DX Cooling Fan Replacement: stap 4, afbeelding 2 van 2
    • Remove the twelve 5mm Phillips #1 screws on the back of the laptop.

  5. HP 15-R011DX Cooling Fan Replacement: stap 5, afbeelding 1 van 2 HP 15-R011DX Cooling Fan Replacement: stap 5, afbeelding 2 van 2
    • Remove the DVD drive from the laptop.

    • Remove the two 3 mm Phillips #1 screws underneath the DVD drive.

  6. HP 15-R011DX Cooling Fan Replacement: stap 6, afbeelding 1 van 3 HP 15-R011DX Cooling Fan Replacement: stap 6, afbeelding 2 van 3 HP 15-R011DX Cooling Fan Replacement: stap 6, afbeelding 3 van 3
    • Flip the laptop and open.

    • Detach the keyboard by prying it free from the laptop using a spudger.

    • Do not completely remove the keyboard yet. It is still attached by a ribbon cable.

    • Disconnect the keyboard ribbon cable.

  7. HP 15-R011DX Cooling Fan Replacement: stap 7, afbeelding 1 van 2 HP 15-R011DX Cooling Fan Replacement: stap 7, afbeelding 2 van 2
    • Disconnect the two narrow ribbon cables to the left of the keyboard connection.

    • Remove five 4 mm Phillips #1 screws from the metal tray for the keyboard.

    • Pry open the plastic casing using a spudger.

    • If struggling to remove the plastic case, check that all screws have been removed.

  8. HP 15-R011DX Cooling Fan Replacement, Hard Drive: stap 8, afbeelding 1 van 1
    • Remove two 5 mm Phillips #1 screws located at the base of the hard drive.

  9. HP 15-R011DX Cooling Fan Replacement: stap 9, afbeelding 1 van 2 HP 15-R011DX Cooling Fan Replacement: stap 9, afbeelding 2 van 2
    • Pull the hard drive upwards and away from the laptop.

    • The hard drive should disconnect from its port on the motherboard as shown in the second image.

  10. HP 15-R011DX Cooling Fan Replacement: stap 10, afbeelding 1 van 1
    • Flip the hard drive over.

    • Remove the two 4 mm Phillips #1 screws from the base of the hard drive.

    • Remove the mounting brace (silver bracket) from the hard drive.

  11. HP 15-R011DX Cooling Fan Replacement, Motherboard: stap 11, afbeelding 1 van 2 HP 15-R011DX Cooling Fan Replacement, Motherboard: stap 11, afbeelding 2 van 2
    • Remove the remaining two 5 mm Philips #1 screws from the motherboard.

  12. HP 15-R011DX Cooling Fan Replacement: stap 12, afbeelding 1 van 1
    • Remove the tape from the display connector attached to the motherboard.

    • Disconnect the display connector from the motherboard.

  13. HP 15-R011DX Cooling Fan Replacement: stap 13, afbeelding 1 van 1
    • Remove one 4 mm Phillips #1 screw from the wireless chip.

    • Remove the wireless chip from the motherboard.

  14. HP 15-R011DX Cooling Fan Replacement: stap 14, afbeelding 1 van 1
    • Remove two 5 mm Phillips #1 screws from the USB component connected to the motherboard.

    • Lift the USB component until the band connecting it to the motherboard lifts off of the laptop.

  15. HP 15-R011DX Cooling Fan Replacement: stap 15, afbeelding 1 van 1
    • Slowly lift the motherboard out of the computer.

    • Be sure that the I/O ports on the left side of the motherboard are not stuck on the laptop frame.

    • Disconnect the power connector from the motherboard as shown in the image.

  16. HP 15-R011DX Cooling Fan Replacement, Cooling Fan: stap 16, afbeelding 1 van 1
    • The cooling fan assembly is located on the underside of the motherboard.

    • Using a Phillips #1 screwdriver, remove the three 5mm screws that secure the cooling fan assembly to the motherboard.

  17. HP 15-R011DX Cooling Fan Replacement: stap 17, afbeelding 1 van 1
    • Separate the cooling fan assembly from the motherboard and proceed to use the canned air to clean the inner pieces of the fan.

    • You can now clean the inner parts of the fan assembly or replace with a new assembly.

  18. HP 15-R011DX Cooling Fan Replacement: stap 18, afbeelding 1 van 1
    • Before reconnecting the cooling fan assembly, make sure to properly apply thermal paste and touch the two connectors together when reassembling your laptop.

Conclusie

To reassemble your device, follow these instructions in reverse order.

Één andere persoon heeft deze handleiding voltooid.

Joshua Brockman

Lid sinds: 03/25/19

347 Reputatie

2 handleidingen geschreven

Team

UMass Dartmouth, Team S2-G4, Bailey Spring 2019 Lid van UMass Dartmouth, Team S2-G4, Bailey Spring 2019

UMASSD-BAILEY-S19S2G4

3 Leden

6 handleidingen geschreven

Één opmerking

It appears as though the jfan1 connection on the motherboard doesn’t have a plastic connector. I’ve bought a fan for this laptop to solve some overheating issues, but I can’t find anywhere to plug it in (I’m assuming that on similar models, the jfan1 connection would be the one to use). Is there any way that I can somehow plug my fan into this motherboard?

Brandon Peterson - Antwoord

Voeg opmerking toe

Weergavestatistieken:

Afgelopen 24 uren: 0

Afgelopen 7 dagen: 0

Afgelopen 30 dagen: 8

Altijd: 1,058