Ga door naar hoofdinhoud

Google Pixel 2 Midframe Replacement

Alleen vereisten
Deze handleiding is alleen bedoeld als vereiste voor andere handleidingen. Het staat niet op zichzelf.

Wat je nodig hebt

  1. Google Pixel 2 Midframe Replacement, Midframe: stap 1, afbeelding 1 van 1
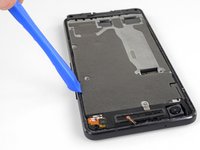
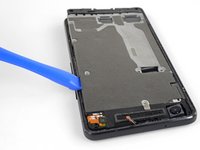
    • Apply a heated iOpener to the proximity sensor on the top edge of the midframe for two minutes to soften its adhesive.

  2. Google Pixel 2 Midframe Replacement: stap 2, afbeelding 1 van 2 Google Pixel 2 Midframe Replacement: stap 2, afbeelding 2 van 2
    • Slide the point of a spudger under the proximity sensor cable, starting from the side closest to the front-facing camera.

    • Gently lift the edge of the sensor cable until the sensor is perpendicular to the midframe.

  3. Google Pixel 2 Midframe Replacement: stap 3, afbeelding 1 van 1
    Gereedschap gebruikt in deze stap:
    Magnetic Project Mat
    $19.95
    Koop
    • Peel back the small piece of tape covering the screw below the earpiece speaker. Peel back any tape covering other screws as well.

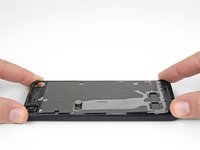
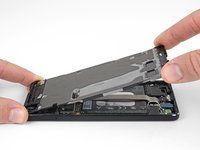
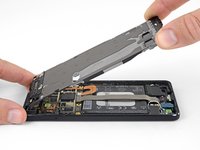
    • Remove the following screws securing the midframe:

    • Eleven 3.7 mm Phillips screws

    • One 4 mm T5 Torx screw

    • Throughout this repair, keep track of each screw and make sure it goes back exactly where it came from.

  4. Google Pixel 2 Midframe Replacement: stap 4, afbeelding 1 van 2 Google Pixel 2 Midframe Replacement: stap 4, afbeelding 2 van 2
    • Insert an opening tool into the notch in the midframe near the hold button.

    • Pry the midframe up enough to create a gap between it and the phone case. The midframe cannot yet be completely removed.

  5. Google Pixel 2 Midframe Replacement: stap 5, afbeelding 1 van 3 Google Pixel 2 Midframe Replacement: stap 5, afbeelding 2 van 3 Google Pixel 2 Midframe Replacement: stap 5, afbeelding 3 van 3
    • Lift the midframe up starting from the bottom edge.

    • When the midframe starts to make about a 45° with the rest of the phone, lift the midframe straight up and away from the phone.

    • As you lift the midfame, carefully guide the proximity sensor through the small slot in the midframe.

Conclusie

To reassemble your device, follow these instructions in reverse order.

Adam O'Camb

Lid sinds: 04/11/15

196.299 Reputatie

416 handleidingen geschreven

0 opmerkingen

Voeg opmerking toe

Weergavestatistieken:

Afgelopen 24 uren: 0

Afgelopen 7 dagen: 0

Afgelopen 30 dagen: 1

Altijd: 85